

Peanut Butter Squares Disneyland: Prepare to be transported back to the happiest place on earth with every single bite! I’m so excited to share this recipe with you, a delightful copycat version of the famous Peanut Butter Squares from Disneyland. These aren’t just any peanut butter treats; they’re a nostalgic journey wrapped in a blanket of creamy, crunchy, and utterly irresistible goodness.
While the exact origins of this particular confection within Disneyland’s culinary landscape remain somewhat shrouded in mystery, what’s undeniable is its enduring popularity. For generations, park-goers have sought out these squares as a quintessential Disneyland experience, a sweet reward after a thrilling ride or a perfect ending to a magical day. They represent a simple pleasure, a comforting indulgence that perfectly complements the whimsical atmosphere of the park.
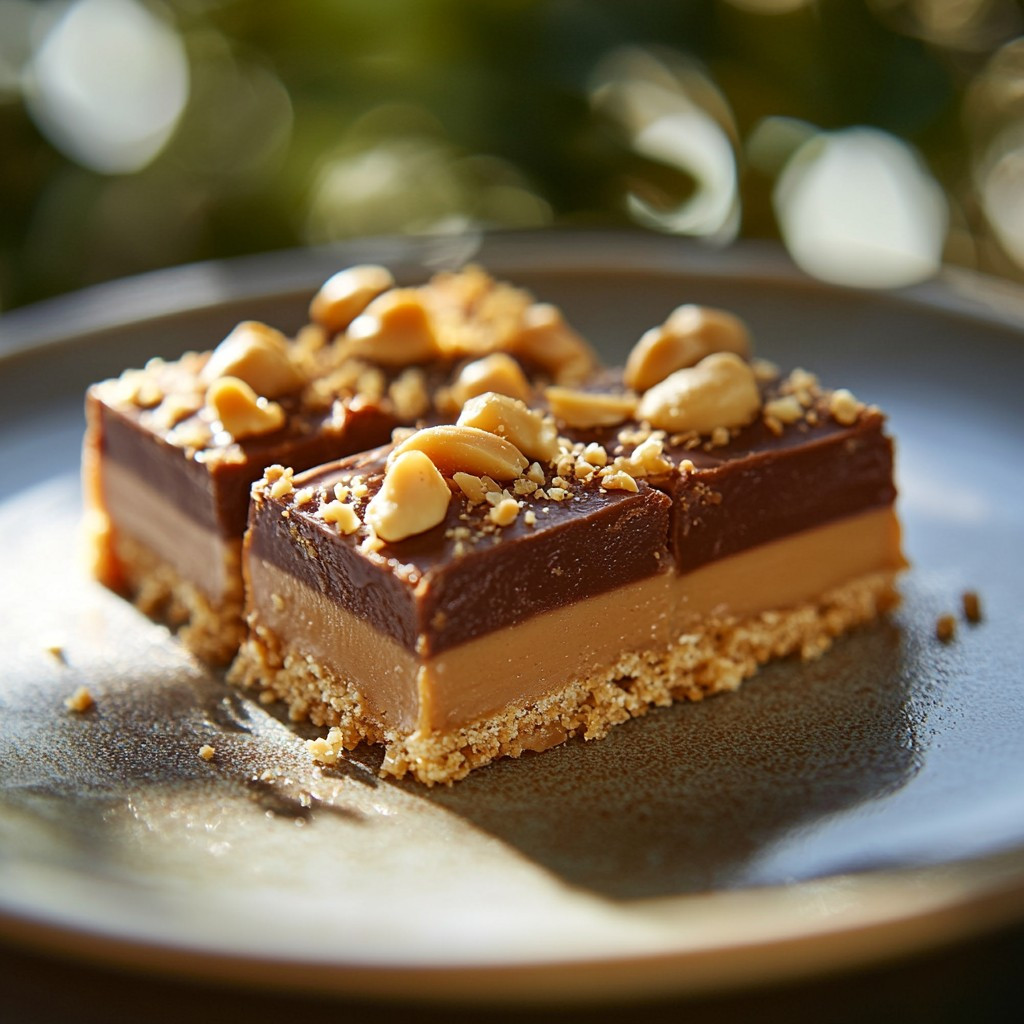
So, what makes these Peanut Butter Squares Disneyland so beloved? It’s the perfect harmony of textures and flavors. The smooth, rich peanut butter filling is perfectly balanced by the crisp, slightly salty graham cracker crust and the decadent chocolate topping. It’s a symphony of sweet and savory that dances on your taste buds. Plus, they’re incredibly easy to make at home! Forget waiting in line; now you can recreate this iconic Disneyland treat in your own kitchen and share the magic with your family and friends. Get ready to experience a taste of Disneyland, one delicious square at a time!

Ingredients:
- For the Crust:
- 1 ½ cups all-purpose flour
- ½ cup (1 stick) unsalted butter, cold and cubed
- ½ cup packed light brown sugar
- ¼ teaspoon salt
- For the Peanut Butter Filling:
- 1 cup (2 sticks) unsalted butter, softened
- 1 cup creamy peanut butter
- 3 cups powdered sugar
- ½ teaspoon vanilla extract
- ¼ cup milk
- For the Chocolate Topping:
- 12 ounces semi-sweet chocolate chips
- 2 tablespoons unsalted butter
Preparing the Crust:
- Combine Dry Ingredients: In a large bowl, whisk together the flour, brown sugar, and salt. This ensures the brown sugar is evenly distributed, preventing clumps in the crust.
- Cut in the Butter: Add the cold, cubed butter to the flour mixture. Using a pastry blender or your fingertips, cut the butter into the flour until the mixture resembles coarse crumbs. The key here is to keep the butter cold; this creates flaky layers in the crust. If you’re using your fingertips, work quickly to prevent the butter from melting.
- Press into Pan: Press the mixture evenly into the bottom of an ungreased 9×13 inch baking pan. I find using the bottom of a measuring cup helps to get a nice, even, and compact crust.
- Bake the Crust: Bake in a preheated oven at 350°F (175°C) for 18-20 minutes, or until lightly golden brown. Keep a close eye on it, as ovens can vary. You want it to be cooked through but not burnt.
- Cool Completely: Remove the crust from the oven and let it cool completely before adding the peanut butter filling. This is crucial! If the crust is even slightly warm, the peanut butter filling will melt and become a gooey mess. Trust me, I’ve learned this the hard way.
Making the Peanut Butter Filling:
- Cream Butter and Peanut Butter: In a large bowl, cream together the softened butter and peanut butter until smooth and fluffy. I recommend using an electric mixer for this, as it can be quite a workout by hand. Make sure your butter is truly softened; otherwise, you’ll end up with lumps.
- Add Powdered Sugar: Gradually add the powdered sugar, one cup at a time, beating well after each addition. Be careful not to add it all at once, or you’ll end up with a cloud of powdered sugar in your kitchen. Trust me, it’s not fun to clean up.
- Add Vanilla and Milk: Stir in the vanilla extract and milk. The milk helps to thin out the filling to a spreadable consistency. If the filling is still too thick, add a little more milk, one tablespoon at a time, until you reach the desired consistency.
- Spread over Crust: Spread the peanut butter filling evenly over the cooled crust. Again, make sure the crust is completely cool! Use an offset spatula or the back of a spoon to create a smooth, even layer.
- Chill: Place the pan in the refrigerator to chill for at least 30 minutes. This will help the peanut butter filling to firm up before you add the chocolate topping.
Creating the Chocolate Topping:
- Melt Chocolate and Butter: In a heatproof bowl set over a saucepan of simmering water (double boiler), combine the chocolate chips and butter. Make sure the bottom of the bowl doesn’t touch the water. Stir constantly until the chocolate and butter are completely melted and smooth. Alternatively, you can melt the chocolate and butter in the microwave in 30-second intervals, stirring in between, until melted and smooth. Be careful not to overheat the chocolate, or it will seize up.
- Pour over Peanut Butter Filling: Pour the melted chocolate evenly over the chilled peanut butter filling. Use an offset spatula or the back of a spoon to spread it into a smooth, even layer.
- Chill Again: Return the pan to the refrigerator and chill for at least 1 hour, or until the chocolate is completely set. This is the hardest part, waiting for them to chill! But trust me, it’s worth it.
Cutting and Serving:
- Cut into Squares: Once the chocolate is set, remove the pan from the refrigerator. Use a sharp knife to cut the bars into squares. For clean cuts, you can run the knife under hot water and wipe it dry between each cut.
- Serve and Enjoy: Serve the peanut butter squares cold. They are best stored in the refrigerator in an airtight container. These are perfect for parties, potlucks, or just a sweet treat for yourself!
Tips and Variations:
- Salted Peanut Butter: For a more intense peanut butter flavor, you can use salted peanut butter in the filling. Just be sure to reduce the amount of salt in the crust slightly.
- Chocolate Variety: Feel free to experiment with different types of chocolate for the topping. Milk chocolate, dark chocolate, or even white chocolate would all be delicious.
- Crushed Pretzels: For a salty-sweet twist, sprinkle crushed pretzels over the chocolate topping before it sets.
- Chopped Nuts: Add chopped peanuts, walnuts, or pecans to the peanut butter filling or sprinkle them over the chocolate topping for added texture and flavor.
- Make it Gluten-Free: Substitute the all-purpose flour in the crust with a gluten-free all-purpose flour blend.
- Storage: These peanut butter squares can be stored in an airtight container in the refrigerator for up to a week. They can also be frozen for longer storage. Just wrap them tightly in plastic wrap and then place them in a freezer-safe bag or container.
Troubleshooting:
- Crust is too dry: If the crust seems too dry and crumbly, add a tablespoon or two of cold water to the flour mixture and mix until it comes together.
- Peanut butter filling is too thick: If the peanut butter filling is too thick, add a little more milk, one tablespoon at a time, until you reach the desired consistency.
- Chocolate is seizing up: If the chocolate seizes up while melting, try adding a tablespoon of vegetable oil or shortening to the chocolate and stirring until smooth.
- Squares are hard to cut: If the squares are difficult to cut cleanly, try running the knife under hot water and wiping it dry between each cut.
Why this recipe works:
This recipe is a classic for a reason! The combination of the buttery, slightly sweet crust, the creamy, rich peanut butter filling, and the smooth, decadent chocolate topping is simply irresistible. The chilling steps are crucial for allowing the layers to set properly, resulting in a clean-cut, perfectly textured square. The balance of sweet and salty flavors is also key to its success. Plus, it’s relatively easy to make, even for beginner bakers. The variations allow you to customize the recipe to your own preferences, making it a truly versatile dessert.
I hope you enjoy making these Peanut Butter Squares as much as I do! They’re always a crowd-pleaser, and I guarantee they won’t last long!
Conclusion:
And there you have it! These Peanut Butter Squares Disneyland copycats are truly a must-try for any peanut butter lover, Disney enthusiast, or anyone simply craving a decadent and satisfying treat. I know, I know, there are a million peanut butter recipes out there, but trust me on this one. The combination of the rich, creamy peanut butter filling, the slightly salty pretzel crust, and the smooth chocolate topping is pure magic. It’s a symphony of flavors and textures that will transport you straight to the happiest place on earth – or at least, to a very happy place in your own kitchen! Why is this recipe a must-try? Well, beyond the incredible taste, it’s surprisingly easy to make. You don’t need any fancy equipment or culinary expertise. The ingredients are readily available at most grocery stores, and the steps are straightforward and simple to follow. Plus, it’s a fantastic make-ahead dessert. You can prepare the squares a day or two in advance, allowing the flavors to meld together even more beautifully. This makes them perfect for parties, potlucks, or simply having a sweet treat on hand whenever the craving strikes. But the best part? The sheer joy these squares bring. They’re nostalgic, comforting, and utterly irresistible. They’re the kind of dessert that makes you want to close your eyes and savor every single bite. And let’s be honest, who doesn’t need a little bit of that in their life? Now, let’s talk serving suggestions and variations! While these squares are divine on their own, there are plenty of ways to customize them to your liking. For a more intense peanut butter flavor, try using natural peanut butter. If you prefer a sweeter treat, you can add a touch of honey or maple syrup to the filling. For a bit of crunch, sprinkle chopped peanuts or pretzels on top of the chocolate layer before it sets. Feeling adventurous? Consider adding a layer of caramel between the peanut butter filling and the chocolate topping. Or, for a festive twist, use different colored sprinkles to match the occasion. You could even drizzle white chocolate over the dark chocolate for a beautiful and elegant presentation. Another fun variation is to use different types of chocolate. Milk chocolate, dark chocolate, or even white chocolate would all work beautifully. You could also experiment with different types of pretzels for the crust. Pretzel sticks, pretzel snaps, or even gluten-free pretzels would all be delicious. The possibilities are endless! Don’t be afraid to get creative and experiment with different flavors and textures to create your own signature version of these Peanut Butter Squares Disneyland inspired treats. I truly hope you give this recipe a try. I’m confident that you’ll love it as much as I do. And when you do, please, please, please share your experience with me! I’d love to hear what you think, what variations you tried, and how much your family and friends enjoyed them. You can leave a comment below, tag me on social media, or even send me an email. I can’t wait to see your creations! Happy baking, and may your days be filled with peanut butter bliss! Print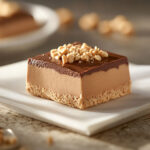
Peanut Butter Squares Disneyland: A Sweet Treat Guide
- Total Time: 115 minutes
- Yield: 24 squares 1x
Description
Decadent Peanut Butter Squares with a buttery crust, creamy peanut butter filling, and a smooth chocolate topping. A classic crowd-pleaser!
Ingredients
- 1 ½ cups all-purpose flour
- ½ cup (1 stick) unsalted butter, cold and cubed
- ½ cup packed light brown sugar
- ¼ teaspoon salt
- 1 cup (2 sticks) unsalted butter, softened
- 1 cup creamy peanut butter
- 3 cups powdered sugar
- ½ teaspoon vanilla extract
- ¼ cup milk
- 12 ounces semi-sweet chocolate chips
- 2 tablespoons unsalted butter
Instructions
- Combine Dry Ingredients: In a large bowl, whisk together the flour, brown sugar, and salt.
- Cut in the Butter: Add the cold, cubed butter to the flour mixture. Using a pastry blender or your fingertips, cut the butter into the flour until the mixture resembles coarse crumbs.
- Press into Pan: Press the mixture evenly into the bottom of an ungreased 9×13 inch baking pan.
- Bake the Crust: Bake in a preheated oven at 350°F (175°C) for 18-20 minutes, or until lightly golden brown.
- Cool Completely: Remove the crust from the oven and let it cool completely before adding the peanut butter filling.
- Cream Butter and Peanut Butter: In a large bowl, cream together the softened butter and peanut butter until smooth and fluffy.
- Add Powdered Sugar: Gradually add the powdered sugar, one cup at a time, beating well after each addition.
- Add Vanilla and Milk: Stir in the vanilla extract and milk. Add more milk, one tablespoon at a time, until you reach the desired consistency.
- Spread over Crust: Spread the peanut butter filling evenly over the cooled crust.
- Chill: Place the pan in the refrigerator to chill for at least 30 minutes.
- Melt Chocolate and Butter: In a heatproof bowl set over a saucepan of simmering water (double boiler), combine the chocolate chips and butter. Stir constantly until the chocolate and butter are completely melted and smooth. Alternatively, you can melt the chocolate and butter in the microwave in 30-second intervals, stirring in between, until melted and smooth.
- Pour over Peanut Butter Filling: Pour the melted chocolate evenly over the chilled peanut butter filling.
- Chill Again: Return the pan to the refrigerator and chill for at least 1 hour, or until the chocolate is completely set.
- Cut into Squares: Once the chocolate is set, remove the pan from the refrigerator. Use a sharp knife to cut the bars into squares.
- Serve and Enjoy: Serve the peanut butter squares cold. They are best stored in the refrigerator in an airtight container.
Notes
- Salted Peanut Butter: For a more intense peanut butter flavor, you can use salted peanut butter in the filling. Just be sure to reduce the amount of salt in the crust slightly.
- Chocolate Variety: Feel free to experiment with different types of chocolate for the topping. Milk chocolate, dark chocolate, or even white chocolate would all be delicious.
- Crushed Pretzels: For a salty-sweet twist, sprinkle crushed pretzels over the chocolate topping before it sets.
- Chopped Nuts: Add chopped peanuts, walnuts, or pecans to the peanut butter filling or sprinkle them over the chocolate topping for added texture and flavor.
- Make it Gluten-Free: Substitute the all-purpose flour in the crust with a gluten-free all-purpose flour blend.
- Storage: These peanut butter squares can be stored in an airtight container in the refrigerator for up to a week. They can also be frozen for longer storage. Just wrap them tightly in plastic wrap and then place them in a freezer-safe bag or container.
- Crust is too dry: If the crust seems too dry and crumbly, add a tablespoon or two of cold water to the flour mixture and mix until it comes together.
- Peanut butter filling is too thick: If the peanut butter filling is too thick, add a little more milk, one tablespoon at a time, until you reach the desired consistency.
- Chocolate is seizing up: If the chocolate seizes up while melting, try adding a tablespoon of vegetable oil or shortening to the chocolate and stirring until smooth.
- Squares are hard to cut: If the squares are difficult to cut cleanly, try running the knife under hot water and wiping it dry between each cut.
- Prep Time: 25 minutes
- Cook Time: 20 minutes
Leave a Comment