

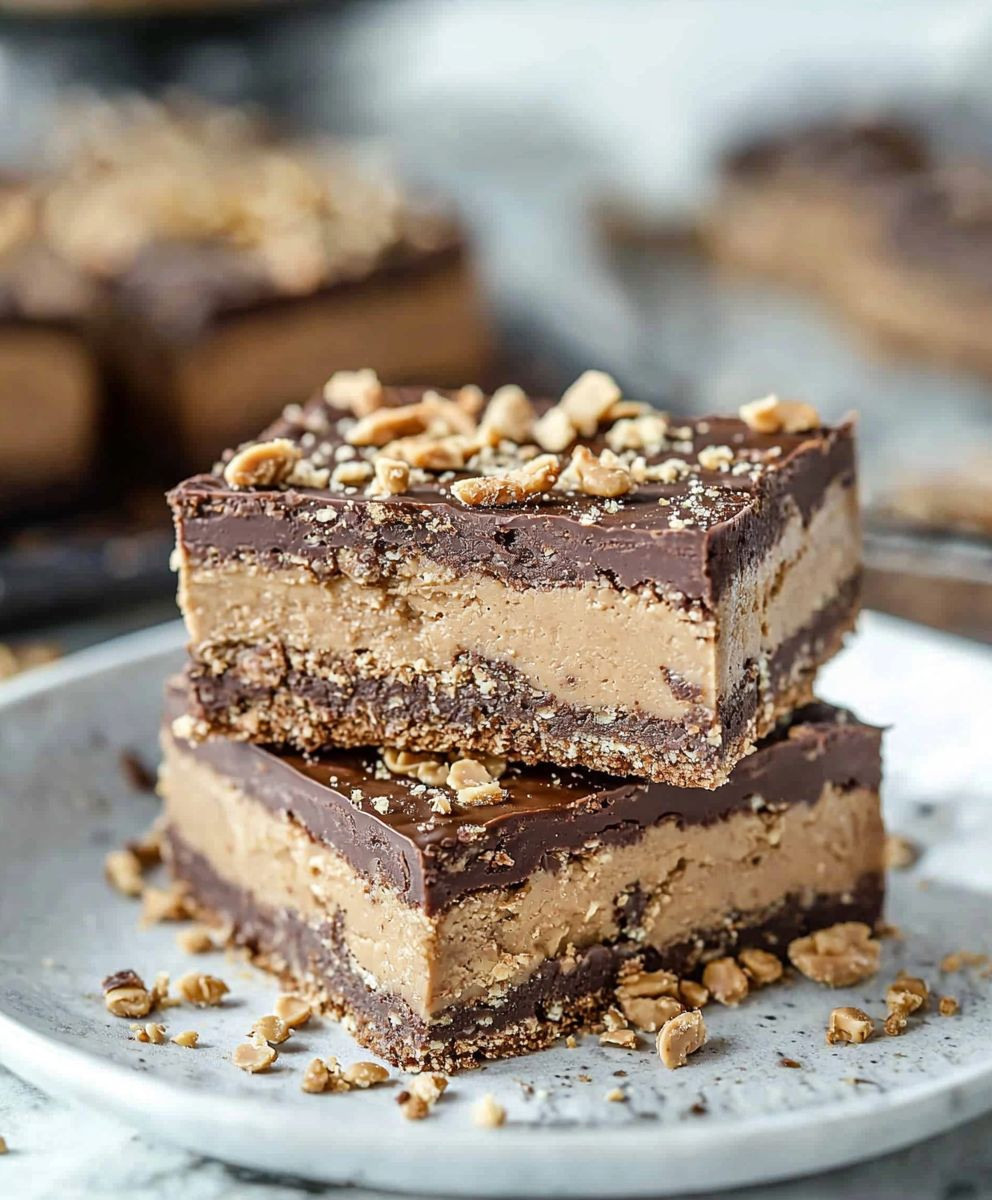
Peanut Butter Sandwich Bars: Prepare to be amazed! Forget everything you thought you knew about the humble peanut butter sandwich because we’re transforming it into a decadent, shareable treat that will have everyone begging for more. These aren’t your average after-school snack; they’re a symphony of textures and flavors, a delightful combination of crumbly, buttery crust, a creamy peanut butter filling, and a rich chocolate topping.
While the exact origins of the peanut butter sandwich are debated, its popularity exploded in the early 20th century, becoming a staple in American households. We’ve taken that classic comfort food and elevated it to a dessert worthy of any occasion. Think of these Peanut Butter Sandwich Bars as a sophisticated, yet approachable, twist on a childhood favorite.
What makes these bars so irresistible? It’s the perfect balance of sweet and salty, the satisfying crunch of the crust against the smooth peanut butter, and the undeniable allure of chocolate. Plus, they’re incredibly easy to make! Whether you’re a seasoned baker or a kitchen novice, you’ll find this recipe straightforward and rewarding. Get ready to experience peanut butter in a whole new light!

Ingredients:
- 1 cup (2 sticks) unsalted butter, softened
- 1 cup granulated sugar
- 1 cup packed brown sugar
- 2 large eggs
- 1 teaspoon vanilla extract
- 1 cup creamy peanut butter
- 2 1/2 cups all-purpose flour
- 1 teaspoon baking soda
- 1 teaspoon baking powder
- 1/2 teaspoon salt
- 1 cup milk chocolate chips
- 1 cup peanut butter chips
Preparing the Dough:
- Cream the butter and sugars: In a large bowl, or the bowl of your stand mixer fitted with the paddle attachment, cream together the softened butter, granulated sugar, and brown sugar until light and fluffy. This usually takes about 3-5 minutes. Make sure to scrape down the sides of the bowl occasionally to ensure everything is evenly mixed. You don’t want any lumps of butter hiding at the bottom!
- Incorporate the wet ingredients: Beat in the eggs one at a time, mixing well after each addition. Then, stir in the vanilla extract and peanut butter until everything is well combined and smooth. The peanut butter might make the mixture a little stiff, but that’s perfectly normal.
- Combine the dry ingredients: In a separate medium bowl, whisk together the flour, baking soda, baking powder, and salt. Whisking is important to distribute the baking soda and baking powder evenly throughout the flour, which will help the bars rise properly.
- Gradually add the dry ingredients to the wet ingredients: Gradually add the dry ingredients to the wet ingredients, mixing on low speed until just combined. Be careful not to overmix the dough, as this can result in tough bars. Overmixing develops the gluten in the flour, which can make the bars dense and chewy instead of soft and tender. Stop mixing as soon as the flour disappears.
- Stir in the chocolate and peanut butter chips: Gently fold in the milk chocolate chips and peanut butter chips until they are evenly distributed throughout the dough. I like to use a rubber spatula for this step to avoid overmixing.
Baking the Bars:
- Prepare the baking pan: Preheat your oven to 350°F (175°C). Grease and flour a 9×13 inch baking pan. You can also line the pan with parchment paper, leaving an overhang on the sides, for easy removal of the bars after baking. This is my preferred method because it makes cleanup a breeze!
- Press the dough into the pan: Press the dough evenly into the prepared baking pan. You can use your fingers or the back of a spoon to spread the dough. Make sure the dough is evenly distributed to ensure the bars bake evenly.
- Bake the bars: Bake for 25-30 minutes, or until the edges are golden brown and a toothpick inserted into the center comes out with a few moist crumbs attached. The baking time may vary depending on your oven, so keep an eye on the bars and check them frequently after 25 minutes.
- Cool the bars: Let the bars cool completely in the pan before cutting into squares. This is important because the bars will continue to set as they cool. If you try to cut them while they are still warm, they will be crumbly and difficult to handle. If you used parchment paper, you can lift the bars out of the pan and place them on a cutting board to make cutting easier.
Optional: Peanut Butter Drizzle
For an extra touch of peanut butter goodness, you can drizzle melted peanut butter over the cooled bars. Here’s how:
- Melt the peanut butter: Place about 1/2 cup of peanut butter in a microwave-safe bowl. Microwave in 30-second intervals, stirring in between, until the peanut butter is melted and smooth. Be careful not to overheat the peanut butter, as it can burn easily.
- Drizzle the peanut butter: Drizzle the melted peanut butter over the cooled bars. You can use a spoon or a piping bag to drizzle the peanut butter.
- Let the peanut butter set: Let the peanut butter set completely before cutting the bars. This will prevent the peanut butter from smearing when you cut the bars.
Cutting and Serving:
- Cut the bars: Once the bars are completely cooled, cut them into squares. The size of the squares is up to you, but I usually cut them into about 2-inch squares.
- Serve and enjoy: Serve the peanut butter sandwich bars and enjoy! These bars are perfect for a snack, dessert, or even a potluck. They are also great for packing in lunchboxes.
Tips and Variations:
- Use different types of chocolate chips: You can use any type of chocolate chips you like in these bars. White chocolate chips, dark chocolate chips, or even a combination of different types of chocolate chips would be delicious.
- Add nuts: Add chopped nuts, such as peanuts, walnuts, or pecans, to the dough for extra flavor and texture.
- Use different types of peanut butter: You can use crunchy peanut butter instead of creamy peanut butter for a more textured bar.
- Make them gluten-free: To make these bars gluten-free, simply substitute the all-purpose flour with a gluten-free all-purpose flour blend. Make sure to use a blend that contains xanthan gum, as this will help to bind the ingredients together.
- Store the bars: Store the peanut butter sandwich bars in an airtight container at room temperature for up to 3 days, or in the refrigerator for up to a week. You can also freeze the bars for up to 2 months.
- Don’t overbake: Overbaking will result in dry, crumbly bars. Be sure to check the bars frequently while they are baking and remove them from the oven as soon as they are done.
- Let them cool completely: Letting the bars cool completely before cutting them is important because they will continue to set as they cool. If you try to cut them while they are still warm, they will be crumbly and difficult to handle.
- For a softer bar: If you prefer a softer bar, you can reduce the baking time by a few minutes.
- For a chewier bar: If you prefer a chewier bar, you can add a tablespoon of molasses to the dough.
- Experiment with toppings: Get creative with the toppings! You can sprinkle the bars with chopped nuts, sprinkles, or even a drizzle of chocolate ganache.
Troubleshooting:
- Bars are too dry: If your bars are too dry, you may have overbaked them. Be sure to check the bars frequently while they are baking and remove them from the oven as soon as they are done. You can also try adding a tablespoon of milk or sour cream to the dough to add moisture.
- Bars are too crumbly: If your bars are too crumbly, you may have overmixed the dough. Be careful not to overmix the dough, as this can result in tough bars. You can also try adding a tablespoon of oil to the dough to add moisture.
- Bars are too dense: If your bars are too dense, you may have used too much flour. Be sure to measure the flour accurately and avoid packing it into the measuring cup. You can also try adding a teaspoon of baking powder to the dough to help the bars rise.
- Bars are too greasy: If your bars are too greasy, you may have used too much butter. Be sure to measure the butter accurately and avoid using softened butter that is too melted.
- Bars are not baking evenly: If your bars are not baking evenly, your oven may not be calibrated correctly. You can use an oven thermometer to check the temperature of your oven and adjust it accordingly. You can also try rotating the pan halfway through baking to ensure even baking.
Nutritional Information (Approximate):
Please note that the nutritional information is an estimate and may vary depending on the specific ingredients used.
- Calories: Approximately 250-300 per bar
- Fat: 15-20 grams
- Saturated Fat: 8-12 grams
- Cholesterol: 30-40 mg
- Sodium: 100-150 mg
- Carbohydrates: 25-35 grams
- Sugar: 15-20 grams
- Protein: 4-6 grams
Enjoy your homemade Peanut Butter Sandwich Bars! I hope you love them as much as I do!
Conclusion:
And there you have it! These Peanut Butter Sandwich Bars are truly a must-try for anyone who loves the classic combination of peanut butter and a sweet, satisfying treat. I know I’m biased, but I genuinely believe this recipe is a winner. It’s quick, easy, and delivers incredible flavor and texture. The soft, chewy peanut butter filling nestled between the buttery, crumbly layers is simply irresistible. But why is this recipe a must-try, you ask? Well, beyond the sheer deliciousness, it’s incredibly versatile. It’s perfect for a quick weeknight dessert, a potluck contribution that’s guaranteed to disappear, or even a bake sale item that will fly off the table. Plus, it’s a fantastic way to use up any leftover peanut butter you might have lurking in the pantry. No more half-empty jars going to waste! Looking for serving suggestions? These bars are fantastic on their own, of course, but they’re also delicious served warm with a scoop of vanilla ice cream. The contrast between the warm, gooey bar and the cold, creamy ice cream is heavenly. You could also drizzle them with melted chocolate for an extra touch of decadence. Or, for a more sophisticated twist, try serving them with a dollop of whipped cream and a sprinkle of sea salt. The salt enhances the peanut butter flavor and adds a delightful complexity. Now, let’s talk variations! Feel free to get creative and customize these bars to your liking. If you’re a chocolate lover, add chocolate chips to the peanut butter filling or the crust. You could also swirl in some Nutella for an even richer, more indulgent flavor. For a bit of crunch, add chopped peanuts or pretzels to the filling or sprinkle them on top before baking. If you’re feeling adventurous, try using a different type of nut butter, such as almond butter or cashew butter. The possibilities are endless!A Few More Ideas:
* Add a layer of jelly: Before adding the top crust, spread a thin layer of your favorite jelly (grape, strawberry, or raspberry would all be delicious) over the peanut butter filling. * Make them gluten-free: Simply substitute the all-purpose flour in the crust with a gluten-free all-purpose flour blend. * Add some spice: A pinch of cinnamon or nutmeg in the crust adds a warm, comforting flavor. * Make them vegan: Use a vegan butter substitute and a flax egg (1 tablespoon of ground flaxseed mixed with 3 tablespoons of water) in the crust. I truly hope you’ll give these Peanut Butter Sandwich Bars a try. I’m confident that you’ll love them as much as I do. They’re a crowd-pleaser, a comfort food classic, and a guaranteed way to satisfy your sweet tooth. So, what are you waiting for? Head to your kitchen, gather your ingredients, and get baking! And most importantly, don’t forget to share your experience with me. I’d love to hear what you think of the recipe, what variations you tried, and how you served them. Leave a comment below, tag me on social media, or send me an email. I can’t wait to see your creations! Happy baking! Print
Peanut Butter Sandwich Bars: Easy Recipe & Baking Tips
- Total Time: 45 minutes
- Yield: 16–24 bars 1x
Description
Soft and chewy peanut butter sandwich bars loaded with chocolate and peanut butter chips. A perfect sweet treat!
Ingredients
- 1 cup (2 sticks) unsalted butter, softened
- 1 cup granulated sugar
- 1 cup packed brown sugar
- 2 large eggs
- 1 teaspoon vanilla extract
- 1 cup creamy peanut butter
- 2 1/2 cups all-purpose flour
- 1 teaspoon baking soda
- 1 teaspoon baking powder
- 1/2 teaspoon salt
- 1 cup milk chocolate chips
- 1 cup peanut butter chips
Instructions
- Cream the butter and sugars: In a large bowl, or the bowl of your stand mixer fitted with the paddle attachment, cream together the softened butter, granulated sugar, and brown sugar until light and fluffy. This usually takes about 3-5 minutes. Make sure to scrape down the sides of the bowl occasionally to ensure everything is evenly mixed.
- Incorporate the wet ingredients: Beat in the eggs one at a time, mixing well after each addition. Then, stir in the vanilla extract and peanut butter until everything is well combined and smooth.
- Combine the dry ingredients: In a separate medium bowl, whisk together the flour, baking soda, baking powder, and salt.
- Gradually add the dry ingredients to the wet ingredients: Gradually add the dry ingredients to the wet ingredients, mixing on low speed until just combined. Be careful not to overmix the dough.
- Stir in the chocolate and peanut butter chips: Gently fold in the milk chocolate chips and peanut butter chips until they are evenly distributed throughout the dough.
- Prepare the baking pan: Preheat your oven to 350°F (175°C). Grease and flour a 9×13 inch baking pan or line with parchment paper.
- Press the dough into the pan: Press the dough evenly into the prepared baking pan.
- Bake the bars: Bake for 25-30 minutes, or until the edges are golden brown and a toothpick inserted into the center comes out with a few moist crumbs attached.
- Cool the bars: Let the bars cool completely in the pan before cutting into squares.
- Optional Peanut Butter Drizzle: Melt 1/2 cup peanut butter in the microwave in 30-second intervals, stirring in between, until smooth. Drizzle over cooled bars and let set.
- Cut and Serve: Cut the cooled bars into squares and enjoy!
Notes
- For an extra touch of peanut butter goodness, you can drizzle melted peanut butter over the cooled bars.
- Use different types of chocolate chips: You can use any type of chocolate chips you like in these bars. White chocolate chips, dark chocolate chips, or even a combination of different types of chocolate chips would be delicious.
- Add nuts: Add chopped nuts, such as peanuts, walnuts, or pecans, to the dough for extra flavor and texture.
- Use different types of peanut butter: You can use crunchy peanut butter instead of creamy peanut butter for a more textured bar.
- Make them gluten-free: To make these bars gluten-free, simply substitute the all-purpose flour with a gluten-free all-purpose flour blend. Make sure to use a blend that contains xanthan gum, as this will help to bind the ingredients together.
- Store the bars: Store the peanut butter sandwich bars in an airtight container at room temperature for up to 3 days, or in the refrigerator for up to a week. You can also freeze the bars for up to 2 months.
- Don’t overbake: Overbaking will result in dry, crumbly bars. Be sure to check the bars frequently while they are baking and remove them from the oven as soon as they are done.
- Let them cool completely: Letting the bars cool completely before cutting them is important because they will continue to set as they cool. If you try to cut them while they are still warm, they will be crumbly and difficult to handle.
- For a softer bar: If you prefer a softer bar, you can reduce the baking time by a few minutes.
- For a chewier bar: If you prefer a chewier bar, you can add a tablespoon of molasses to the dough.
- Experiment with toppings: Get creative with the toppings! You can sprinkle the bars with chopped nuts, sprinkles, or even a drizzle of chocolate ganache.
- Prep Time: 15 minutes
- Cook Time: 25 minutes
Leave a Comment