

Maple Fudge, oh, the very words conjure up images of cozy autumn evenings and the sweet, comforting aroma filling the kitchen! Have you ever tasted a fudge so rich, so creamy, and so utterly decadent that it felt like a warm hug from the inside out? That’s precisely what this recipe delivers. Forget those dry, crumbly fudges of yesteryear; we’re talking about a melt-in-your-mouth experience that will have everyone begging for more.
While the exact origins of fudge are debated, many believe it was born from a happy accident in the late 19th century, a “fudged” batch of caramels, if you will. But the addition of maple? That’s where the magic truly happens, especially here in regions where maple syrup is a cherished part of our heritage. It elevates the humble fudge to something truly special, imbuing it with a unique depth of flavor that’s both sophisticated and comforting.
People adore maple fudge for its unparalleled sweetness and smooth texture. It’s the perfect treat to satisfy a sweet tooth, a delightful addition to holiday dessert platters, or a thoughtful homemade gift. Plus, this recipe is surprisingly simple to make, requiring only a handful of ingredients and minimal effort. So, are you ready to embark on a sweet adventure? Let’s dive into the secrets of creating the most irresistible maple fudge you’ve ever tasted!

Ingredients:
- 3 cups granulated sugar
- 1 cup heavy cream
- 1/2 cup unsalted butter, cut into pieces
- 1/4 cup pure maple syrup
- 1/4 teaspoon salt
- 1 teaspoon vanilla extract
- 1/2 cup chopped walnuts or pecans (optional)
Preparing the Maple Fudge
- Combine the Ingredients: In a heavy-bottomed 3-quart saucepan, combine the granulated sugar, heavy cream, unsalted butter, maple syrup, and salt. Make sure the saucepan is heavy-bottomed to prevent scorching. I find that using a stainless steel saucepan works best, but enameled cast iron is also a good choice.
- Stir and Heat: Place the saucepan over medium heat. Stir constantly with a wooden spoon until the sugar is completely dissolved. This is a crucial step, as any undissolved sugar crystals can cause the fudge to become grainy. Continue stirring until the mixture comes to a boil.
- Boil to Soft-Ball Stage: Once the mixture is boiling, stop stirring. Insert a candy thermometer into the saucepan, making sure it doesn’t touch the bottom. Continue to cook the mixture, without stirring, until it reaches the soft-ball stage, which is 235-240°F (113-116°C). It’s really important to monitor the temperature carefully. If you don’t have a candy thermometer, you can test for the soft-ball stage by dropping a small amount of the hot mixture into a bowl of cold water. If it forms a soft, pliable ball that you can flatten between your fingers, it’s ready.
- Cool Slightly: Remove the saucepan from the heat and let it cool undisturbed for about 5 minutes. This allows the mixture to cool slightly and helps prevent sugar crystals from forming during the beating process. Don’t skip this step!
Beating and Finishing the Fudge
- Add Vanilla and Beat: Add the vanilla extract to the saucepan. Now, using a wooden spoon or a stand mixer fitted with the paddle attachment, beat the mixture vigorously until it loses its glossy sheen and becomes thick and creamy. This usually takes about 5-10 minutes. The mixture will start to look dull and lose its shine as it thickens. Be patient and keep beating! If you’re using a stand mixer, start on low speed and gradually increase to medium speed.
- Incorporate Nuts (Optional): If you’re adding nuts, gently fold them into the fudge mixture until they are evenly distributed. I love the added texture and flavor that nuts bring to the fudge, but it’s perfectly delicious without them too.
- Pour into Prepared Pan: Line an 8×8 inch square baking pan with parchment paper, leaving an overhang on two sides. This will make it easy to lift the fudge out of the pan later. Pour the fudge mixture into the prepared pan and spread it evenly with a spatula.
- Chill and Set: Cover the pan with plastic wrap and refrigerate for at least 2 hours, or preferably overnight, until the fudge is firm and completely set. This is the hardest part – waiting! But trust me, it’s worth it.
Cutting and Serving
- Remove from Pan: Once the fudge is set, lift it out of the pan using the parchment paper overhang.
- Cut into Squares: Place the fudge on a cutting board and use a sharp knife to cut it into squares. I usually cut it into 1-inch squares, but you can make them larger or smaller depending on your preference. For clean cuts, you can run the knife under hot water and wipe it dry between each cut.
- Serve and Enjoy: Serve the maple fudge immediately or store it in an airtight container at room temperature for up to a week. It’s also great stored in the refrigerator for longer storage. Enjoy your homemade maple fudge! It’s perfect for gifting, holiday gatherings, or just a sweet treat for yourself.
Tips for Perfect Maple Fudge:
- Use a Heavy-Bottomed Saucepan: This will help prevent the fudge from scorching.
- Stir Constantly at the Beginning: This ensures that the sugar dissolves completely and prevents graininess.
- Don’t Stir While Boiling: Stirring while boiling can cause sugar crystals to form.
- Use a Candy Thermometer: This is the most accurate way to ensure that the fudge reaches the soft-ball stage.
- Cool Slightly Before Beating: This helps prevent sugar crystals from forming during the beating process.
- Beat Vigorously: Beat the fudge until it loses its glossy sheen and becomes thick and creamy.
- Chill Completely: Make sure the fudge is completely set before cutting it into squares.
Troubleshooting:
- Grainy Fudge: This is usually caused by undissolved sugar crystals or stirring while boiling. Make sure to stir constantly at the beginning until the sugar is completely dissolved, and avoid stirring while boiling.
- Fudge That Doesn’t Set: This is usually caused by not cooking the mixture to the soft-ball stage. Make sure to use a candy thermometer and cook the mixture to 235-240°F (113-116°C).
- Hard Fudge: This is usually caused by overcooking the mixture. Make sure to use a candy thermometer and avoid cooking the mixture past the soft-ball stage.
Variations:
- Maple Walnut Fudge: Add 1/2 cup of chopped walnuts to the fudge mixture.
- Maple Pecan Fudge: Add 1/2 cup of chopped pecans to the fudge mixture.
- Maple Chocolate Fudge: Add 1/4 cup of cocoa powder to the fudge mixture along with the sugar.
- Maple Cream Fudge: Substitute half of the heavy cream with milk for a lighter flavor.

Conclusion:
This maple fudge recipe isn’t just another dessert; it’s a journey into pure, unadulterated sweetness, a comforting hug in every bite. I truly believe you’ll find yourself reaching for this recipe time and time again, not just during the holidays, but whenever you crave a little bit of homemade magic. The creamy texture, the rich maple flavor, and the surprisingly simple preparation make it a standout treat that’s guaranteed to impress. Why is this a must-try? Because it’s more than just fudge. It’s a taste of nostalgia, a connection to simpler times, and a celebration of the incredible flavor that only real maple syrup can provide. Forget those store-bought fudges that are often overly sweet and lacking in depth. This recipe delivers an authentic maple experience that will tantalize your taste buds and leave you wanting more. Plus, it’s a fantastic way to showcase the quality of your favorite maple syrup – the better the syrup, the better the fudge! But the best part? It’s incredibly versatile! While the classic recipe is divine on its own, feel free to experiment and make it your own signature creation.Serving Suggestions and Variations:
* Walnut Maple Fudge: Add a cup of chopped walnuts or pecans to the mixture just before pouring it into the pan for a delightful nutty crunch. * Maple Fudge with Sea Salt: Sprinkle a pinch of flaky sea salt on top of the fudge after it’s been poured into the pan. The salt enhances the sweetness and creates a wonderful flavor contrast. * Maple Chocolate Swirl Fudge: Melt a few ounces of dark or milk chocolate and swirl it into the maple fudge mixture before it sets. This adds a decadent chocolatey dimension that complements the maple perfectly. * Maple Coffee Fudge: Add a tablespoon or two of instant espresso powder to the mixture for a coffee-infused treat that’s perfect for an afternoon pick-me-up. * Maple Fudge Bites: Instead of cutting the fudge into squares, use a small cookie scoop to create bite-sized pieces. These are perfect for parties or for portion control (if you can resist eating them all at once!). * Gift Giving: Package the fudge in decorative tins or boxes to give as homemade gifts. It’s a thoughtful and delicious present that anyone will appreciate. Don’t be intimidated by the idea of making fudge. This recipe is surprisingly easy, and I’ve included all the tips and tricks you need to ensure success. Just follow the instructions carefully, and you’ll be rewarded with a batch of the most delicious maple fudge you’ve ever tasted. I’m so excited for you to try this recipe! I know you’re going to love it as much as I do. Once you’ve made it, I’d absolutely love to hear about your experience. Did you try any of the variations? What did you think of the flavor? Share your photos and comments with me – I can’t wait to see your creations! Happy fudge-making! Let me know if you have any questions, and I’ll do my best to help. Enjoy! Print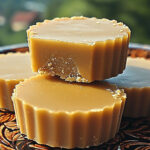
Maple Fudge: The Ultimate Guide to Making Perfect Fudge
- Total Time: Creamy, cheesy baked tortellini with a rich tomato sauce, spinach, and a golden, bubbly topping. Perfect for a comforting weeknight meal.
- Yield: This recipe features juicy chicken thighs marinated in a flavorful blend of yogurt, lemon juice, and aromatic spices, then baked to golden perfection. Serve with your favorite sides for a complete and satisfying meal.
Description
Loading…
Ingredients
A vibrant and flavorful Mediterranean-inspired pasta salad with sun-dried tomatoes, artichoke hearts, olives, feta cheese, and a zesty lemon-herb vinaigrette. Perfect for a light lunch, potluck, or side dish.
Instructions
This vibrant and flavorful Mediterranean Quinoa Salad is packed with fresh vegetables, herbs, and a tangy lemon vinaigrette. It’s a healthy and delicious meal or side dish that’s easy to customize.
Notes
Creamy, flavorful Alfredo sauce coats perfectly cooked fettuccine. A classic comfort food, ready in minutes.
- Prep Time: Appetizing gourmet recipe with hyperrealistic details. Bright, natural light illuminates textures and sharp focus on the main subject. Shallow depth of field creates a soft bokeh background.
- Cook Time: This recipe features juicy chicken thighs marinated in a flavorful blend of soy sauce, honey, garlic, and ginger, then baked to perfection. Serve over rice or noodles for a quick and delicious weeknight meal.

Leave a Comment