

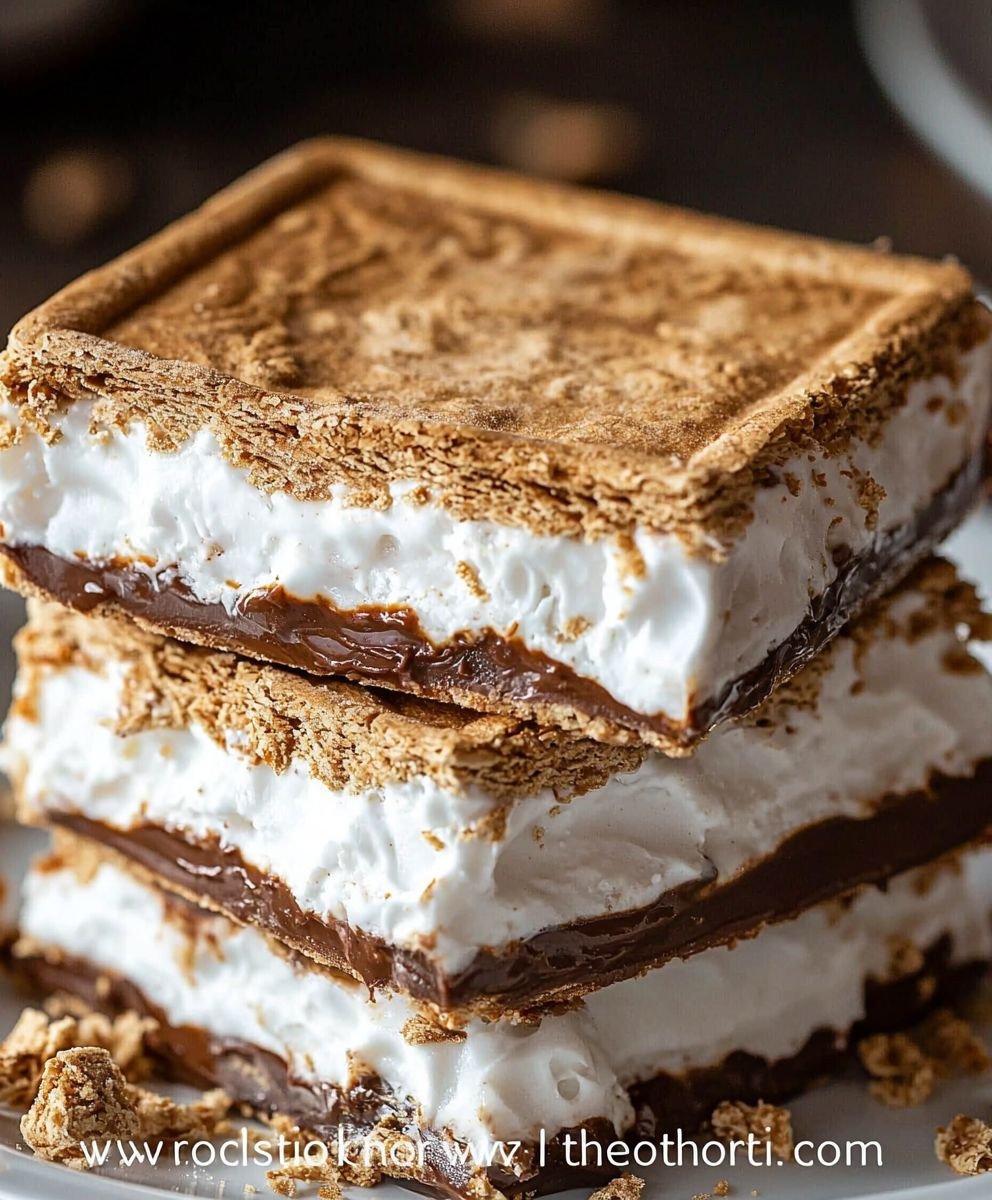
Frozen Smores: the nostalgic campfire treat reimagined for the modern kitchen! Imagine biting into a creamy, cool dessert that perfectly captures the essence of a warm summer evening, without ever having to light a match. This isn’t just another dessert; it’s a delightful twist on a beloved classic, offering a refreshing escape from the ordinary.
S’mores, with their simple combination of graham crackers, chocolate, and toasted marshmallows, have been a quintessential part of American culture for nearly a century. While the exact origin is debated, the first published recipe appeared in a Girl Scout guidebook in the 1920s, quickly cementing its place in our hearts and around campfires. But what if you could enjoy that same gooey, chocolatey goodness without the sticky fingers and smoky aroma? That’s where Frozen Smores come in!
People adore s’mores for their comforting flavors and the memories they evoke. The combination of crunchy graham crackers, melted chocolate, and gooey marshmallows is simply irresistible. This frozen version takes all those wonderful elements and elevates them to a new level of deliciousness. The cool, creamy texture is a welcome change, especially on a hot day, and the convenience of making them ahead of time makes them perfect for parties or a simple weeknight treat. Get ready to experience the magic of s’mores in a whole new way!

Ingredients:
- 1 (14.3 ounce) package chocolate sandwich cookies, such as Oreos
- 6 tablespoons unsalted butter, melted
- 1 (10 ounce) package large marshmallows
- 2 tablespoons milk
- 1 teaspoon vanilla extract
- 1/4 teaspoon salt
- 1 1/2 cups heavy cream
- 1/4 cup powdered sugar
- 1/4 cup mini chocolate chips, for garnish (optional)
- Graham crackers, broken into small pieces, for garnish (optional)
Preparing the Cookie Crust:
Okay, let’s get started with the foundation of our frozen smores – the cookie crust! This is super easy and gives a fantastic chocolatey base to complement the marshmallow and cream.
- Crush the Cookies: First, you’ll need to crush the entire package of chocolate sandwich cookies. You have a couple of options here. My preferred method is to use a food processor. Just toss the whole cookies in (filling and all!) and pulse until you have fine crumbs. If you don’t have a food processor, no worries! You can put the cookies in a large zip-top bag, seal it tightly, and then use a rolling pin or even the bottom of a heavy pan to crush them. Aim for a consistent, fine crumb texture.
- Melt the Butter: Next, melt the butter in a microwave-safe bowl. You can do this in 30-second intervals, stirring in between, until it’s completely melted. Alternatively, you can melt the butter in a small saucepan over low heat on the stovetop. Just keep an eye on it so it doesn’t burn.
- Combine and Press: Now, in a medium bowl, combine the crushed cookie crumbs and the melted butter. Mix them together thoroughly until the crumbs are evenly moistened. The mixture should resemble wet sand.
- Press into Pan: Take an 8×8 inch square baking pan and line it with parchment paper. This will make it much easier to remove the frozen smores later. Press the cookie crumb mixture evenly into the bottom of the prepared pan. Use the bottom of a measuring cup or your fingers to firmly pack the crumbs down. This is important to create a solid crust that won’t crumble when you cut the smores.
- Freeze the Crust: Place the pan with the cookie crust into the freezer for at least 30 minutes. This will help the crust to set and become firm before we add the marshmallow layer.
Making the Marshmallow Filling:
Now for the star of the show – the gooey, delicious marshmallow filling! This part requires a little bit of attention, but the end result is totally worth it.
- Melt the Marshmallows: In a large, microwave-safe bowl, combine the marshmallows, milk, vanilla extract, and salt. Microwave on high for 1 minute, then stir well. If the marshmallows are not completely melted, continue to microwave in 30-second intervals, stirring after each interval, until smooth and melted. Be careful not to overheat the marshmallows, as they can become hard and rubbery.
- Cool Slightly: Let the melted marshmallow mixture cool slightly for about 5-10 minutes. This will prevent it from melting the cookie crust when you pour it on.
Preparing the Whipped Cream:
The whipped cream adds a light and airy texture that perfectly complements the rich cookie crust and gooey marshmallow filling. It’s also super easy to make!
- Chill the Bowl and Beaters: Before you start, make sure your mixing bowl and the beaters of your electric mixer are chilled. This will help the heavy cream whip up more quickly and easily. You can place them in the freezer for about 15-20 minutes before you begin.
- Whip the Cream: Pour the heavy cream into the chilled bowl and add the powdered sugar. Using an electric mixer, beat on medium speed until stiff peaks form. Be careful not to over-whip the cream, as it can turn into butter. You’ll know it’s ready when the cream holds its shape and forms stiff peaks when you lift the beaters.
Assembling the Frozen Smores:
Alright, we’re in the home stretch! Now it’s time to put everything together and create our masterpiece.
- Fold in Whipped Cream: Gently fold the whipped cream into the slightly cooled marshmallow mixture. Be careful not to deflate the whipped cream; you want to keep it light and airy. Fold until just combined.
- Pour over Crust: Remove the cookie crust from the freezer and pour the marshmallow cream mixture evenly over the top.
- Garnish (Optional): If you’re feeling fancy, sprinkle the top with mini chocolate chips and broken graham cracker pieces. This adds a nice visual appeal and extra flavor.
- Freeze: Cover the pan with plastic wrap and freeze for at least 4-6 hours, or preferably overnight, until completely frozen solid.
Serving and Storing:
The moment we’ve all been waiting for – time to enjoy our frozen smores!
- Cut and Serve: Remove the frozen smores from the freezer and let them sit at room temperature for a few minutes to soften slightly. This will make them easier to cut. Use a sharp knife to cut the smores into squares.
- Enjoy: Serve immediately and enjoy the delicious combination of chocolate, marshmallow, and cream!
- Storage: Store any leftover frozen smores in an airtight container in the freezer for up to a week. If you’re stacking them, place a piece of parchment paper between each layer to prevent them from sticking together.
Conclusion:
So there you have it! These Frozen Smores are truly a must-try, especially when you’re craving that campfire flavor without the campfire commitment. I know, I know, sometimes you just want a quick and easy dessert that satisfies that sweet tooth and brings back those nostalgic memories. And trust me, this recipe delivers on all fronts. The creamy, cold filling combined with the crunchy graham crackers and the gooey marshmallow topping is a symphony of textures and flavors that will have you reaching for seconds (and maybe thirds!). But why are these Frozen Smores so special? Well, beyond the incredible taste, they’re incredibly simple to make. We’re talking minimal ingredients and minimal effort. Perfect for those busy weeknights or when you need a last-minute dessert for a gathering. Plus, they’re a fantastic make-ahead treat. You can whip up a batch on Sunday and have delicious, ready-to-eat desserts all week long. No more stressing about what to bring to that potluck – these Frozen Smores are guaranteed to be a crowd-pleaser! And the best part? You can totally customize them to your liking! Feeling adventurous? Try using different flavored graham crackers, like chocolate or cinnamon. Want to add a little extra decadence? Drizzle some melted chocolate over the top before freezing. Or, for a truly indulgent treat, add a layer of peanut butter between the graham crackers and the filling. The possibilities are endless! Serving suggestions? I love enjoying these Frozen Smores straight from the freezer for a refreshing treat on a hot day. They’re also delicious slightly softened, allowing the filling to become even creamier. You can even cut them into smaller squares and serve them as bite-sized appetizers at your next party. For a more elegant presentation, try layering them in a parfait glass with whipped cream and chocolate shavings. Don’t be afraid to experiment and find your own perfect version of these Frozen Smores. That’s the beauty of cooking, right? It’s all about creating something that you love and sharing it with the people you care about. I truly believe that everyone should have this recipe in their repertoire. It’s a guaranteed crowd-pleaser, it’s easy to make, and it’s incredibly versatile. So, what are you waiting for? Head to the kitchen, gather your ingredients, and get ready to experience the magic of these Frozen Smores. I’m so excited for you to try this recipe! And I would absolutely love to hear about your experience. Did you make any variations? Did you serve them at a party? What did your friends and family think? Please, share your thoughts and photos in the comments below. Your feedback is invaluable, and it helps me to continue creating recipes that you’ll love. So go ahead, give these Frozen Smores a try. I promise you won’t be disappointed. Happy baking (or should I say, freezing!) and I can’t wait to hear all about your delicious creations! Let me know if you have any questions, and I’ll do my best to answer them. Enjoy! Print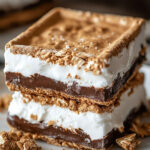
Frozen Smores: The Ultimate Guide to Making This Delicious Treat
- Total Time: Creamy, cheesy chicken enchiladas with a flavorful homemade sauce. Perfect for a satisfying weeknight dinner.
- Yield: Loading…
Description
Loading…
Ingredients
This recipe features juicy chicken thighs marinated in a flavorful blend of soy sauce, honey, garlic, and ginger, then baked to perfection. Serve over rice or noodles for a quick and delicious meal.
Instructions
This easy recipe combines juicy chicken thighs with a flavorful honey-garlic glaze. Simply sear the chicken, then simmer in the sweet and savory sauce until perfectly caramelized. Serve over rice or noodles for a delicious weeknight meal.
Notes
Fluffy, golden-brown pancakes with a hint of cinnamon, perfect for a cozy breakfast or brunch.
- Prep Time: Fluffy, golden pancakes with a hint of vanilla, perfect for a weekend breakfast.
- Cook Time: Fluffy, buttery brioche dough filled with rich chocolate chips and topped with a sweet glaze. Perfect for breakfast, brunch, or a delightful treat.

Leave a Comment