

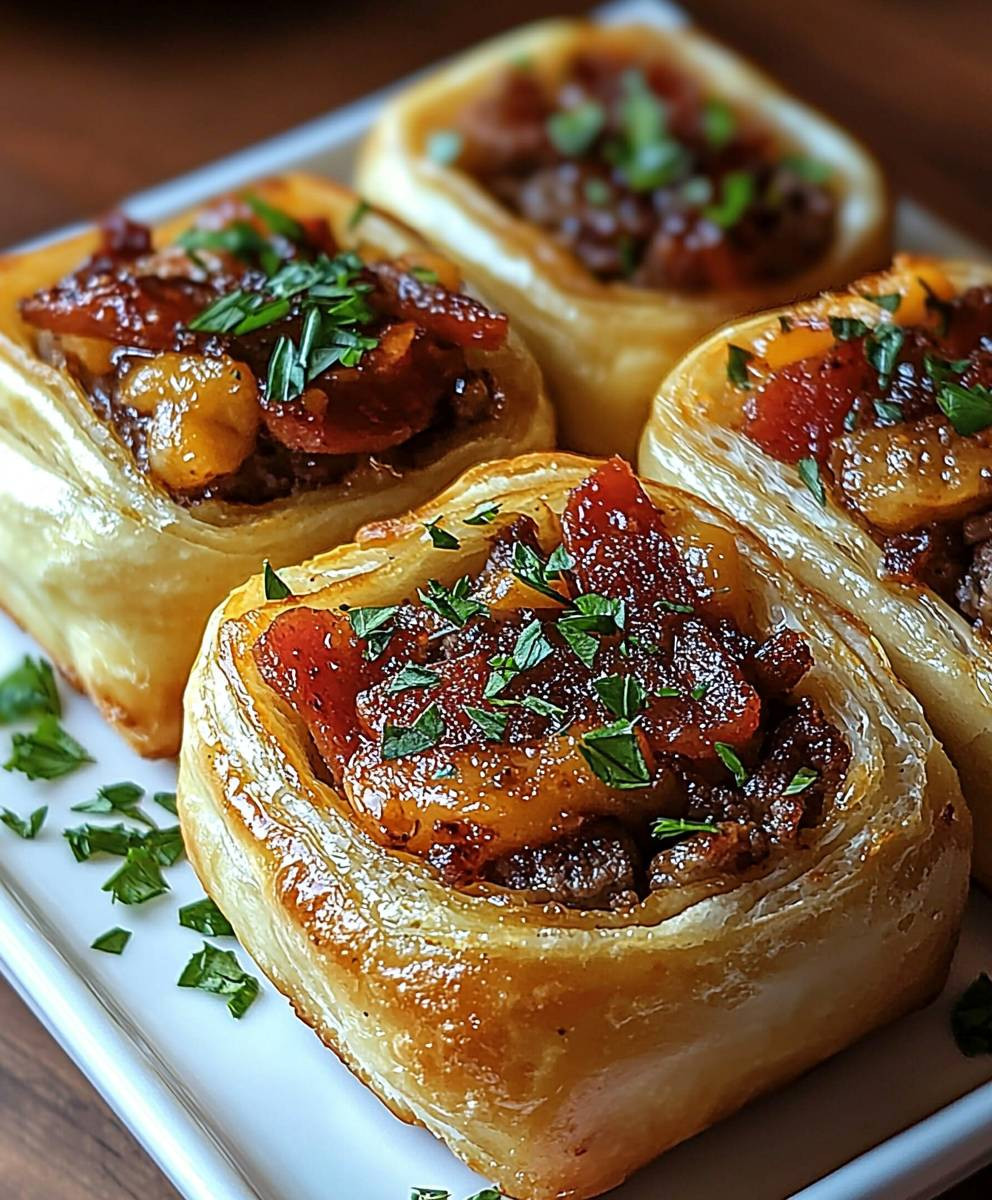
Crescent Roll Cheeseburger Bites: Prepare to meet your new favorite appetizer! Imagine sinking your teeth into a warm, flaky crescent roll, only to discover a juicy, perfectly seasoned cheeseburger filling inside. These aren’t just any ordinary snacks; they’re a delightful explosion of flavor and texture that will have everyone reaching for seconds (and thirds!).
The concept of combining ground beef and cheese within a pastry crust isn’t entirely new, echoing the savory hand pies enjoyed in various cultures for centuries. Think of the Cornish pasty or even the empanada – portable pockets of deliciousness designed for easy eating. But these Crescent Roll Cheeseburger Bites bring a modern, playful twist to that tradition, leveraging the convenience and buttery goodness of crescent roll dough.
What makes these bites so irresistible? It’s the perfect marriage of textures: the soft, yielding dough against the savory, meaty filling. The taste is pure comfort food – a miniature cheeseburger experience without the bun. Plus, they’re incredibly easy to make, requiring minimal ingredients and effort. Whether you’re hosting a game day party, need a quick weeknight dinner solution, or simply craving a fun and satisfying snack, these Crescent Roll Cheeseburger Bites are guaranteed to be a crowd-pleaser. Get ready to experience cheeseburger bliss in every bite!

Ingredients:
- 1 pound ground beef
- 1 package (8 ounces) cream cheese, softened
- 1/2 cup shredded cheddar cheese
- 1/4 cup chopped onion
- 1 tablespoon Worcestershire sauce
- 1 teaspoon garlic powder
- 1/2 teaspoon salt
- 1/4 teaspoon black pepper
- 2 cans (8 ounces each) refrigerated crescent roll dough
- 1 tablespoon butter, melted
- 1 tablespoon sesame seeds
- Optional toppings: ketchup, mustard, pickles, lettuce, tomato
Preparing the Cheeseburger Filling
Okay, let’s get started with the heart of these little bites – the cheeseburger filling! This is where all the delicious flavors come together, so pay close attention.
- Brown the Ground Beef: In a large skillet over medium-high heat, crumble the ground beef. Cook, stirring occasionally, until the beef is browned and no longer pink. Drain off any excess grease. Nobody wants greasy bites!
- Add Aromatics: Reduce the heat to medium. Add the chopped onion to the skillet with the cooked ground beef. Cook, stirring occasionally, until the onion is softened and translucent, about 3-5 minutes. This step is crucial for building flavor. Don’t skip it!
- Incorporate the Flavor Boosters: Stir in the Worcestershire sauce, garlic powder, salt, and pepper. Mix well to ensure the spices are evenly distributed throughout the beef and onion mixture. The Worcestershire sauce adds a depth of flavor that really elevates these bites.
- Creamy Cheese Time: Remove the skillet from the heat. Add the softened cream cheese and shredded cheddar cheese to the beef mixture. Stir until the cheeses are completely melted and everything is smooth and creamy. Make sure the cream cheese is really softened; otherwise, it will be difficult to incorporate smoothly. I usually leave mine out on the counter for about an hour before starting.
- Taste and Adjust: Give the filling a taste and adjust the seasonings as needed. You might want to add a little more salt, pepper, or garlic powder to suit your personal preference. This is your chance to make it perfect!
- Cool Slightly: Let the filling cool slightly while you prepare the crescent roll dough. This will prevent the dough from becoming too soft and sticky when you fill it.
Assembling the Crescent Roll Bites
Now for the fun part – putting everything together! This is where the magic happens, and you’ll start to see those adorable little cheeseburger bites take shape.
- Preheat the Oven: Preheat your oven to 375°F (190°C). This ensures that the crescent rolls will bake evenly and become golden brown.
- Prepare the Crescent Roll Dough: Unroll both cans of crescent roll dough. Separate the dough into triangles. You should have 16 triangles in total.
- Fill the Triangles: Place a spoonful (about 1-2 tablespoons) of the cheeseburger filling onto the wide end of each crescent roll triangle. Don’t overfill them, or the filling will ooze out during baking.
- Roll ‘Em Up: Starting at the wide end, roll up each triangle towards the point. Pinch the edges to seal the filling inside. This is important to prevent the filling from leaking out.
- Arrange on Baking Sheet: Place the rolled-up crescent bites onto a baking sheet lined with parchment paper. This will prevent them from sticking and make cleanup a breeze.
Baking and Finishing Touches
Almost there! Now it’s time to bake these beauties to golden perfection and add a final touch of flavor and visual appeal.
- Brush with Butter: Brush the tops of the crescent roll bites with melted butter. This will give them a beautiful golden color and a rich, buttery flavor.
- Sprinkle with Sesame Seeds: Sprinkle the tops of the bites with sesame seeds. This adds a subtle nutty flavor and a nice visual contrast.
- Bake to Golden Brown: Bake in the preheated oven for 12-15 minutes, or until the crescent rolls are golden brown and the filling is heated through. Keep a close eye on them, as baking times may vary depending on your oven.
- Cool Slightly: Remove the baking sheet from the oven and let the crescent roll cheeseburger bites cool slightly on the baking sheet before serving. This will prevent you from burning your mouth!
Serving Suggestions
These crescent roll cheeseburger bites are delicious on their own, but they’re even better with your favorite toppings and dipping sauces. Here are a few ideas to get you started:
- Classic Toppings: Serve with ketchup, mustard, pickles, lettuce, and tomato for a classic cheeseburger experience.
- Dipping Sauces: Offer a variety of dipping sauces, such as ranch dressing, barbecue sauce, or a spicy mayo.
- Side Dishes: Pair them with a side of fries, onion rings, or a simple salad for a complete meal.
- Party Platter: Arrange the bites on a platter with various toppings and dipping sauces for a fun and interactive party snack.
Tips and Tricks for Perfect Cheeseburger Bites
Here are a few extra tips and tricks to ensure your crescent roll cheeseburger bites are a smashing success:
- Don’t Overfill: Resist the urge to overfill the crescent roll triangles. Too much filling will cause them to burst open during baking.
- Seal the Edges: Make sure to pinch the edges of the crescent rolls tightly to seal in the filling. This will prevent leaks and ensure a neat presentation.
- Use Softened Cream Cheese: Softened cream cheese is essential for a smooth and creamy filling. If you forget to take it out of the refrigerator in advance, you can microwave it for a few seconds to soften it.
- Customize the Filling: Feel free to customize the filling to your liking. Add diced bacon, mushrooms, or jalapenos for extra flavor.
- Make Ahead: You can prepare the filling ahead of time and store it in the refrigerator for up to 24 hours. Just make sure to bring it to room temperature before assembling the bites.
- Freezing Instructions: These bites can be frozen before baking. Assemble them as directed, then place them on a baking sheet and freeze until solid. Transfer the frozen bites to a freezer bag and store for up to 2 months. When ready to bake, bake from frozen, adding a few extra minutes to the baking time.
Variations on the Recipe
Want to mix things up a bit? Here are a few variations on the classic crescent roll cheeseburger bite recipe:
- Pizza Bites: Substitute the cheeseburger filling with pizza sauce, mozzarella cheese, and your favorite pizza toppings.
- Buffalo Chicken Bites: Use shredded cooked chicken, buffalo wing sauce, and cream cheese for a spicy and flavorful twist.
- Spinach and Artichoke Bites: Fill the crescent rolls with a mixture of spinach, artichoke hearts, cream cheese, and Parmesan cheese for a vegetarian option.
- Breakfast Bites: Use scrambled eggs, sausage, and cheddar cheese for a delicious breakfast treat.
Troubleshooting Common Issues
Sometimes things don’t go exactly as planned. Here are a few common issues you might encounter and how to fix them:
- Filling is Too Runny: If your filling is too runny, try adding a tablespoon of breadcrumbs or cornstarch to thicken it up.
- Crescent Rolls are Burning: If the crescent rolls are browning too quickly, tent them with aluminum foil during the last few minutes of baking.
- Filling is Leaking Out: Make sure you are sealing the edges of the crescent rolls tightly. If the filling is still leaking, try using less filling in each bite.
- Bites are Sticking to the Baking Sheet: Always use parchment paper or a silicone baking mat to prevent the bites from sticking.
I hope you enjoy making these crescent roll cheeseburger bites as much as I do! They’re a guaranteed crowd-pleaser and perfect for any occasion.
Conclusion:
This isn’t just another appetizer; it’s a guaranteed crowd-pleaser that’s ridiculously easy to make. The combination of flaky crescent rolls, savory ground beef, and melted cheese is simply irresistible. Seriously, these Crescent Roll Cheeseburger Bites are the perfect solution for game day, potlucks, or even a fun weeknight dinner. They’re quick, satisfying, and always a hit! But why is this recipe a must-try? First, the simplicity is unmatched. You’re talking about minimal prep time and readily available ingredients. No fancy techniques or hard-to-find spices are required. Second, the flavor profile is universally appealing. Who doesn’t love a good cheeseburger? And third, the bite-sized format makes them incredibly convenient and shareable. No forks or knives needed! Now, let’s talk about serving suggestions and variations. While these bites are delicious on their own, a few dipping sauces can elevate them to the next level. Ketchup and mustard are classic choices, of course, but don’t be afraid to get creative! Try a tangy barbecue sauce, a creamy ranch dressing, or even a spicy sriracha mayo. For a little extra zing, consider adding a sprinkle of everything bagel seasoning before baking. Want to take these bites to the next level? Consider these variations: * Pizza Bites: Swap the ground beef for pepperoni and add a sprinkle of Italian seasoning. Use marinara sauce for dipping. * Buffalo Chicken Bites: Use shredded cooked chicken tossed in buffalo wing sauce and top with a sprinkle of blue cheese crumbles. Serve with ranch or blue cheese dressing. * Jalapeño Popper Bites: Mix cream cheese, shredded cheddar cheese, and diced jalapeños with the ground beef for a spicy kick. * Breakfast Bites: Use cooked sausage or bacon instead of ground beef and add a scrambled egg mixture. The possibilities are truly endless! Feel free to experiment with different fillings and toppings to create your own signature Crescent Roll Cheeseburger Bites. You can even make a batch with a variety of fillings to cater to different tastes. I’m confident that you’ll love this recipe as much as I do. It’s a surefire way to impress your friends and family without spending hours in the kitchen. The flaky crust, the juicy filling, and the melty cheese create a symphony of flavors and textures that will leave everyone wanting more. So, what are you waiting for? Grab a can of crescent rolls, some ground beef, and your favorite cheese, and get ready to bake up a batch of these irresistible bites. I promise you won’t regret it! And most importantly, I want to hear about your experience! Did you try the original recipe, or did you experiment with different variations? What dipping sauces did you use? What did your friends and family think? Share your photos and stories in the comments below. I can’t wait to see what you create! Happy baking, and enjoy your delicious Crescent Roll Cheeseburger Bites! Print
Crescent Roll Cheeseburger Bites: Easy Recipe & Baking Tips
- Total Time: 35 minutes
- Yield: 16 bites 1x
Description
Easy, delicious crescent roll cheeseburger bites filled with a creamy, cheesy beef mixture and baked to golden perfection. Perfect for parties, game day, or a fun family dinner.
Ingredients
- 1 pound ground beef
- 1 package (8 ounces) cream cheese, softened
- 1/2 cup shredded cheddar cheese
- 1/4 cup chopped onion
- 1 tablespoon Worcestershire sauce
- 1 teaspoon garlic powder
- 1/2 teaspoon salt
- 1/4 teaspoon black pepper
- 2 cans (8 ounces each) refrigerated crescent roll dough
- 1 tablespoon butter, melted
- 1 tablespoon sesame seeds
- Optional toppings: ketchup, mustard, pickles, lettuce, tomato
Instructions
- In a large skillet over medium-high heat, brown the ground beef, crumbling it as it cooks. Drain off any excess grease.
- Reduce heat to medium. Add chopped onion to the skillet and cook until softened, about 3-5 minutes.
- Stir in Worcestershire sauce, garlic powder, salt, and pepper. Mix well.
- Remove from heat. Add softened cream cheese and shredded cheddar cheese. Stir until cheeses are melted and smooth.
- Taste and adjust seasonings as needed. Let the filling cool slightly.
- Preheat oven to 375°F (190°C).
- Unroll crescent roll dough and separate into 16 triangles.
- Place a spoonful (1-2 tablespoons) of cheeseburger filling onto the wide end of each triangle.
- Roll up each triangle from the wide end to the point. Pinch edges to seal.
- Arrange on a baking sheet lined with parchment paper.
- Brush the tops of the crescent roll bites with melted butter.
- Sprinkle with sesame seeds.
- Bake for 12-15 minutes, or until golden brown and filling is heated through.
- Cool slightly before serving.
- Serve with your favorite toppings like ketchup, mustard, pickles, lettuce, and tomato. Great with dipping sauces like ranch or BBQ sauce.
Notes
- Don’t overfill the crescent rolls to prevent bursting.
- Ensure cream cheese is softened for a smooth filling.
- Customize the filling with bacon, mushrooms, or jalapenos.
- Filling can be made ahead and stored in the refrigerator for up to 24 hours.
- These bites can be frozen before baking. Assemble, freeze until solid, then transfer to a freezer bag. Bake from frozen, adding a few extra minutes to the baking time.
- If filling is too runny, add a tablespoon of breadcrumbs or cornstarch.
- If crescent rolls are browning too quickly, tent with aluminum foil.
- Always use parchment paper to prevent sticking.
- Prep Time: 20 minutes
- Cook Time: 15 minutes
Leave a Comment