

Cottage cheese ice cream might sound a little unconventional, but trust me, this creamy, dreamy dessert is about to become your new obsession! Forget everything you think you know about ice cream – this recipe is a game-changer, offering a surprisingly delicious and healthy alternative to traditional versions.
While the exact origins of using cottage cheese in frozen desserts are a bit hazy, resourceful cooks have long been experimenting with ways to boost protein and reduce sugar in their favorite treats. Think of it as a modern twist on classic dairy-based desserts, adapted for today’s health-conscious palates. It’s a testament to the ingenuity of home cooks who are always looking for ways to enjoy the foods they love, without compromising on nutrition.
So, why is everyone raving about cottage cheese ice cream? Well, for starters, it boasts a remarkably smooth and velvety texture that rivals even the richest ice creams. The subtle tang of the cottage cheese adds a unique depth of flavor that perfectly complements both sweet and savory additions. But the real magic lies in its versatility. You can customize it with your favorite fruits, chocolate chips, nuts, or even a swirl of peanut butter. Plus, it’s incredibly easy to make, requiring minimal ingredients and effort. Get ready to indulge in a guilt-free treat that’s packed with protein and bursting with flavor!

Ingredients:
- 16 ounces full-fat cottage cheese
- 1/2 cup heavy cream
- 1/4 cup milk (whole milk recommended for richness)
- 1/2 cup granulated sugar (or sweetener of choice, adjust to taste)
- 1 teaspoon vanilla extract
- Pinch of salt
- Optional: 1/4 cup fruit puree (berries, mango, etc.) for flavor
- Optional: Chocolate chips, chopped nuts, or other mix-ins
Preparing the Cottage Cheese Base:
Okay, let’s get started! The key to creamy cottage cheese ice cream is to get rid of that grainy texture. Don’t worry, it’s easier than you think!
- Drain the Cottage Cheese: Place the cottage cheese in a fine-mesh sieve lined with cheesecloth or a clean kitchen towel. Let it drain for at least 30 minutes, or even better, an hour. This removes excess liquid and helps create a smoother base. Gently press down on the cottage cheese with a spoon to encourage more liquid to drain. The drier the cottage cheese, the creamier your final product will be.
- Blend the Cottage Cheese: This is where the magic happens! Transfer the drained cottage cheese to a food processor or high-powered blender. Blend until completely smooth and creamy. This might take a few minutes, so be patient. Scrape down the sides of the bowl as needed to ensure everything is evenly processed. You’re looking for a texture that resembles ricotta cheese or even a thick yogurt. If you’re using a regular blender, you might need to add a tablespoon or two of milk to help it blend smoothly.
Creating the Ice Cream Mixture:
Now that we have our smooth cottage cheese base, we can add the other ingredients to create the perfect ice cream mixture.
- Combine Ingredients: In a medium bowl, whisk together the heavy cream, milk, sugar, vanilla extract, and salt. Make sure the sugar is completely dissolved. You can warm the milk slightly in the microwave (just for a few seconds) to help the sugar dissolve faster, but be careful not to overheat it.
- Incorporate the Cottage Cheese: Pour the cream mixture into the blended cottage cheese. Gently fold the ingredients together until everything is well combined. Avoid overmixing, as this can introduce air and affect the final texture.
- Add Flavor (Optional): If you’re using fruit puree, now’s the time to add it. Gently fold it into the mixture until evenly distributed. Be careful not to overmix, as this can cause the ice cream to become too soft. You can also add a few drops of food coloring if you want to enhance the color of your ice cream.
- Chill the Mixture: Cover the bowl with plastic wrap, pressing it directly onto the surface of the ice cream mixture to prevent a skin from forming. Refrigerate for at least 4 hours, or preferably overnight. This allows the flavors to meld together and the mixture to chill thoroughly, which is essential for proper freezing.
Churning the Ice Cream:
This is the fun part! Get your ice cream maker ready, because we’re about to turn this mixture into delicious ice cream.
- Prepare the Ice Cream Maker: Follow the manufacturer’s instructions for your ice cream maker. If you have a freezer bowl ice cream maker, make sure the bowl has been frozen for at least 24 hours. If you have an ice and salt ice cream maker, prepare the ice and salt mixture according to the instructions.
- Churn the Ice Cream: Pour the chilled ice cream mixture into the prepared ice cream maker. Churn according to the manufacturer’s instructions. This usually takes about 20-30 minutes, but it can vary depending on your ice cream maker and the ambient temperature. The ice cream is ready when it has a soft-serve consistency.
- Add Mix-Ins (Optional): During the last few minutes of churning, add any mix-ins you desire, such as chocolate chips, chopped nuts, or sprinkles. This will ensure that they are evenly distributed throughout the ice cream.
Freezing and Serving:
Almost there! Now we just need to harden the ice cream for a bit before we can enjoy it.
- Transfer to a Container: Transfer the soft-serve ice cream to an airtight container. A freezer-safe container with a tight-fitting lid is ideal. You can also use a loaf pan lined with plastic wrap.
- Freeze to Harden: Place the container in the freezer and freeze for at least 2-3 hours, or until the ice cream is firm enough to scoop. This will allow the ice cream to harden to a more scoopable consistency.
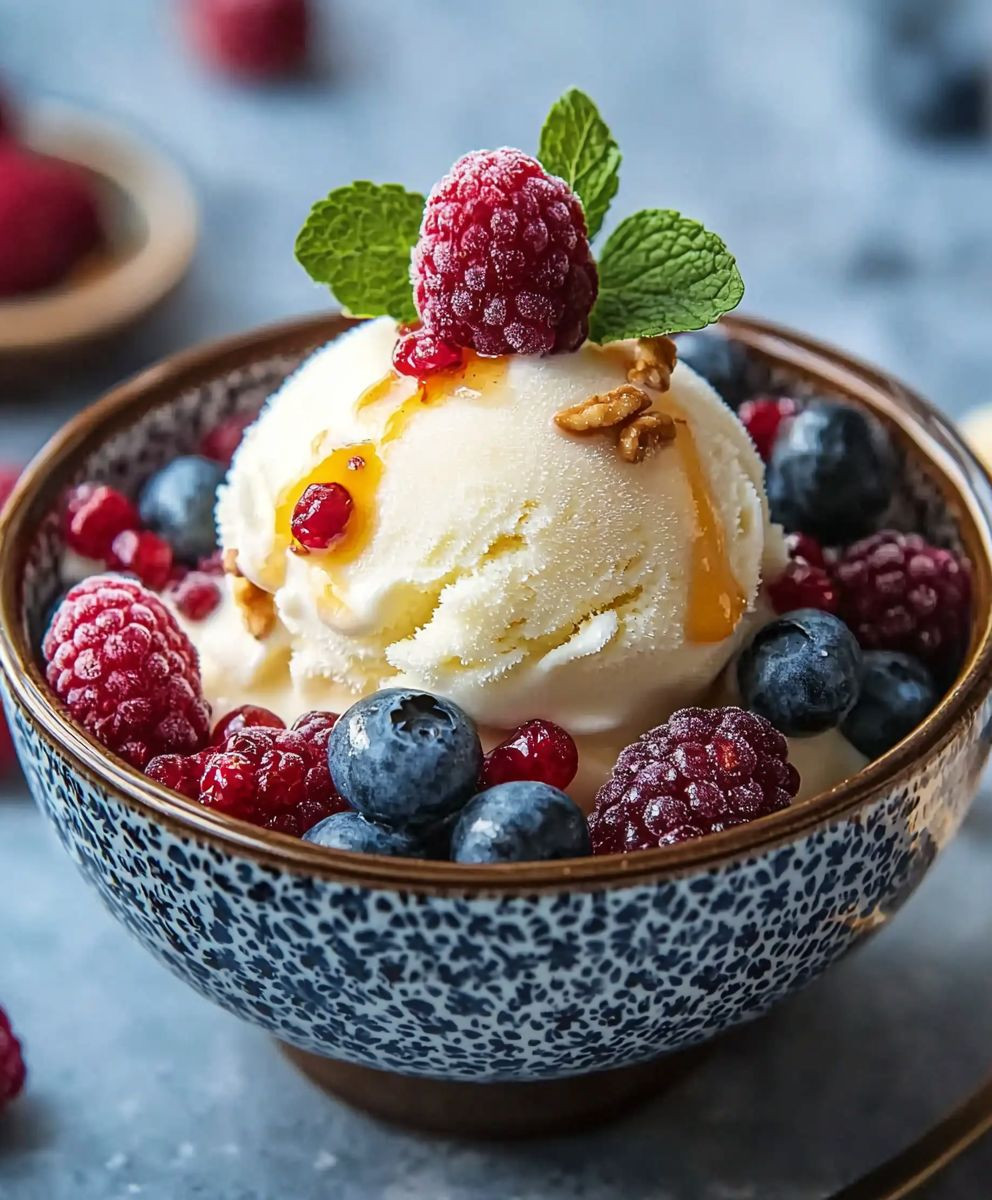
- Serving: Before serving, let the ice cream sit at room temperature for a few minutes to soften slightly. This will make it easier to scoop. Serve in bowls or cones and enjoy! You can top it with your favorite toppings, such as whipped cream, chocolate sauce, or fresh fruit.
Tips for Success:
- Use Full-Fat Cottage Cheese: This is crucial for achieving a creamy texture. Low-fat or non-fat cottage cheese will result in a less creamy and more icy ice cream.
- Don’t Skip the Draining Step: Draining the cottage cheese is essential for removing excess liquid and preventing the ice cream from becoming icy.
- Chill the Mixture Thoroughly: Chilling the ice cream mixture for at least 4 hours, or preferably overnight, allows the flavors to meld together and ensures that the mixture is cold enough for proper freezing.
- Adjust Sweetness to Taste: The amount of sugar can be adjusted to your preference. If you prefer a less sweet ice cream, reduce the amount of sugar. You can also use a sugar substitute, such as stevia or erythritol.
- Experiment with Flavors: Feel free to experiment with different flavors and mix-ins. You can add different fruit purees, extracts, spices, or even savory ingredients like herbs or cheese.
- Store Properly: Store the ice cream in an airtight container in the freezer for up to 2 weeks. After that, the texture may start to deteriorate.
Troubleshooting:
- Icy Ice Cream: If your ice cream is icy, it could be due to several factors. Make sure you’re using full-fat cottage cheese, draining the cottage cheese properly, and chilling the mixture thoroughly. You can also try adding a tablespoon or two of vodka or other alcohol to the mixture, as alcohol helps prevent ice crystals from forming.
- Grainy Texture: If your ice cream has a grainy texture, it could be because the cottage cheese wasn’t blended enough. Make sure you blend the cottage cheese until it’s completely smooth and creamy. You can also try using a higher-powered blender or food processor.
- Soft Ice Cream: If your ice cream is too soft, it could be because it wasn’t frozen long enough. Make sure you freeze the ice cream for at least 2-3 hours, or until it’s firm enough to scoop. You can also try lowering the temperature of your freezer.
Enjoy your homemade cottage cheese ice cream! It’s a delicious and healthy treat that you can feel good about eating.
Conclusion:
So there you have it! This cottage cheese ice cream recipe is truly a game-changer. It’s not just about sneaking in extra protein (though that’s a definite bonus!), it’s about creating a dessert that’s surprisingly delicious, incredibly easy to make, and far healthier than your average store-bought ice cream. I know, I know, cottage cheese in ice cream sounds a little… unconventional. But trust me on this one. The blending process transforms the cottage cheese into a luxuriously smooth and creamy base that you won’t believe is packed with so much goodness. Why is this a must-try? Because it’s the perfect solution for those moments when you’re craving something sweet but don’t want to derail your healthy eating habits. It’s also fantastic for anyone looking for a high-protein snack or dessert option. Plus, it’s so simple that even the most novice cook can whip it up in minutes. Seriously, if you can operate a blender or food processor, you can make this ice cream. But the best part? The possibilities are endless! I love serving mine with a sprinkle of fresh berries and a drizzle of honey for a simple and satisfying treat. But don’t let me limit your creativity!Serving Suggestions and Variations:
* Chocolate Lover’s Dream: Add a tablespoon or two of cocoa powder and a handful of chocolate chips to the blender for a rich and decadent chocolate cottage cheese ice cream. * Berry Bliss: Blend in your favorite berries – strawberries, blueberries, raspberries – for a fruity and refreshing twist. A swirl of berry compote on top adds an extra layer of flavor. * Tropical Paradise: Add chunks of pineapple, mango, and a splash of coconut milk for a taste of the tropics. Toasted coconut flakes make a beautiful and flavorful garnish. * Coffee Craze: Add a shot of espresso or a teaspoon of instant coffee to the blender for a coffee-flavored ice cream that’s perfect for an afternoon pick-me-up. * Nutty Delight: Add a tablespoon of your favorite nut butter (peanut, almond, cashew) for a creamy and nutty flavor. Top with chopped nuts for added crunch. * Spice It Up: A pinch of cinnamon, nutmeg, or cardamom can add a warm and comforting flavor to your cottage cheese ice cream. Don’t be afraid to experiment with different flavors and toppings to create your own signature version. The beauty of this recipe is its versatility. You can easily adapt it to suit your taste preferences and dietary needs. Use different sweeteners, add different fruits, nuts, or spices – the only limit is your imagination! I’m so excited for you to try this recipe and discover just how delicious and versatile cottage cheese ice cream can be. I truly believe it will become a staple in your kitchen, just like it has in mine. So, go ahead, grab your blender or food processor, and get ready to experience a guilt-free and incredibly satisfying dessert. And please, don’t be shy! I’d love to hear about your experience. Share your creations, your variations, and your thoughts in the comments below. Let me know what flavor combinations you come up with and how much you enjoyed this healthy and delicious treat. Happy blending! I can’t wait to see what you create! Print
Cottage Cheese Ice Cream: The Healthy & Delicious Dessert You Need
- Total Time: 280 minutes
- Yield: 4 servings 1x
Description
Creamy homemade ice cream made with cottage cheese! A surprisingly healthy, protein-packed treat that’s easy to customize with your favorite flavors and mix-ins.
Ingredients
- 16 ounces full-fat cottage cheese
- 1/2 cup heavy cream
- 1/4 cup milk (whole milk recommended for richness)
- 1/2 cup granulated sugar (or sweetener of choice, adjust to taste)
- 1 teaspoon vanilla extract
- Pinch of salt
- Optional: 1/4 cup fruit puree (berries, mango, etc.) for flavor
- Optional: Chocolate chips, chopped nuts, or other mix-ins
Instructions
- Place the cottage cheese in a fine-mesh sieve lined with cheesecloth or a clean kitchen towel. Let it drain for at least 30 minutes, or even better, an hour. Gently press down on the cottage cheese with a spoon to encourage more liquid to drain.
- Transfer the drained cottage cheese to a food processor or high-powered blender. Blend until completely smooth and creamy. Scrape down the sides of the bowl as needed.
- In a medium bowl, whisk together the heavy cream, milk, sugar, vanilla extract, and salt until the sugar is dissolved.
- Pour the cream mixture into the blended cottage cheese. Gently fold the ingredients together until well combined.
- If using fruit puree, gently fold it into the mixture until evenly distributed.
- Cover the bowl with plastic wrap, pressing it directly onto the surface. Refrigerate for at least 4 hours, or preferably overnight.
- Follow the manufacturer’s instructions for your ice cream maker.
- Pour the chilled ice cream mixture into the prepared ice cream maker. Churn according to the manufacturer’s instructions until it reaches a soft-serve consistency (usually 20-30 minutes).
- During the last few minutes of churning, add any mix-ins you desire.
- Transfer the soft-serve ice cream to an airtight container.
- Place the container in the freezer and freeze for at least 2-3 hours, or until the ice cream is firm enough to scoop.
- Before serving, let the ice cream sit at room temperature for a few minutes to soften slightly. Serve in bowls or cones and enjoy!
Notes
- Use full-fat cottage cheese for the creamiest texture.
- Don’t skip the draining step to prevent icy ice cream.
- Chill the mixture thoroughly for the best flavor and texture.
- Adjust sweetness to taste.
- Experiment with different flavors and mix-ins.
- Store in an airtight container in the freezer for up to 2 weeks.
- If your ice cream is icy, ensure you’re using full-fat cottage cheese, draining it properly, and chilling the mixture thoroughly.
- If your ice cream has a grainy texture, blend the cottage cheese until completely smooth.
- If your ice cream is too soft, freeze it longer.
- Prep Time: 20 minutes
- Cook Time: 20 minutes

Leave a Comment