

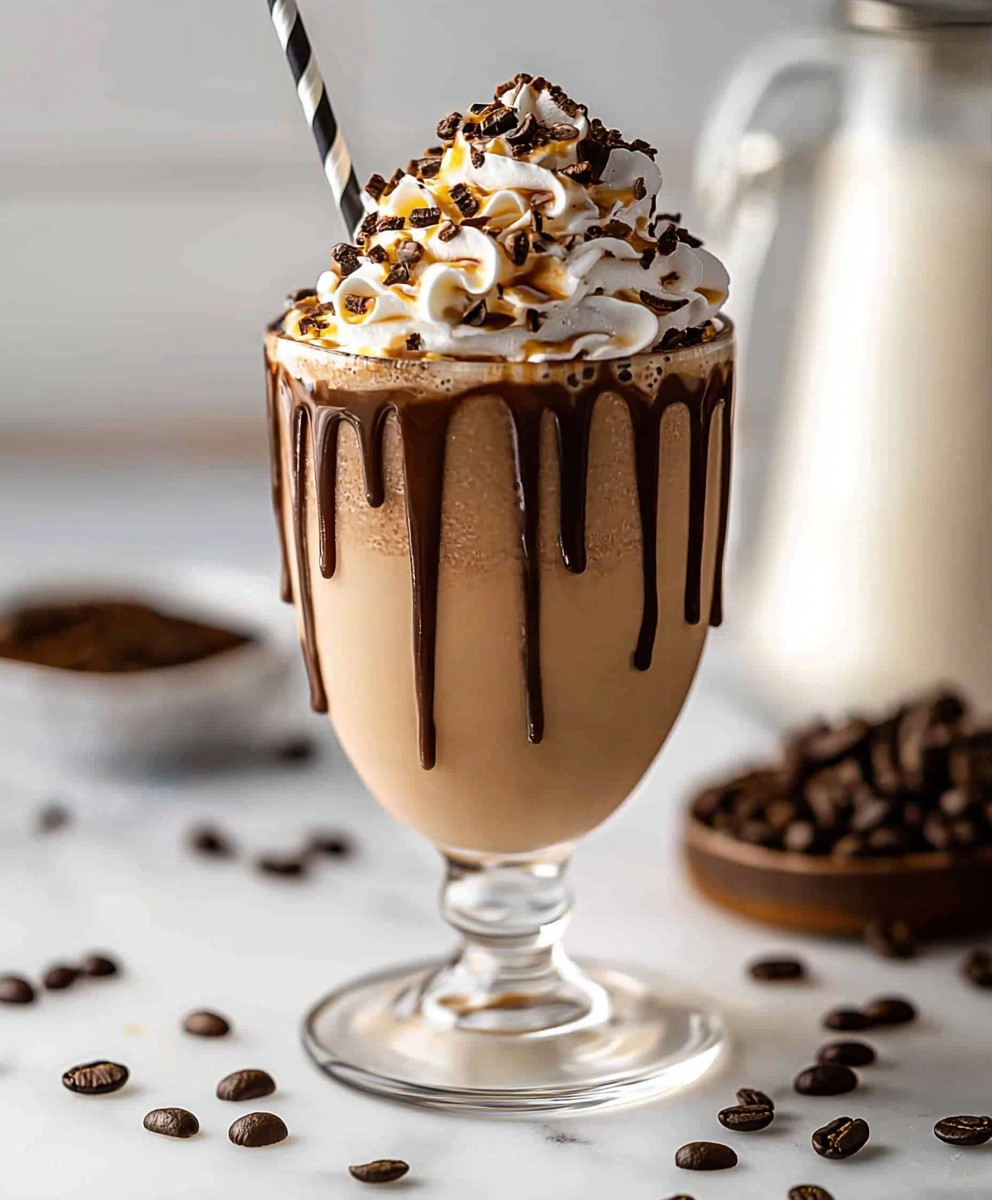
Coffee milkshake: the ultimate pick-me-up disguised as a dessert! Are you ready to experience a caffeine kick so delicious, it’ll make your taste buds sing? Forget your regular morning brew; we’re elevating your coffee game to a whole new level. This isn’t just a milkshake; it’s an experience, a symphony of creamy, coffee-infused goodness that will leave you craving more.
While the exact origins of the coffee milkshake are a bit hazy, its popularity exploded in the mid-20th century, riding the wave of diner culture and the increasing accessibility of electric blenders. It quickly became a beloved treat, offering a refreshing and energizing alternative to traditional milkshakes. Think of it as the rebellious cousin of the classic vanilla shake, adding a jolt of grown-up flavor to a childhood favorite.
People adore the coffee milkshake for its perfect balance of flavors and textures. The rich, bold taste of coffee blends seamlessly with the creamy sweetness of ice cream, creating a harmonious combination that’s both comforting and invigorating. It’s incredibly easy to make, requiring just a handful of ingredients and a few minutes of your time. Whether you need a quick afternoon boost or a decadent dessert to end your day, this coffee milkshake is the answer. So, grab your blender, and let’s get started on this delightful caffeinated adventure!

Ingredients:
- 1 cup strong brewed coffee, cooled
- 1 cup vanilla ice cream (high quality is best!)
- 1/2 cup milk (whole milk recommended for richness, but any kind works)
- 2 tablespoons chocolate syrup (or more, to taste!)
- 1 tablespoon granulated sugar (optional, depending on your coffee and syrup sweetness)
- 1/4 teaspoon vanilla extract (enhances the vanilla flavor)
- Pinch of salt (balances the sweetness)
- Whipped cream, for topping (optional, but highly encouraged!)
- Chocolate shavings or cocoa powder, for garnish (optional)
- Ice cubes (about 1/2 cup, adjust to desired thickness)
Preparing the Coffee Base:
The key to a great coffee milkshake is starting with a good coffee base. You don’t want to use hot coffee, as it will melt the ice cream too quickly and result in a watery milkshake. Here’s how I prepare mine:
- Brew Strong Coffee: Brew your coffee a little stronger than you normally would. This will ensure that the coffee flavor really shines through in the milkshake. I usually use a French press or a pour-over method for a richer flavor, but any brewing method will work.
- Cool the Coffee: This is crucial! Let the coffee cool completely. You can speed up the process by pouring it into a shallow dish or placing it in the refrigerator for about 30 minutes. You can even brew the coffee ahead of time and store it in the fridge until you’re ready to make your milkshake.
- Consider Coffee Concentrate: If you’re really short on time, you can use coffee concentrate or cold brew concentrate. Just adjust the amount of milk you use accordingly, as these concentrates are much stronger than regular brewed coffee.
Blending the Milkshake:
Now comes the fun part – blending everything together! I find that the order in which you add the ingredients can make a difference in the final texture of the milkshake. Here’s my preferred method:
- Add the Ice Cream: Start by adding the vanilla ice cream to your blender. This will provide the base for your milkshake and help to create a smooth and creamy texture.
- Pour in the Coffee: Next, pour in the cooled coffee. Make sure it’s completely cooled to prevent the ice cream from melting too quickly.
- Add the Milk: Add the milk to the blender. The amount of milk you use will determine the thickness of your milkshake. If you prefer a thicker milkshake, use less milk. If you prefer a thinner milkshake, use more milk.
- Add the Chocolate Syrup: Drizzle in the chocolate syrup. You can adjust the amount of chocolate syrup to your liking. If you’re a chocolate lover, feel free to add more!
- Add Sugar (Optional): Taste the mixture and add sugar if needed. The amount of sugar you need will depend on the sweetness of your coffee and chocolate syrup.
- Add Vanilla Extract and Salt: Add the vanilla extract and a pinch of salt. These ingredients may seem small, but they can make a big difference in the overall flavor of the milkshake. The vanilla extract enhances the vanilla flavor of the ice cream, and the salt balances the sweetness.
- Add Ice Cubes: Add the ice cubes. Start with about 1/2 cup and add more if you want a thicker milkshake. Be careful not to add too much ice, as it can make the milkshake watery.
- Blend Until Smooth: Place the lid on the blender and blend until everything is smooth and creamy. This usually takes about 30-60 seconds, depending on the power of your blender.
- Check the Consistency: Stop the blender and check the consistency of the milkshake. If it’s too thick, add a little more milk. If it’s too thin, add a few more ice cubes or a scoop of ice cream.
- Blend Again: Blend again until you reach your desired consistency.
Serving and Garnishing:
The final step is to pour your delicious coffee milkshake into a glass and garnish it to your liking. This is where you can really get creative and make it your own!
- Pour into a Glass: Pour the milkshake into a tall glass. I like to use a chilled glass for an extra refreshing treat.
- Add Whipped Cream (Optional): Top with a generous dollop of whipped cream. This adds a touch of indulgence and makes the milkshake even more decadent.
- Garnish with Chocolate Shavings or Cocoa Powder (Optional): Sprinkle with chocolate shavings or cocoa powder for a beautiful and flavorful garnish. You can also use chocolate sprinkles, coffee beans, or even a drizzle of chocolate syrup.
- Serve Immediately: Serve your coffee milkshake immediately and enjoy! It’s best enjoyed fresh, before the ice cream melts too much.
Tips and Variations:
This coffee milkshake recipe is just a starting point. Feel free to experiment with different ingredients and variations to create your own signature milkshake. Here are a few ideas to get you started:
- Mocha Milkshake: Add a tablespoon of cocoa powder to the blender for a richer, chocolatey flavor.
- Caramel Coffee Milkshake: Add a tablespoon of caramel syrup to the blender for a sweet and salty treat.
- Peppermint Coffee Milkshake: Add a few drops of peppermint extract to the blender for a festive and refreshing milkshake.
- Irish Coffee Milkshake: Add a shot of Irish whiskey to the blender for an adult-friendly milkshake. (Please drink responsibly!)
- Vegan Coffee Milkshake: Use plant-based ice cream and milk to make a vegan version of this milkshake. There are many delicious vegan ice cream options available these days.
- Add a Shot of Espresso: For an extra strong coffee flavor, add a shot of espresso to the blender.
- Use Different Flavors of Ice Cream: Experiment with different flavors of ice cream, such as coffee ice cream, chocolate ice cream, or even cookies and cream ice cream.
- Add a Cookie: Blend in a chocolate chip cookie or an Oreo cookie for a fun and flavorful twist.
- Make it a Coffee Float: Pour the coffee milkshake over a scoop of ice cream in a glass for a coffee float.
- Use Flavored Syrups: Experiment with different flavored syrups, such as hazelnut, vanilla, or almond.
Troubleshooting:
Sometimes, things don’t go exactly as planned. Here are a few common problems you might encounter when making a coffee milkshake and how to fix them:
- Milkshake is too thick: Add a little more milk until you reach your desired consistency.
- Milkshake is too thin: Add a few more ice cubes or a scoop of ice cream.
- Milkshake is not sweet enough: Add a little more sugar or chocolate syrup.
- Milkshake is too sweet: Add a pinch of salt or a squeeze of lemon juice.
- Milkshake is not coffee-flavored enough: Use stronger coffee or add a shot of espresso.
- Milkshake is icy: Make sure your coffee is completely cooled before blending. Also, avoid adding too much ice.
- Milkshake is not smooth: Blend for a longer period of time until everything is completely smooth.
Equipment You’ll Need:
Making a coffee milkshake is pretty straightforward, but having the right equipment can make the process even easier. Here’s what I recommend:
- Blender: A good quality blender is essential for making a smooth and creamy milkshake. I prefer a high-powered blender, but any blender will work.
- Measuring Cups and Spoons: Accurate measurements are important for getting the right balance of flavors.
- Tall Glass: You’ll need a tall glass to serve your milkshake in. A chilled glass is even better!
- Spoon or Straw: For enjoying your delicious coffee milkshake!
Storage:
Coffee milkshakes are best enjoyed immediately. However, if you have any leftovers, you can store them in the freezer for a short period of time. Keep in mind that the texture may change slightly when frozen and thawed.
- Freezing: Pour the leftover milkshake into an airtight container and freeze for up to 2 hours.
- Thawing: Let the milkshake thaw slightly before serving. You may need to blend it again to restore its smooth texture.
I hope you enjoy this coffee milkshake recipe as much as I
Conclusion:
This isn’t just another milkshake recipe; it’s a ticket to coffee-infused bliss! I truly believe this coffee milkshake is a must-try for anyone who loves a creamy, caffeinated treat. The rich coffee flavor, perfectly balanced with the sweetness of the ice cream and a hint of chocolate (if you choose!), creates a symphony of flavors that will dance on your taste buds. It’s the perfect pick-me-up on a hot day, a delightful dessert after a satisfying meal, or even a decadent breakfast indulgence (we won’t judge!). But what truly sets this recipe apart is its versatility. Feel free to experiment and make it your own! For a more intense coffee flavor, try using cold brew concentrate instead of brewed coffee. If you’re feeling adventurous, add a splash of your favorite coffee liqueur for an extra kick. And for the chocolate lovers out there, a swirl of chocolate syrup or a sprinkle of chocolate shavings will elevate this milkshake to a whole new level of deliciousness.Serving Suggestions and Variations:
* Classic Coffee Milkshake: Follow the recipe as is for a timeless and satisfying treat. * Mocha Madness: Add 1-2 tablespoons of chocolate syrup or cocoa powder for a rich, chocolatey twist. * Caramel Coffee Dream: Drizzle caramel sauce inside the glass before pouring in the milkshake and top with whipped cream and caramel drizzle. * Peanut Butter Coffee Bliss: Blend in a tablespoon of peanut butter for a nutty and creamy delight. * Vegan Coffee Milkshake: Use your favorite non-dairy ice cream and milk alternative for a delicious and guilt-free treat. * Affogato-Inspired Milkshake: Top your milkshake with a shot of hot espresso for an extra boost of coffee flavor and a delightful contrast in temperature. * Spiced Coffee Milkshake: Add a pinch of cinnamon, nutmeg, or cardamom for a warm and cozy flavor. * Add a Garnish: Top with whipped cream, chocolate shavings, coffee beans, or a sprinkle of cocoa powder for an extra touch of elegance. I’ve poured my heart into perfecting this recipe, and I’m confident that you’ll love it as much as I do. It’s quick, easy, and requires minimal ingredients, making it the perfect treat for any occasion. Whether you’re a seasoned milkshake connoisseur or a curious beginner, this recipe is guaranteed to impress. So, what are you waiting for? Gather your ingredients, dust off your blender, and get ready to experience the ultimate coffee milkshake sensation! I’m so excited for you to try it and discover your own favorite variations. And most importantly, don’t forget to share your creations! I’d love to see your photos and hear about your experiences in the comments below. Let me know what variations you tried, what you loved, and what you would change. Your feedback is invaluable and helps me continue to create and share delicious recipes with all of you. Happy blending! I can’t wait to hear all about your coffee milkshake adventures! Print
Coffee Milkshake: The Ultimate Guide to Making the Perfect One
- Total Time: Creamy, cheesy baked tortellini with spinach and ricotta filling, topped with a crispy breadcrumb crust. Perfect for a comforting weeknight meal.
- Yield: 1 serving
Description
Cool down with this creamy and delicious coffee milkshake! Made with strong brewed coffee, vanilla ice cream, and a touch of chocolate, it’s the perfect pick-me-up.
Ingredients
Creamy, cheesy baked tortellini with a rich tomato sauce, spinach, and a golden, bubbly topping. Perfect for a comforting weeknight meal.
Instructions
This recipe features juicy chicken thighs marinated in a flavorful blend of soy sauce, honey, garlic, and ginger, then baked to perfection. Serve over rice or noodles for a quick and delicious meal.
Notes
Fluffy, golden-brown pancakes with a hint of cinnamon, perfect for a weekend breakfast treat.
- Prep Time: Fluffy, buttery brioche dough filled with rich chocolate hazelnut spread and topped with a crunchy streusel. Perfect for breakfast, brunch, or dessert.
- Cook Time: This recipe features juicy chicken thighs marinated in a flavorful blend of soy sauce, honey, garlic, and ginger, then baked to golden perfection. Serve over rice or noodles for a quick and delicious weeknight meal.

Leave a Comment