

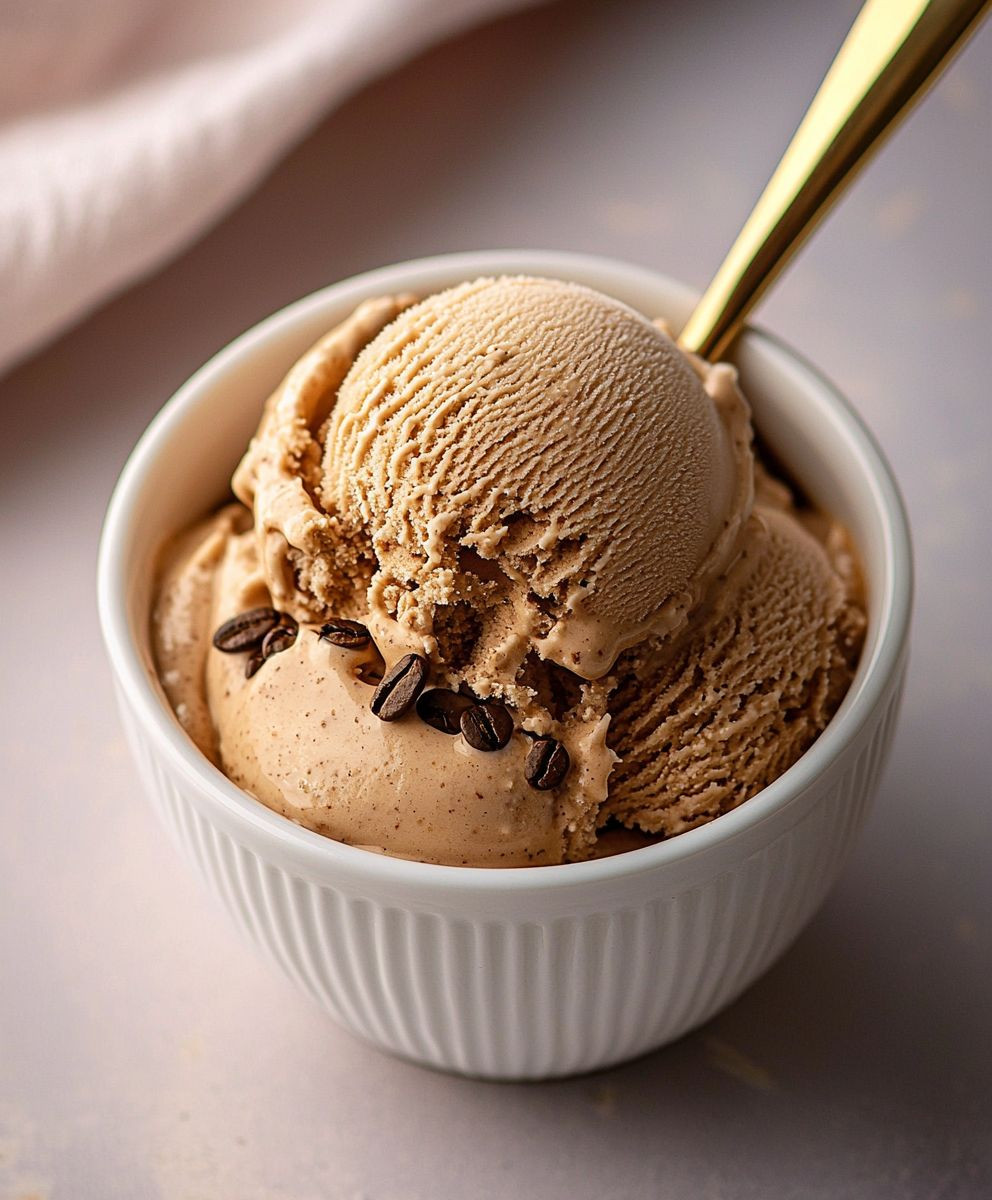
Coffee Ice Cream: the ultimate pick-me-up disguised as dessert! Imagine the rich, bold flavor of your favorite morning brew, transformed into a creamy, dreamy indulgence that melts in your mouth. Are you ready to ditch the afternoon slump and treat yourself to something truly special? This recipe is your ticket to homemade bliss.
While the exact origins of coffee ice cream are a bit hazy, the combination of coffee and frozen desserts has a long and fascinating history. Coffee houses in Europe, dating back to the 17th century, often served chilled coffee beverages, paving the way for the eventual marriage of coffee and ice cream. Today, coffee ice cream is a global phenomenon, enjoyed in countless variations and flavors.
What makes this frozen treat so irresistible? It’s the perfect balance of bitter and sweet, the invigorating caffeine kick, and the smooth, velvety texture that makes every spoonful a delight. Plus, it’s incredibly versatile! Enjoy it straight from the bowl, use it to create decadent milkshakes, or pair it with your favorite cookies for an unforgettable ice cream sandwich. Whether you’re a coffee aficionado or simply looking for a unique and satisfying dessert, this recipe is guaranteed to become a new favorite.

Ingredients:
- 2 cups heavy cream
- 1 cup whole milk
- ¾ cup granulated sugar
- ¼ teaspoon salt
- 1 vanilla bean, split lengthwise and seeds scraped (or 1 teaspoon vanilla extract)
- ½ cup freshly ground coffee beans (medium-dark roast recommended)
- Optional: ¼ cup coffee liqueur (such as Kahlua)
- Optional: Chocolate shavings or espresso beans for garnish
Infusing the Cream with Coffee
Okay, let’s get started! The first and arguably most important step is infusing our cream with that glorious coffee flavor. This is where the magic happens, so pay close attention!
- Combine Cream, Milk, Sugar, and Salt: In a medium saucepan, whisk together the heavy cream, whole milk, granulated sugar, and salt. Make sure the sugar is mostly dissolved before moving on to the next step. This ensures a smooth and creamy final product.
- Add Vanilla: If you’re using a vanilla bean, scrape the seeds into the cream mixture and also add the pod itself. If you’re using vanilla extract, hold off on adding it until after the cream has cooled. The heat can diminish the flavor of the extract.
- Infuse with Coffee: Stir in the freshly ground coffee beans. Don’t skimp on the quality of the beans here! The better the coffee, the better the ice cream. I personally prefer a medium-dark roast for a robust coffee flavor, but feel free to experiment with your favorite.
- Heat the Mixture: Place the saucepan over medium heat. We’re not looking to boil the mixture, just to gently heat it. Stir constantly to prevent scorching and to help the coffee infuse properly. Heat until the mixture is steaming and small bubbles begin to form around the edges (about 5-7 minutes).
- Steep the Coffee: Remove the saucepan from the heat, cover it, and let the coffee steep for at least 1 hour, or even better, 2 hours. The longer it steeps, the stronger the coffee flavor will be. I often let it steep for 2 hours for a really intense coffee kick. This is crucial for extracting all that delicious coffee essence.
- Strain the Mixture: After steeping, strain the mixture through a fine-mesh sieve lined with cheesecloth (if you have it) into a clean bowl. This will remove all the coffee grounds and any bits of vanilla bean pod. Press down on the coffee grounds with a spoon to extract as much liquid as possible. We want every last drop of that coffee-infused goodness!
- Discard Solids: Discard the coffee grounds and vanilla bean pod (if used).
Chilling and Preparing for Churning
Now that we have our coffee-infused cream, it’s time to chill it down. This is a vital step for achieving a smooth and creamy ice cream texture. Warm cream won’t freeze properly in the ice cream maker.
- Add Vanilla Extract (if using): If you used vanilla extract instead of a vanilla bean, now is the time to stir it in.
- Add Coffee Liqueur (optional): If you’re feeling a little adventurous, stir in the coffee liqueur. This will add an extra layer of coffee flavor and a touch of boozy warmth. It also helps to keep the ice cream a little softer.
- Chill Thoroughly: Cover the bowl with plastic wrap, pressing it directly onto the surface of the cream mixture to prevent a skin from forming. Refrigerate for at least 4 hours, or preferably overnight. The colder the mixture, the better the ice cream will churn. I usually make this part the day before I plan to churn the ice cream.
Churning the Ice Cream
Alright, the moment we’ve been waiting for! Time to churn that chilled coffee cream into glorious ice cream. Make sure your ice cream maker bowl is properly frozen according to the manufacturer’s instructions. This is usually at least 24 hours in the freezer.
- Prepare the Ice Cream Maker: Remove the ice cream maker bowl from the freezer and assemble the machine according to the manufacturer’s instructions.
- Pour in the Mixture: Pour the chilled coffee cream mixture into the ice cream maker bowl.
- Churn: Turn on the ice cream maker and churn according to the manufacturer’s instructions. This usually takes about 20-25 minutes, or until the ice cream has reached a soft-serve consistency. Keep an eye on it – you want it thick and creamy, but not rock solid.
Freezing and Final Touches
We’re almost there! Now we need to harden the ice cream in the freezer to achieve that perfect scoopable texture.
- Transfer to a Container: Transfer the soft-serve ice cream to an airtight container. I like to use a freezer-safe container with a tight-fitting lid.
- Harden in the Freezer: Press a piece of plastic wrap directly onto the surface of the ice cream to prevent ice crystals from forming. Seal the container tightly and freeze for at least 2-3 hours, or preferably overnight, to allow the ice cream to harden completely.
- Serve and Enjoy: Once the ice cream is firm, scoop it into bowls or cones. Garnish with chocolate shavings or espresso beans, if desired. And most importantly, enjoy your homemade coffee ice cream!
Tips for the Best Coffee Ice Cream:
- Use High-Quality Coffee Beans: The flavor of your ice cream will only be as good as the coffee you use. Opt for freshly roasted, high-quality beans for the best results.
- Don’t Over-Churn: Over-churning can result in a grainy texture. Churn until the ice cream reaches a soft-serve consistency, then transfer it to the freezer to harden.
- Chill Thoroughly: Make sure the cream mixture is thoroughly chilled before churning. This will help the ice cream freeze properly and prevent ice crystals from forming.
- Experiment with Flavors: Feel free to add other flavors to your coffee ice cream. Chocolate chips, chopped nuts, or a swirl of caramel sauce would all be delicious additions.
- Adjust Sweetness to Taste: If you prefer a less sweet ice cream, reduce the amount of sugar slightly.
Troubleshooting:
- Ice Cream is Too Icy: This is usually caused by not chilling the cream mixture thoroughly enough or by over-churning. Make sure to chill the mixture for at least 4 hours, and don’t churn for too long.
- Ice Cream is Too Hard: This can be caused by freezing the ice cream for too long or by using too much sugar. If the ice cream is too hard to scoop, let it sit at room temperature for a few minutes before serving.
- Ice Cream is Grainy: This can be caused by over-churning or by using low-quality ingredients. Make sure to use high-quality ingredients and don’t churn for too long.
Conclusion:
And there you have it! This Coffee Ice Cream recipe is truly a must-try for any coffee lover, and honestly, even those who aren’t die-hard coffee fans might just find themselves converted. The rich, intense coffee flavor, combined with the creamy, smooth texture, creates a dessert experience that’s simply unforgettable. It’s the perfect pick-me-up on a hot day, a delightful after-dinner treat, or even a decadent breakfast (we won’t judge!). What makes this recipe so special? It’s the perfect balance of simplicity and sophistication. You don’t need any fancy equipment or hard-to-find ingredients to create something truly extraordinary. The process is straightforward, and the results are consistently delicious. Plus, the homemade aspect adds a touch of love and care that you just can’t get from store-bought ice cream. You know exactly what’s going into your dessert, and you can customize it to your exact preferences. Speaking of customization, the possibilities are endless! For a richer, more decadent experience, try adding a swirl of chocolate sauce or a handful of chocolate-covered espresso beans. If you’re feeling adventurous, a splash of coffee liqueur can really amplify the coffee flavor. For a lighter, more refreshing option, consider serving it with fresh berries or a dollop of whipped cream. And if you’re looking for a vegan alternative, simply substitute the dairy milk and cream with coconut milk and coconut cream – the results are surprisingly delicious! Here are a few serving suggestions to get you started:Serving Suggestions:
- Classic Scoop: Enjoy a simple scoop (or two!) in a bowl or cone.
- Affogato: Pour a shot of hot espresso over a scoop of the ice cream for a truly indulgent treat.
- Ice Cream Sandwich: Sandwich a scoop between two chocolate chip cookies or brownies.
- Milkshake: Blend the ice cream with milk and a touch of coffee extract for a creamy, caffeinated milkshake.
- Parfait: Layer the ice cream with granola, berries, and whipped cream for a beautiful and delicious parfait.

Coffee Ice Cream: The Ultimate Guide to Making It at Home
- Total Time: 447 minutes
- Yield: 1 quart 1x
Description
Rich, creamy homemade coffee ice cream with intense flavor from freshly ground coffee beans.
Ingredients
- 2 cups heavy cream
- 1 cup whole milk
- ¾ cup granulated sugar
- ¼ teaspoon salt
- 1 vanilla bean, split lengthwise and seeds scraped (or 1 teaspoon vanilla extract)
- ½ cup freshly ground coffee beans (medium-dark roast recommended)
- Optional: ¼ cup coffee liqueur (such as Kahlua)
- Optional: Chocolate shavings or espresso beans for garnish
Instructions
- Combine Cream, Milk, Sugar, and Salt: In a medium saucepan, whisk together the heavy cream, whole milk, granulated sugar, and salt. Ensure the sugar is mostly dissolved.
- Add Vanilla: If using a vanilla bean, scrape the seeds into the cream mixture and add the pod. If using vanilla extract, hold off until after the cream has cooled.
- Infuse with Coffee: Stir in the freshly ground coffee beans.
- Heat the Mixture: Place the saucepan over medium heat. Stir constantly until the mixture is steaming and small bubbles form around the edges (about 5-7 minutes).
- Steep the Coffee: Remove from heat, cover, and let steep for at least 1 hour, or up to 2 hours for a stronger flavor.
- Strain the Mixture: Strain through a fine-mesh sieve lined with cheesecloth into a clean bowl. Press down on the coffee grounds to extract as much liquid as possible.
- Discard Solids: Discard the coffee grounds and vanilla bean pod (if used).
- Add Vanilla Extract (if using): Stir in vanilla extract now.
- Add Coffee Liqueur (optional): Stir in coffee liqueur, if desired.
- Chill Thoroughly: Cover the bowl with plastic wrap, pressing it onto the surface. Refrigerate for at least 4 hours, or preferably overnight.
- Prepare the Ice Cream Maker: Remove the ice cream maker bowl from the freezer and assemble the machine according to the manufacturer’s instructions.
- Pour in the Mixture: Pour the chilled coffee cream mixture into the ice cream maker bowl.
- Churn: Turn on the ice cream maker and churn according to the manufacturer’s instructions (usually 20-25 minutes), until it reaches a soft-serve consistency.
- Transfer to a Container: Transfer the soft-serve ice cream to an airtight container.
- Harden in the Freezer: Press a piece of plastic wrap directly onto the surface of the ice cream. Seal the container and freeze for at least 2-3 hours, or preferably overnight, to harden completely.
- Serve and Enjoy: Scoop into bowls or cones. Garnish with chocolate shavings or espresso beans, if desired.
Notes
- Use high-quality, freshly roasted coffee beans for the best flavor. A medium-dark roast is recommended.
- The longer the coffee steeps, the stronger the coffee flavor will be.
- Chilling the cream mixture thoroughly is essential for a smooth and creamy texture.
- Don’t over-churn the ice cream, as this can result in a grainy texture.
- Experiment with adding other flavors like chocolate chips, chopped nuts, or caramel sauce.
- Adjust sweetness to taste by reducing the amount of sugar slightly.
- If the ice cream is too icy, ensure the cream mixture is thoroughly chilled and avoid over-churning.
- If the ice cream is too hard, let it sit at room temperature for a few minutes before serving.
- If the ice cream is grainy, use high-quality ingredients and avoid over-churning.
- Prep Time: 20 minutes
- Cook Time: 7 minutes


Leave a Comment