

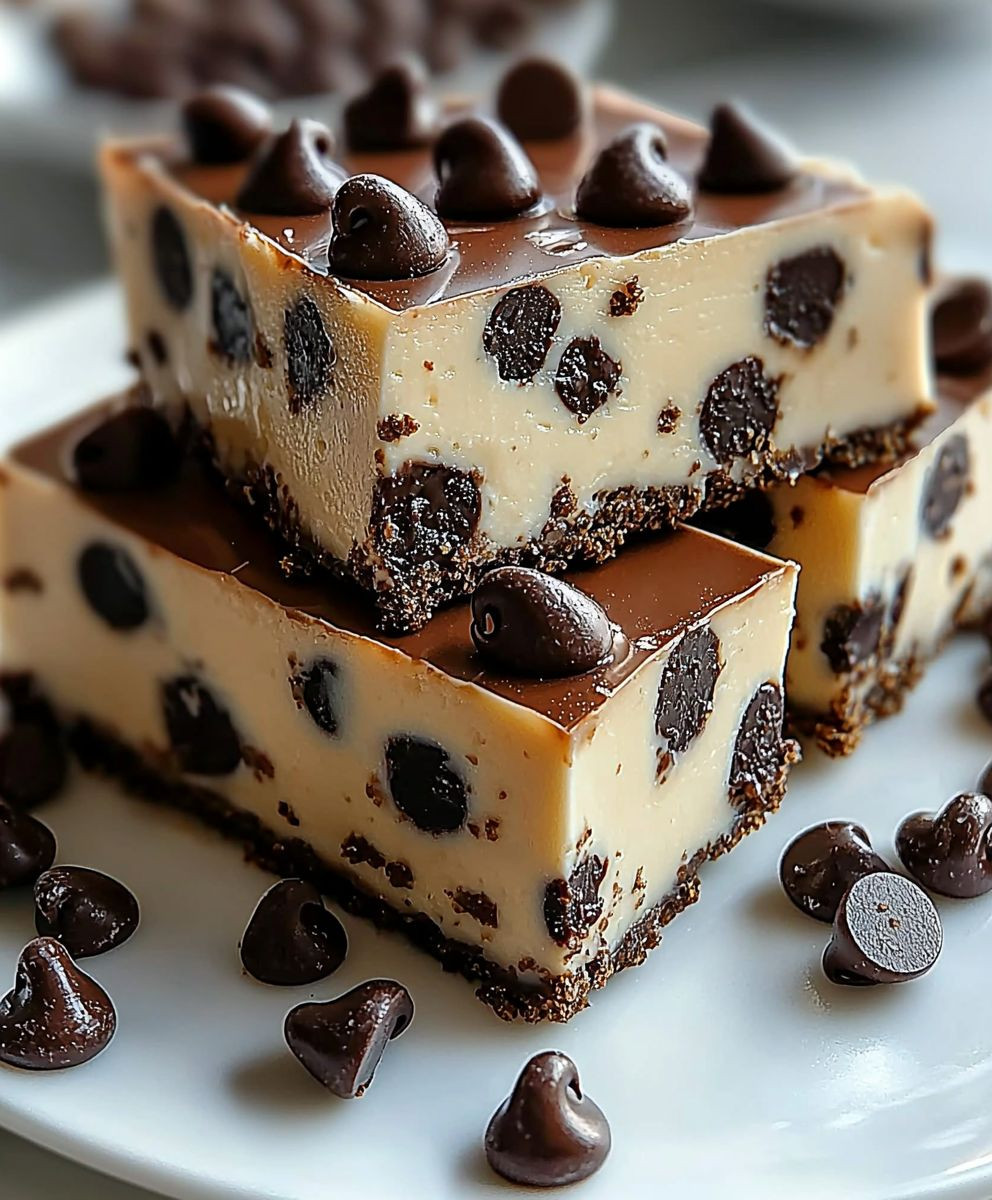
Chocolate Chip Cheesecake Bars: Prepare to meet your new favorite dessert! Imagine the creamy, tangy delight of a classic cheesecake swirled together with the comforting, familiar goodness of chocolate chip cookies. These aren’t just bars; they’re a decadent dream come true, and I’m so excited to share this recipe with you.
While the exact origins of cheesecake are debated, its roots can be traced back to ancient Greece. Over centuries, it evolved, finding its way into various cultures and cuisines. The addition of chocolate chips, however, is a more modern and distinctly American twist, blending two beloved treats into one irresistible package. It’s a testament to our love of innovation and, let’s be honest, our insatiable sweet tooth!
What makes these Chocolate Chip Cheesecake Bars so incredibly popular? It’s the perfect marriage of textures and flavors. The smooth, rich cheesecake filling contrasts beautifully with the slightly chewy, chocolate-studded base. They’re also incredibly convenient – easier to make and serve than a full-sized cheesecake, yet just as impressive. Whether you’re looking for a crowd-pleasing dessert for a party, a special treat for your family, or simply a little something to brighten your day, these bars are guaranteed to hit the spot. Get ready to experience a symphony of sweetness and satisfaction in every single bite!

Ingredients:
- For the Crust:
- 1 ½ cups graham cracker crumbs
- 5 tablespoons unsalted butter, melted
- ¼ cup granulated sugar
- ¼ teaspoon salt
- For the Cheesecake Filling:
- 24 ounces cream cheese, softened to room temperature
- ¾ cup granulated sugar
- 2 large eggs, room temperature
- 2 large egg yolks, room temperature
- 1 teaspoon vanilla extract
- ½ cup sour cream, room temperature
- 1 cup semi-sweet chocolate chips
- For the Chocolate Ganache Topping (Optional):
- 4 ounces semi-sweet chocolate, finely chopped
- ⅓ cup heavy cream
Preparing the Graham Cracker Crust:
- Preheat your oven to 350°F (175°C). This is crucial for ensuring the crust bakes evenly and doesn’t burn.
- In a medium bowl, combine the graham cracker crumbs, melted butter, granulated sugar, and salt. Mix well until all the crumbs are moistened and the mixture resembles wet sand. I like to use a fork to ensure everything is evenly distributed.
- Press the graham cracker mixture firmly into the bottom of a 9×13 inch baking pan. I find that using the bottom of a measuring cup helps to create a smooth and even crust. Make sure to press it firmly so it holds together well.
- Bake the crust for 8-10 minutes, or until lightly golden brown. Keep a close eye on it to prevent burning. Once baked, remove from the oven and let it cool completely while you prepare the cheesecake filling. This cooling period is important because it allows the crust to firm up and prevent it from becoming soggy when the filling is added.
Making the Cheesecake Filling:
- In a large bowl, beat the softened cream cheese with an electric mixer until smooth and creamy. This is probably the most important step to ensure a lump-free cheesecake. Make sure your cream cheese is truly at room temperature; otherwise, you’ll end up with stubborn lumps. I usually let mine sit out for at least an hour, sometimes longer depending on the temperature of my kitchen.
- Gradually add the granulated sugar and continue to beat until well combined and the mixture is light and fluffy. Don’t overbeat at this stage, as it can incorporate too much air into the batter, which can cause the cheesecake to crack during baking.
- Add the eggs one at a time, beating well after each addition. Then, add the egg yolks and beat until just combined. Again, avoid overmixing. Using room temperature eggs is key here, as they emulsify better and contribute to a smoother texture.
- Stir in the vanilla extract and sour cream. Mix until just combined. The sour cream adds a lovely tang and richness to the cheesecake.
- Gently fold in the chocolate chips. Be careful not to overmix, as this can cause the chocolate chips to melt and streak the batter.
Baking the Cheesecake Bars:
- Pour the cheesecake filling over the cooled graham cracker crust, spreading it evenly. I like to use an offset spatula to ensure a smooth and even surface.
- Bake in the preheated oven for 30-35 minutes, or until the edges are set and the center is just slightly jiggly. The cheesecake should be mostly set but still have a slight wobble in the very center. This is a sign that it will finish setting up perfectly as it cools.
- Turn off the oven and crack the oven door slightly. Let the cheesecake bars cool in the oven for 1 hour. This gradual cooling process helps to prevent cracking.
- Remove the cheesecake bars from the oven and let them cool completely at room temperature.
- Cover the baking pan with plastic wrap and refrigerate for at least 4 hours, or preferably overnight, before cutting and serving. This chilling time is essential for the cheesecake to fully set and develop its flavor.
Preparing the Chocolate Ganache (Optional):
While the cheesecake bars are chilling, you can prepare the chocolate ganache, if desired. This adds an extra layer of decadence and makes the bars even more irresistible.
- Place the finely chopped chocolate in a heatproof bowl.
- In a small saucepan, heat the heavy cream over medium heat until it just begins to simmer. Do not boil.
- Pour the hot cream over the chocolate and let it sit for 1 minute to allow the chocolate to melt.
- Gently whisk the mixture until smooth and glossy.
- Let the ganache cool slightly before pouring it over the chilled cheesecake bars.
Assembling and Serving:
- Once the cheesecake bars are thoroughly chilled, remove them from the refrigerator.
- If you made the chocolate ganache, pour it evenly over the top of the cheesecake bars. You can spread it with an offset spatula for a smooth finish.
- Return the cheesecake bars to the refrigerator for another 30 minutes to allow the ganache to set.
- Using a sharp knife, cut the cheesecake bars into squares or rectangles. For clean cuts, I recommend wiping the knife clean with a warm, damp cloth between each cut.
- Serve the cheesecake bars cold and enjoy! They can be stored in an airtight container in the refrigerator for up to 5 days.
Tips for Success:
- Room Temperature Ingredients: Using room temperature ingredients, especially the cream cheese, eggs, and sour cream, is crucial for a smooth and creamy cheesecake filling.
- Don’t Overmix: Overmixing the cheesecake batter can incorporate too much air, which can cause the cheesecake to crack during baking. Mix until just combined.
- Baking Time: Keep a close eye on the cheesecake while it’s baking. The baking time may vary depending on your oven. The cheesecake is done when the edges are set and the center is just slightly jiggly.
- Cooling Process: The gradual cooling process, both in the oven and at room temperature, is essential for preventing cracks.
- Chilling Time: Don’t skip the chilling time! This allows the cheesecake to fully set and develop its flavor.
- Variations: Feel free to experiment with different flavors and toppings. You can add different types of chocolate chips, nuts, or fruit to the filling. You can also top the cheesecake with a fruit compote, caramel sauce, or whipped cream.
Troubleshooting:
- Cracked Cheesecake: If your cheesecake cracks, don’t worry! It will still taste delicious. To prevent cracking, make sure to use room temperature ingredients, avoid overmixing, and follow the cooling instructions carefully. You can also try baking the cheesecake in a water bath.
- Lumpy Filling: If your cheesecake filling is lumpy, it’s likely because your cream cheese wasn’t soft enough. Make sure to let your cream cheese come to room temperature before using it. You can also try beating the cream cheese with an electric mixer until it’s smooth and creamy before adding the other ingredients.
- Soggy Crust: To prevent a soggy crust, make sure to press the graham cracker mixture firmly into the bottom of the baking pan. You can also pre-bake the crust for a few minutes before adding the filling.
Conclusion:
These Chocolate Chip Cheesecake Bars are truly irresistible, and I wholeheartedly believe you need to experience their creamy, chocolate-studded goodness firsthand. They’re the perfect marriage of two beloved desserts, offering the comforting familiarity of chocolate chip cookies with the rich, tangy indulgence of cheesecake. What’s not to love? But beyond just being delicious, these bars are surprisingly easy to make. The simple graham cracker crust comes together in minutes, and the cheesecake filling requires minimal effort – just a few ingredients and a little mixing. Forget spending hours slaving away in the kitchen; these bars are a quick and rewarding treat that’s perfect for any occasion, from a casual weeknight dessert to a potluck gathering. They’re also incredibly versatile. Think of these bars as a blank canvas for your culinary creativity! While the classic chocolate chip combination is a winner, don’t be afraid to experiment. Consider adding a swirl of caramel sauce to the cheesecake filling for an extra layer of sweetness, or perhaps a sprinkle of chopped pecans or walnuts for a delightful crunch. For a more decadent twist, try using different types of chocolate chips – dark chocolate, white chocolate, or even a combination of all three! Serving suggestions are endless. These bars are fantastic on their own, but they’re even better when paired with a scoop of vanilla ice cream or a dollop of whipped cream. A drizzle of chocolate syrup or a dusting of cocoa powder adds a touch of elegance, making them perfect for a more formal dessert presentation. You could even cut them into smaller squares and serve them as bite-sized treats at a party. For a seasonal variation, consider adding pumpkin puree and a blend of warm spices like cinnamon, nutmeg, and ginger to the cheesecake filling during the fall months. This creates a delightful pumpkin spice cheesecake bar that’s perfect for Thanksgiving or any autumn gathering. In the summer, you could incorporate fresh berries like strawberries, blueberries, or raspberries into the filling or as a topping for a burst of fruity flavor. These Chocolate Chip Cheesecake Bars are also a fantastic make-ahead dessert. They can be stored in the refrigerator for up to three days, making them perfect for busy weeknights or when you need to prepare for a party in advance. Just be sure to keep them covered to prevent them from drying out. You can even freeze them for longer storage – simply wrap them tightly in plastic wrap and then place them in a freezer-safe bag or container. When you’re ready to enjoy them, thaw them in the refrigerator overnight. I truly believe that this recipe will become a new favorite in your household. It’s a crowd-pleaser that’s sure to impress your family and friends. So, what are you waiting for? Gather your ingredients, preheat your oven, and get ready to bake up a batch of these irresistible Chocolate Chip Cheesecake Bars. I’m so excited for you to try this recipe! Once you do, please come back and share your experience in the comments below. Let me know what variations you tried, what your family thought, and any tips or tricks you discovered along the way. I can’t wait to hear all about your baking adventures! Happy baking! Print
Chocolate Chip Cheesecake Bars: The Ultimate Dessert Recipe
- Total Time: This recipe features juicy chicken thighs marinated in a flavorful blend of soy sauce, honey, garlic, and ginger, then baked to golden perfection. Serve over rice or noodles for a quick and delicious weeknight meal.
- Yield: Loading…
Description
Loading…
Ingredients
Creamy, cheesy chicken enchiladas with a flavorful homemade sauce. Perfect for a comforting weeknight meal.
Instructions
Creamy, cheesy baked tortellini with a rich tomato sauce, spinach, and a crispy breadcrumb topping. Perfect for a comforting weeknight meal.
Notes
Creamy, cheesy, and flavorful seven-layer dip perfect for parties or game day. Features refried beans, guacamole, sour cream, salsa, cheese, olives, and green onions.
- Prep Time: Fluffy, buttery brioche dough filled with rich chocolate hazelnut spread and topped with a crunchy streusel. Perfect for breakfast, brunch, or dessert.
- Cook Time: Creamy, cheesy baked pasta with a crispy breadcrumb topping. Perfect for a comforting weeknight meal.
Leave a Comment