

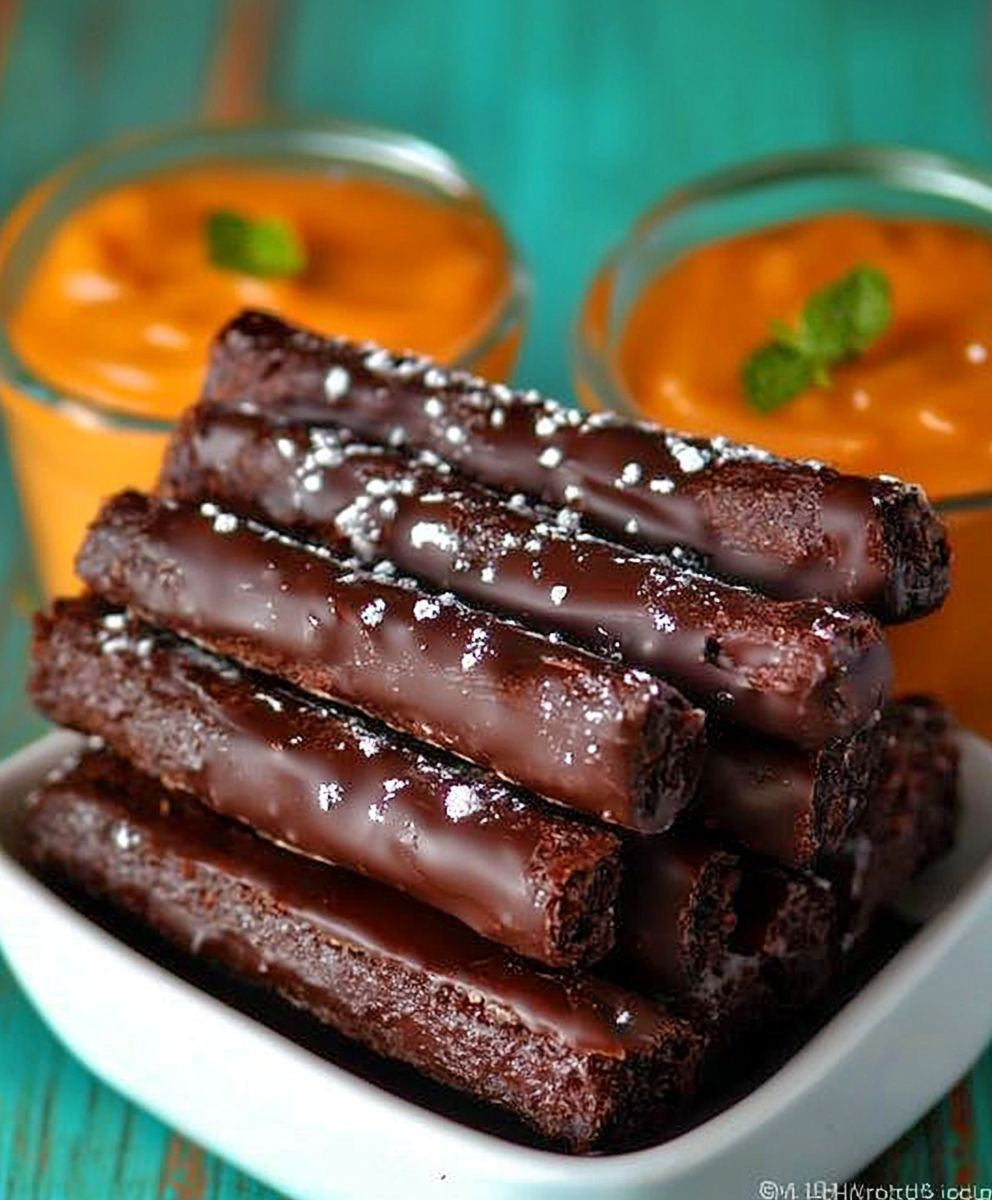
Chocolate brownie truffle fries: Prepare to have your dessert world turned upside down! Imagine the fudgy, decadent goodness of a chocolate brownie, transformed into playful, irresistible “fries” and then elevated with a luxurious truffle-infused ganache. Yes, you read that right. This isn’t your average sweet treat; it’s an experience.
While the exact origins of chocolate brownie truffle fries are shrouded in delicious mystery (perhaps a late-night craving gone wonderfully right?), the concept draws inspiration from the classic brownie, a beloved American dessert staple since the late 19th century. Brownies have always been about satisfying that intense chocolate craving with a dense, chewy texture. But we’re taking it to the next level!
People adore this dish because it’s the perfect blend of playful presentation and sophisticated flavor. The “fry” shape makes it fun and shareable, while the rich chocolate and truffle combination is undeniably indulgent. The contrast of the slightly crisp exterior with the soft, fudgy interior is simply divine. Plus, these are surprisingly easy to make, making them perfect for a special occasion or just a delightful weekend treat. Get ready to impress your friends and family with this unique and unforgettable dessert!

Ingredients:
- For the Brownie Base:
- 1 cup (2 sticks) unsalted butter, melted
- 2 cups granulated sugar
- 1 cup unsweetened cocoa powder
- 1/2 teaspoon salt
- 1 teaspoon vanilla extract
- 4 large eggs
- 1 cup all-purpose flour
- 1 cup semi-sweet chocolate chips
- For the Truffle Coating:
- 8 ounces cream cheese, softened
- 1/2 cup (1 stick) unsalted butter, softened
- 3 cups powdered sugar
- 1/4 cup unsweetened cocoa powder
- 1 teaspoon vanilla extract
- Pinch of salt
- For the “Fries” Shape and Decoration:
- 1 cup dark chocolate, melted (for dipping)
- 1/2 cup white chocolate, melted (for drizzling)
- Sprinkles (optional, for garnish)
- Sea salt flakes (optional, for garnish)
Making the Brownie Base
- Preheat and Prep: First things first, preheat your oven to 350°F (175°C). Grease and flour a 9×13 inch baking pan. This will prevent the brownies from sticking and make them easy to remove later. I like to use parchment paper lining as well for extra insurance!
- Melt the Butter: In a large bowl, melt the butter completely. You can do this in the microwave in 30-second intervals, stirring in between, or in a saucepan over low heat. Be careful not to burn it!
- Combine Wet Ingredients: Add the granulated sugar, cocoa powder, and salt to the melted butter. Whisk everything together until it’s well combined and there are no lumps of cocoa powder. This step is crucial for a smooth brownie texture.
- Add Vanilla and Eggs: Stir in the vanilla extract. Then, add the eggs one at a time, mixing well after each addition. Make sure each egg is fully incorporated before adding the next. This helps create a rich and fudgy texture.
- Incorporate the Flour: Gradually add the all-purpose flour to the wet ingredients. Mix until just combined. Be careful not to overmix, as this can lead to tough brownies. A few streaks of flour are okay at this point.
- Add Chocolate Chips: Fold in the semi-sweet chocolate chips. This adds extra chocolatey goodness and creates pockets of melted chocolate throughout the brownies.
- Bake: Pour the brownie batter into the prepared baking pan and spread it evenly. Bake for 25-30 minutes, or until a toothpick inserted into the center comes out with moist crumbs attached. Don’t overbake, or the brownies will be dry.
- Cool Completely: Let the brownies cool completely in the pan before cutting them. This is important because warm brownies are too soft to handle and shape into fries. I usually let them cool for at least an hour, or even longer if I have the time.
Making the Truffle Coating
- Soften the Butter and Cream Cheese: Make sure your cream cheese and butter are softened to room temperature. This is essential for a smooth and creamy truffle coating. If they’re not soft enough, you’ll end up with lumps in your frosting.
- Cream Together: In a large bowl, beat the softened cream cheese and butter together with an electric mixer until light and fluffy. This usually takes about 2-3 minutes.
- Add Powdered Sugar and Cocoa Powder: Gradually add the powdered sugar and cocoa powder to the cream cheese mixture, beating on low speed until combined. Be careful not to add all the powdered sugar at once, or you’ll end up with a cloud of sugar dust!
- Add Vanilla and Salt: Stir in the vanilla extract and a pinch of salt. Mix until everything is well combined and the frosting is smooth and creamy. If the frosting is too thick, you can add a tablespoon of milk or cream to thin it out.
Assembling the Brownie Truffle Fries
- Cut the Brownies: Once the brownies are completely cooled, cut them into “fry” shapes. I like to cut them into long, thin strips, about 1/2 inch wide and 3-4 inches long. You can use a sharp knife or a pizza cutter for this.
- Shape the Truffles: Take each brownie “fry” and roll it into a ball or oval shape. This will help the truffle coating adhere better and create a more uniform look. Don’t worry if they’re not perfect; they’ll still taste delicious!
- Coat the Truffles: Dip each brownie truffle into the truffle coating, making sure it’s completely covered. You can use a fork or your fingers for this. If you’re using your fingers, be prepared to get a little messy!
- Chill the Truffles: Place the coated truffles on a baking sheet lined with parchment paper and chill them in the refrigerator for at least 30 minutes. This will help the coating set and make them easier to handle.
Decorating the Brownie Truffle Fries
- Melt the Chocolate: Melt the dark chocolate and white chocolate separately in the microwave in 30-second intervals, stirring in between, or in a double boiler over low heat. Be careful not to burn the chocolate!
- Dip in Dark Chocolate: Dip the bottom half of each chilled truffle fry into the melted dark chocolate. This will create a “dipped” effect, like real fries.
- Drizzle with White Chocolate: Drizzle the melted white chocolate over the dark chocolate-dipped truffle fries. You can use a fork or a piping bag for this. Get creative with your drizzle patterns!
- Add Sprinkles and Sea Salt (Optional): While the chocolate is still wet, sprinkle the truffle fries with sprinkles or sea salt flakes. This adds extra flavor and visual appeal.
- Chill Again: Place the decorated truffle fries back on the baking sheet and chill them in the refrigerator for another 15-20 minutes, or until the chocolate is set.
- Serve and Enjoy: Serve the brownie truffle fries chilled and enjoy! These are perfect for parties, holidays, or any time you want a decadent and fun treat.
 Print
Print
Chocolate Brownie Truffle Fries: A Decadent Dessert Recipe
- Total Time: This vibrant and flavorful Mediterranean Quinoa Salad is packed with fresh vegetables, herbs, and a zesty lemon vinaigrette. It’s a healthy and delicious meal that’s perfect for lunch, dinner, or a potluck.
- Yield: 24-30 “fries”
Description
Decadent brownie “fries” dipped in a creamy truffle coating, then drizzled with chocolate and sprinkled for a fun and delicious treat!
Ingredients
This recipe features juicy chicken thighs marinated in a flavorful blend of soy sauce, honey, garlic, and ginger, then baked to perfection. Serve over rice or noodles for a quick and delicious meal.
Instructions
Creamy, cheesy chicken enchiladas with a flavorful homemade sauce. Perfect for a weeknight dinner or a crowd-pleasing meal.
Notes
Fluffy, golden-brown pancakes with a hint of sweetness, perfect for a weekend breakfast.
- Prep Time: Creamy, cheesy baked pasta with a crispy breadcrumb topping. Perfect for a comforting weeknight meal.
- Cook Time: This recipe features juicy chicken thighs marinated in a flavorful blend of soy sauce, honey, garlic, and ginger, then baked to golden perfection. Serve over rice or noodles for a quick and delicious weeknight meal.

Leave a Comment