

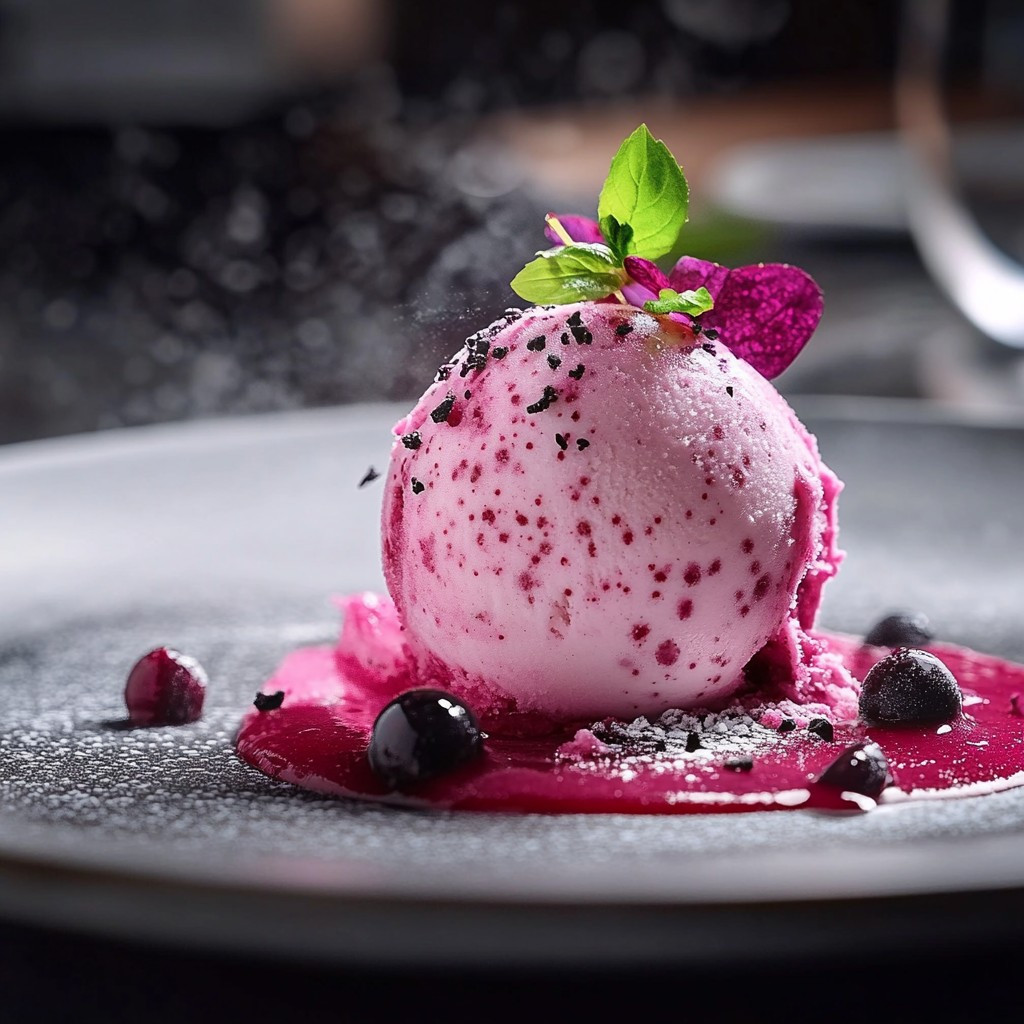
Cherry Ice Cream Homemade: Is there anything that screams summer quite like a scoop of perfectly chilled, vibrantly flavored cherry ice cream? I think not! Get ready to ditch the store-bought tubs because I’m about to share a recipe that will transform your summer, one spoonful at a time. This isn’t just any ice cream; it’s a creamy, dreamy, intensely cherry-flavored experience that you can easily create in your own kitchen.
While the exact origins of ice cream are debated, frozen desserts have been enjoyed for centuries. Cherries, with their bright, sweet-tart flavor, have long been a favorite addition to desserts around the world. Combining these two timeless treats feels like a natural evolution, resulting in a dessert that’s both comforting and exciting.
People adore cherry ice cream homemade for several reasons. First, the taste is simply irresistible. The combination of sweet creaminess and the burst of fresh cherry flavor is a match made in heaven. Second, homemade ice cream has a superior texture compared to many store-bought versions. It’s richer, smoother, and often has a more intense flavor. Finally, making your own ice cream is a fun and rewarding experience. There’s something incredibly satisfying about creating a delicious treat from scratch, knowing exactly what ingredients went into it. So, are you ready to embark on this delicious adventure? Let’s get churning!

Ingredients:
- For the Cherry Base:
- 2 cups fresh sweet cherries, pitted (Bing or Rainier work great!)
- 1/2 cup granulated sugar
- 1 tablespoon lemon juice
- 1/4 teaspoon almond extract (optional, but adds a lovely depth)
- For the Custard Base:
- 2 cups heavy cream
- 1 cup whole milk
- 3/4 cup granulated sugar
- 1/4 teaspoon salt
- 6 large egg yolks
- 1 teaspoon vanilla extract
- Optional Add-ins:
- 1/4 cup Kirsch (cherry liqueur) – adds a boozy kick!
- 1/2 cup chopped dark chocolate (for a cherry chocolate swirl)
- A few drops of red food coloring (if you want a more vibrant color, but I prefer natural!)
Preparing the Cherry Base:
- Combine Cherries, Sugar, and Lemon Juice: In a medium saucepan, combine the pitted cherries, 1/2 cup of granulated sugar, and lemon juice. The lemon juice helps to brighten the cherry flavor and prevent the mixture from becoming overly sweet.
- Cook the Cherry Mixture: Place the saucepan over medium heat. Bring the mixture to a simmer, stirring occasionally to prevent sticking. As the cherries heat up, they will release their juices.
- Simmer Until Softened: Continue to simmer the cherry mixture for about 10-15 minutes, or until the cherries are softened and have released a good amount of liquid. The mixture should thicken slightly.
- Puree the Cherry Mixture: Remove the saucepan from the heat and let the cherry mixture cool slightly for about 5-10 minutes. Then, carefully transfer the mixture to a blender or food processor. Puree until smooth. Be careful when blending hot liquids! You might want to vent the blender lid slightly to prevent pressure buildup.
- Strain the Cherry Puree (Optional): For a super smooth ice cream, you can strain the cherry puree through a fine-mesh sieve to remove any small bits of cherry skin. This step is optional, but it will result in a silkier texture. If you don’t mind a little texture, you can skip this step.
- Add Almond Extract (Optional): Stir in the almond extract (if using) into the cherry puree. The almond extract complements the cherry flavor beautifully.
- Chill the Cherry Base: Transfer the cherry puree to an airtight container and refrigerate for at least 2 hours, or preferably overnight. This allows the flavors to meld and the mixture to cool completely, which is important for the ice cream making process.
Preparing the Custard Base:
- Heat the Cream, Milk, Sugar, and Salt: In a medium saucepan, combine the heavy cream, whole milk, 3/4 cup of granulated sugar, and salt. The salt enhances the sweetness and other flavors.
- Heat Gently: Place the saucepan over medium heat and heat the mixture, stirring occasionally, until it is just about to simmer. You’ll see small bubbles forming around the edges of the pan. Do not boil the mixture! Boiling can cause the custard to curdle.
- Whisk the Egg Yolks: While the cream mixture is heating, whisk the egg yolks in a separate medium bowl until they are light and pale yellow. This incorporates air and helps to create a smooth custard.
- Temper the Egg Yolks: This is a crucial step to prevent the egg yolks from scrambling when you add them to the hot cream mixture. Slowly drizzle a small amount (about 1/2 cup) of the hot cream mixture into the egg yolks, whisking constantly. This gradually raises the temperature of the egg yolks. Repeat this process a few times until the egg yolks are warm.
- Combine the Mixtures: Pour the tempered egg yolk mixture into the saucepan with the remaining cream mixture.
- Cook the Custard: Place the saucepan over low heat and cook the custard, stirring constantly with a wooden spoon or heat-resistant spatula, until it thickens enough to coat the back of the spoon. This usually takes about 5-10 minutes. To test for doneness, dip the back of the spoon into the custard and run your finger across the coated spoon. If the line remains distinct and doesn’t run back together, the custard is ready. Be careful not to overcook the custard, or it will curdle.
- Strain the Custard: Immediately remove the saucepan from the heat and strain the custard through a fine-mesh sieve into a clean bowl. This will remove any cooked egg bits and ensure a smooth, creamy texture.
- Add Vanilla Extract: Stir in the vanilla extract into the strained custard.
- Chill the Custard Base: Cover the bowl with plastic wrap, pressing the plastic wrap directly onto the surface of the custard to prevent a skin from forming. Refrigerate for at least 4 hours, or preferably overnight. The custard base needs to be completely chilled before churning.
Churning and Freezing the Ice Cream:
- Combine the Cherry and Custard Bases: Once both the cherry base and the custard base are thoroughly chilled, gently whisk them together in a large bowl until they are well combined.
- Add Kirsch (Optional): If you’re using Kirsch (cherry liqueur), stir it into the mixture at this point.
- Prepare Your Ice Cream Maker: Follow the manufacturer’s instructions for your ice cream maker. Most ice cream makers require you to freeze the bowl for at least 24 hours before use.
- Churn the Ice Cream: Pour the cherry custard mixture into the prepared ice cream maker. Churn according to the manufacturer’s instructions. This usually takes about 20-30 minutes, or until the ice cream has reached a soft-serve consistency.
- Add Chocolate Chips (Optional): If you’re adding chopped dark chocolate, add it during the last few minutes of churning.
- Transfer to a Freezer-Safe Container: Transfer the churned ice cream to a freezer-safe container with a tight-fitting lid.
- Harden the Ice Cream: Press a piece of plastic wrap directly onto the surface of the ice cream to prevent ice crystals from forming. Seal the container tightly and freeze for at least 2-3 hours, or preferably overnight, to allow the ice cream to harden completely.
Serving and Storage:
- Scoop and Serve: When you’re ready to serve, let the ice cream sit at room temperature for a few minutes to soften slightly. This will make it easier to scoop.
- Enjoy! Scoop the cherry ice cream into bowls or cones and enjoy! You can garnish with fresh cherries, whipped cream, or chocolate shavings, if desired.
- Storage: Store the leftover ice cream in the freezer in an airtight container. It’s best to consume homemade ice cream within 1-2 weeks for the best quality. After that, it may start to develop ice crystals.
Conclusion:
So there you have it! This Cherry Ice Cream Homemade recipe is truly a must-try, and I’m not just saying that because I created it. The combination of sweet, tart cherries with the creamy, rich base is simply divine. It’s the perfect summer treat, a delightful dessert after any meal, or even just a little something to brighten your day. Trust me, once you taste the difference between store-bought and homemade, especially when it comes to cherry ice cream, you’ll never go back! What makes this recipe so special? It’s the freshness, the control you have over the ingredients, and the sheer satisfaction of creating something so delicious from scratch. You know exactly what’s going into your ice cream – no artificial flavors, colors, or preservatives. Just pure, wholesome goodness. Plus, the vibrant color and intense cherry flavor are unmatched. It’s a sensory experience that will leave you wanting more. But the best part? It’s incredibly versatile! While I’ve shared my favorite version, feel free to experiment and make it your own. For a richer, more decadent experience, try using a higher fat content cream. If you’re watching your sugar intake, you can substitute with your preferred sugar alternative, just be mindful of how it affects the texture. Serving suggestions? Oh, the possibilities are endless! A simple scoop in a waffle cone is always a classic. But you could also serve it alongside a warm slice of cherry pie for the ultimate cherry indulgence. Or, try making an ice cream sundae with hot fudge, whipped cream, and extra cherries on top. For a more sophisticated presentation, consider serving it in a chilled glass with a sprig of mint. And don’t forget about variations! If you’re a fan of chocolate, add some dark chocolate shavings to the mix for a cherry chocolate swirl. For a nutty twist, incorporate some chopped almonds or pecans. You could even add a splash of Kirsch (cherry liqueur) for an extra boozy kick (adults only, of course!). Get creative and have fun with it! I truly believe that this Cherry Ice Cream Homemade recipe is a winner. It’s easy to follow, uses readily available ingredients, and delivers exceptional results. But don’t just take my word for it – try it yourself! I’m confident that you’ll be amazed by how delicious and rewarding it is to make your own ice cream. So, what are you waiting for? Gather your ingredients, dust off your ice cream maker (or get ready to churn by hand!), and get ready to experience the joy of homemade cherry ice cream. I can’t wait to hear about your creations! Once you’ve tried this recipe, please come back and share your experience in the comments below. Did you make any variations? What did you think of the flavor and texture? Any tips or tricks you’d like to share? I’m always eager to learn from my readers and see how you’ve made this recipe your own. Happy ice cream making! Let me know if you have any questions, and I’ll do my best to help. Enjoy! Print
Cherry Ice Cream Homemade: The Ultimate Guide to Making It
- Total Time: 420 minutes
- Yield: 1 quart 1x
Description
Creamy homemade Cherry Ice Cream with a sweet cherry base swirled into rich custard. Optional Kirsch and dark chocolate add decadence.
Ingredients
- 2 cups fresh sweet cherries, pitted (Bing or Rainier work great!)
- 1/2 cup granulated sugar
- 1 tablespoon lemon juice
- 1/4 teaspoon almond extract (optional, but adds a lovely depth)
- 2 cups heavy cream
- 1 cup whole milk
- 3/4 cup granulated sugar
- 1/4 teaspoon salt
- 6 large egg yolks
- 1 teaspoon vanilla extract
- 1/4 cup Kirsch (cherry liqueur) – adds a boozy kick!
- 1/2 cup chopped dark chocolate (for a cherry chocolate swirl)
- A few drops of red food coloring (if you want a more vibrant color, but I prefer natural!)
Instructions
- In a medium saucepan, combine the pitted cherries, 1/2 cup of granulated sugar, and lemon juice.
- Place the saucepan over medium heat. Bring the mixture to a simmer, stirring occasionally.
- Continue to simmer for about 10-15 minutes, or until the cherries are softened and have released liquid. The mixture should thicken slightly.
- Remove from heat and let cool slightly (5-10 minutes). Transfer to a blender or food processor and puree until smooth. Be careful when blending hot liquids!
- For a super smooth ice cream, strain the cherry puree through a fine-mesh sieve to remove any small bits of cherry skin.
- Stir in the almond extract (if using) into the cherry puree.
- Transfer the cherry puree to an airtight container and refrigerate for at least 2 hours, or preferably overnight.
- In a medium saucepan, combine the heavy cream, whole milk, 3/4 cup of granulated sugar, and salt.
- Place the saucepan over medium heat and heat the mixture, stirring occasionally, until it is just about to simmer. Do not boil!
- While the cream mixture is heating, whisk the egg yolks in a separate medium bowl until they are light and pale yellow.
- Slowly drizzle a small amount (about 1/2 cup) of the hot cream mixture into the egg yolks, whisking constantly. Repeat this process a few times until the egg yolks are warm.
- Pour the tempered egg yolk mixture into the saucepan with the remaining cream mixture.
- Place the saucepan over low heat and cook the custard, stirring constantly with a wooden spoon or heat-resistant spatula, until it thickens enough to coat the back of the spoon (5-10 minutes). Be careful not to overcook the custard, or it will curdle.
- Immediately remove the saucepan from the heat and strain the custard through a fine-mesh sieve into a clean bowl.
- Stir in the vanilla extract into the strained custard.
- Cover the bowl with plastic wrap, pressing the plastic wrap directly onto the surface of the custard to prevent a skin from forming. Refrigerate for at least 4 hours, or preferably overnight.
- Once both the cherry base and the custard base are thoroughly chilled, gently whisk them together in a large bowl until they are well combined.
- If you’re using Kirsch (cherry liqueur), stir it into the mixture at this point.
- Follow the manufacturer’s instructions for your ice cream maker. Most ice cream makers require you to freeze the bowl for at least 24 hours before use.
- Pour the cherry custard mixture into the prepared ice cream maker. Churn according to the manufacturer’s instructions. This usually takes about 20-30 minutes, or until the ice cream has reached a soft-serve consistency.
- If you’re adding chopped dark chocolate, add it during the last few minutes of churning.
- Transfer the churned ice cream to a freezer-safe container with a tight-fitting lid.
- Press a piece of plastic wrap directly onto the surface of the ice cream to prevent ice crystals from forming. Seal the container tightly and freeze for at least 2-3 hours, or preferably overnight, to allow the ice cream to harden completely.
- When you’re ready to serve, let the ice cream sit at room temperature for a few minutes to soften slightly. This will make it easier to scoop.
- Scoop the cherry ice cream into bowls or cones and enjoy! You can garnish with fresh cherries, whipped cream, or chocolate shavings, if desired.
- Store the leftover ice cream in the freezer in an airtight container. It’s best to consume homemade ice cream within 1-2 weeks for the best quality. After that, it may start to develop ice crystals.
Notes
- Using high-quality ingredients will result in the best flavor and texture.
- Be careful when blending hot liquids. Vent the blender lid slightly to prevent pressure buildup.
- Tempering the egg yolks is crucial to prevent them from scrambling.
- Don’t overcook the custard, or it will curdle.
- Chilling the bases thoroughly is essential for proper ice cream making.
- Homemade ice cream is best consumed within 1-2 weeks for optimal quality.
- Prep Time: 45 minutes
- Cook Time: 30 minutes
Leave a Comment