

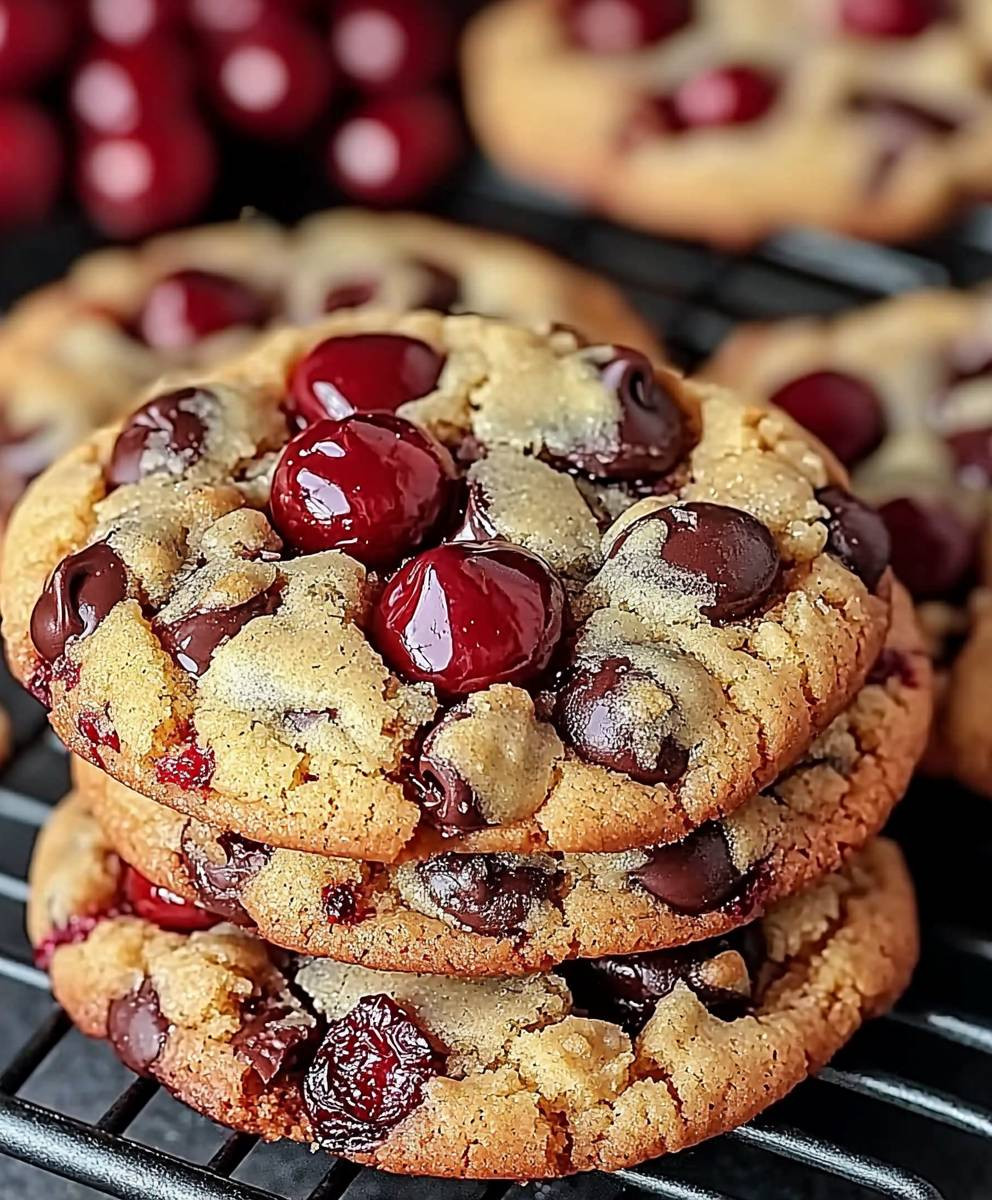
Cherry Chocolate Chip Cookies: Prepare to fall in love with the most delightful twist on a classic treat! Imagine sinking your teeth into a warm, chewy cookie, bursting with the sweetness of ripe cherries and the rich decadence of dark chocolate chips. It’s a symphony of flavors that will leave you craving more.
While the exact origins of the cherry chocolate chip combination are somewhat shrouded in mystery, the concept of adding fruit to cookies dates back centuries. Bakers have long experimented with incorporating seasonal fruits into their recipes, adding a touch of natural sweetness and vibrant color. The marriage of cherries and chocolate, however, feels particularly modern and indulgent, a testament to our ever-evolving culinary creativity.
What makes these Cherry Chocolate Chip Cookies so irresistible? It’s the perfect balance of textures – the soft, yielding cookie base, the juicy burst of cherry, and the satisfying snap of chocolate. The slight tanginess of the cherries cuts through the richness of the chocolate, creating a flavor profile that’s both comforting and exciting. Plus, they’re incredibly easy to make, perfect for a quick weeknight treat or a special occasion. Get ready to bake a batch of happiness!

Ingredients:
- 1 cup (2 sticks) unsalted butter, softened
- ¾ cup granulated sugar
- ¾ cup packed light brown sugar
- 2 large eggs
- 1 teaspoon vanilla extract
- 2 ¼ cups all-purpose flour
- 1 teaspoon baking soda
- 1 teaspoon salt
- 1 cup semi-sweet chocolate chips
- 1 cup dried cherries, chopped
- ½ cup chopped walnuts or pecans (optional)
Preparing the Dough:
- Cream the butter and sugars: In a large bowl, or the bowl of your stand mixer, cream together the softened butter, granulated sugar, and brown sugar until light and fluffy. This usually takes about 3-5 minutes. Make sure to scrape down the sides of the bowl occasionally to ensure everything is evenly mixed. The mixture should be pale and airy. This step is crucial for achieving a soft and chewy cookie.
- Add the eggs and vanilla: Beat in the eggs one at a time, mixing well after each addition. Then, stir in the vanilla extract. Ensure the eggs are fully incorporated into the butter and sugar mixture before adding the vanilla. This prevents the vanilla from curdling the mixture.
- Combine the dry ingredients: In a separate medium bowl, whisk together the all-purpose flour, baking soda, and salt. Whisking is important to evenly distribute the baking soda and salt throughout the flour, which helps the cookies rise properly and have a consistent flavor.
- Gradually add the dry ingredients to the wet ingredients: Gradually add the dry ingredients to the wet ingredients, mixing on low speed until just combined. Be careful not to overmix the dough. Overmixing can develop the gluten in the flour, resulting in tough cookies. Mix until the flour is just incorporated, and then stop.
- Fold in the chocolate chips, cherries, and nuts (if using): Gently fold in the chocolate chips, chopped dried cherries, and chopped walnuts or pecans (if using). Distribute the ingredients evenly throughout the dough. Folding is a gentle mixing technique that helps prevent overmixing.
- Chill the dough (optional, but recommended): Cover the bowl with plastic wrap and chill the dough in the refrigerator for at least 30 minutes, or up to 2 hours. Chilling the dough allows the flavors to meld together and helps prevent the cookies from spreading too much during baking. This results in thicker, chewier cookies. If you’re short on time, you can skip this step, but the cookies may spread more.
Baking the Cookies:
- Preheat the oven: Preheat your oven to 375°F (190°C). Make sure your oven rack is positioned in the center of the oven for even baking.
- Prepare the baking sheets: Line baking sheets with parchment paper or silicone baking mats. This prevents the cookies from sticking to the baking sheets and makes cleanup easier. Parchment paper also helps the cookies bake more evenly.
- Scoop the dough: Use a cookie scoop or spoon to drop rounded tablespoons of dough onto the prepared baking sheets, leaving about 2 inches between each cookie. This allows the cookies to spread without running into each other.
- Bake the cookies: Bake for 9-11 minutes, or until the edges are golden brown and the centers are still slightly soft. The baking time may vary depending on your oven, so keep a close eye on the cookies. Don’t overbake them, as they will continue to bake slightly as they cool on the baking sheet.
- Cool the cookies: Remove the baking sheets from the oven and let the cookies cool on the baking sheets for a few minutes before transferring them to a wire rack to cool completely. This allows the cookies to firm up slightly before being moved, preventing them from breaking.
Tips and Variations:
- Use high-quality chocolate chips: The quality of the chocolate chips will affect the overall flavor of the cookies. Use good-quality semi-sweet chocolate chips for the best results. You can also experiment with different types of chocolate chips, such as dark chocolate or milk chocolate.
- Adjust the sweetness: If you prefer a less sweet cookie, you can reduce the amount of sugar slightly.
- Add different extracts: Experiment with different extracts, such as almond extract or peppermint extract, to add a unique flavor to the cookies.
- Make them gluten-free: Substitute the all-purpose flour with a gluten-free all-purpose flour blend. Be sure to use a blend that contains xanthan gum, as this will help bind the ingredients together.
- Add a glaze: Drizzle the cooled cookies with a simple glaze made from powdered sugar and milk for an extra touch of sweetness.
- Storage: Store the cooled cookies in an airtight container at room temperature for up to 3 days. You can also freeze the cookies for longer storage.
- Freezing the dough: You can freeze the cookie dough for up to 2 months. Scoop the dough into balls and place them on a baking sheet lined with parchment paper. Freeze until solid, then transfer the frozen dough balls to a freezer bag. When ready to bake, simply bake the frozen dough balls as directed, adding a few extra minutes to the baking time.
- For chewier cookies: Use more brown sugar than granulated sugar. Brown sugar contains molasses, which helps to create a chewier texture.
- For crispier cookies: Use more granulated sugar than brown sugar. Granulated sugar helps to create a crispier texture.
- Don’t overmix! I can’t stress this enough. Overmixing develops the gluten in the flour, resulting in tough cookies. Mix until the flour is just incorporated, and then stop.
Troubleshooting:
- Cookies are too flat: This can be caused by using softened butter that is too warm, not chilling the dough, or overmixing the dough. Make sure to use softened butter that is still cool to the touch, chill the dough for at least 30 minutes, and avoid overmixing.
- Cookies are too dry: This can be caused by using too much flour or overbaking the cookies. Make sure to measure the flour accurately and avoid overbaking.
- Cookies are too hard: This can be caused by overbaking the cookies. Make sure to bake the cookies until the edges are golden brown and the centers are still slightly soft.
- Cookies are not spreading: This can be caused by using too much flour or not enough butter. Make sure to measure the flour accurately and use the correct amount of butter.
Enjoy your delicious Cherry Chocolate Chip Cookies!
Conclusion:
So, there you have it! These Cherry Chocolate Chip Cookies are more than just a sweet treat; they’re an experience. The delightful combination of tart cherries, rich chocolate chips, and that perfectly chewy cookie base creates a symphony of flavors and textures that will leave you wanting more. I truly believe this recipe is a must-try for any baking enthusiast, whether you’re a seasoned pro or just starting out on your culinary journey. The recipe is straightforward, the ingredients are readily available, and the results are simply divine. But why is this recipe a must-try, you ask? Well, beyond the incredible taste, these cookies offer a unique twist on the classic chocolate chip cookie. The cherries add a burst of freshness and a subtle tanginess that perfectly complements the sweetness of the chocolate. It’s a flavor combination that’s both familiar and exciting, making these cookies a guaranteed crowd-pleaser. Plus, the vibrant red of the cherries adds a beautiful visual appeal, making them perfect for gifting or bringing to potlucks. And the best part? There’s so much room for customization! Feel free to experiment with different types of chocolate chips – dark chocolate for a more intense flavor, white chocolate for a sweeter touch, or even a mix of both! You could also add a sprinkle of sea salt on top before baking to enhance the sweetness and create a delightful salty-sweet contrast.Serving Suggestions and Variations:
* Warm and Gooey: Serve these cookies warm, straight from the oven, with a scoop of vanilla ice cream for the ultimate indulgence. * Cookie Sandwiches: Use two cookies to sandwich a layer of your favorite frosting or ice cream for a fun and festive treat. * Coffee Companion: Enjoy these cookies with a cup of hot coffee or tea for a cozy afternoon snack. * Cherry Liqueur Infusion: For an adult twist, soak the dried cherries in a cherry liqueur like Kirsch for a few hours before adding them to the dough. This will add a subtle boozy flavor that’s perfect for special occasions. * Nutty Addition: Add chopped walnuts or pecans to the dough for a crunchy texture and nutty flavor. * Gluten-Free Option: Substitute the all-purpose flour with a gluten-free blend for a delicious treat that everyone can enjoy. Just be sure to use a high-quality gluten-free flour blend for the best results. I’m so confident that you’ll love these Cherry Chocolate Chip Cookies that I urge you to give them a try. Don’t be intimidated by the baking process; this recipe is designed to be easy and accessible for bakers of all skill levels. Follow the instructions carefully, and you’ll be rewarded with a batch of warm, chewy, and utterly irresistible cookies. Once you’ve baked your own batch of these delightful treats, I’d love to hear about your experience! Share your photos and stories on social media using [Your Hashtag Here] or leave a comment below. Let me know what variations you tried and how they turned out. Did you add nuts? Did you use a different type of chocolate? I’m always eager to learn from your baking adventures! Happy baking, and I hope you enjoy these cookies as much as I do! I can’t wait to hear what you think about this Cherry Chocolate Chip Cookies recipe. Print
Cherry Chocolate Chip Cookies: The Ultimate Recipe
- Total Time: 34 minutes
- Yield: 24–30 cookies 1x
Description
Chewy cookies with semi-sweet chocolate chips, tart dried cherries, and optional walnuts or pecans. A sweet and tart treat!
Ingredients
- 1 cup (2 sticks) unsalted butter, softened
- ¾ cup granulated sugar
- ¾ cup packed light brown sugar
- 2 large eggs
- 1 teaspoon vanilla extract
- 2 ¼ cups all-purpose flour
- 1 teaspoon baking soda
- 1 teaspoon salt
- 1 cup semi-sweet chocolate chips
- 1 cup dried cherries, chopped
- ½ cup chopped walnuts or pecans (optional)
Instructions
- Cream the butter and sugars: In a large bowl, or the bowl of your stand mixer, cream together the softened butter, granulated sugar, and brown sugar until light and fluffy (3-5 minutes). Scrape down the sides of the bowl occasionally.
- Add the eggs and vanilla: Beat in the eggs one at a time, mixing well after each addition. Stir in the vanilla extract.
- Combine the dry ingredients: In a separate medium bowl, whisk together the all-purpose flour, baking soda, and salt.
- Gradually add the dry ingredients to the wet ingredients: Gradually add the dry ingredients to the wet ingredients, mixing on low speed until just combined. Be careful not to overmix the dough.
- Fold in the chocolate chips, cherries, and nuts (if using): Gently fold in the chocolate chips, chopped dried cherries, and chopped walnuts or pecans (if using).
- Chill the dough (optional, but recommended): Cover the bowl with plastic wrap and chill the dough in the refrigerator for at least 30 minutes, or up to 2 hours.
- Preheat the oven: Preheat your oven to 375°F (190°C).
- Prepare the baking sheets: Line baking sheets with parchment paper or silicone baking mats.
- Scoop the dough: Use a cookie scoop or spoon to drop rounded tablespoons of dough onto the prepared baking sheets, leaving about 2 inches between each cookie.
- Bake the cookies: Bake for 9-11 minutes, or until the edges are golden brown and the centers are still slightly soft.
- Cool the cookies: Remove the baking sheets from the oven and let the cookies cool on the baking sheets for a few minutes before transferring them to a wire rack to cool completely.
Notes
- Use high-quality chocolate chips for the best flavor.
- Adjust the sweetness by reducing the amount of sugar slightly.
- Experiment with different extracts, such as almond extract or peppermint extract.
- Make them gluten-free by substituting the all-purpose flour with a gluten-free all-purpose flour blend.
- Add a glaze made from powdered sugar and milk for an extra touch of sweetness.
- Store the cooled cookies in an airtight container at room temperature for up to 3 days.
- Freeze the cookie dough for up to 2 months. Scoop the dough into balls and place them on a baking sheet lined with parchment paper. Freeze until solid, then transfer the frozen dough balls to a freezer bag. When ready to bake, simply bake the frozen dough balls as directed, adding a few extra minutes to the baking time.
- For chewier cookies: Use more brown sugar than granulated sugar.
- For crispier cookies: Use more granulated sugar than brown sugar.
- Don’t overmix! Overmixing develops the gluten in the flour, resulting in tough cookies. Mix until the flour is just incorporated, and then stop.
- Cookies are too flat: This can be caused by using softened butter that is too warm, not chilling the dough, or overmixing the dough. Make sure to use softened butter that is still cool to the touch, chill the dough for at least 30 minutes, and avoid overmixing.
- Cookies are too dry: This can be caused by using too much flour or overbaking the cookies. Make sure to measure the flour accurately and avoid overbaking.
- Cookies are too hard: This can be caused by overbaking the cookies. Make sure to bake the cookies until the edges are golden brown and the centers are still slightly soft.
- Cookies are not spreading: This can be caused by using too much flour or not enough butter. Make sure to measure the flour accurately and use the correct amount of butter.
- Prep Time: 15 minutes
- Cook Time: 9-11 minutes


Leave a Comment