

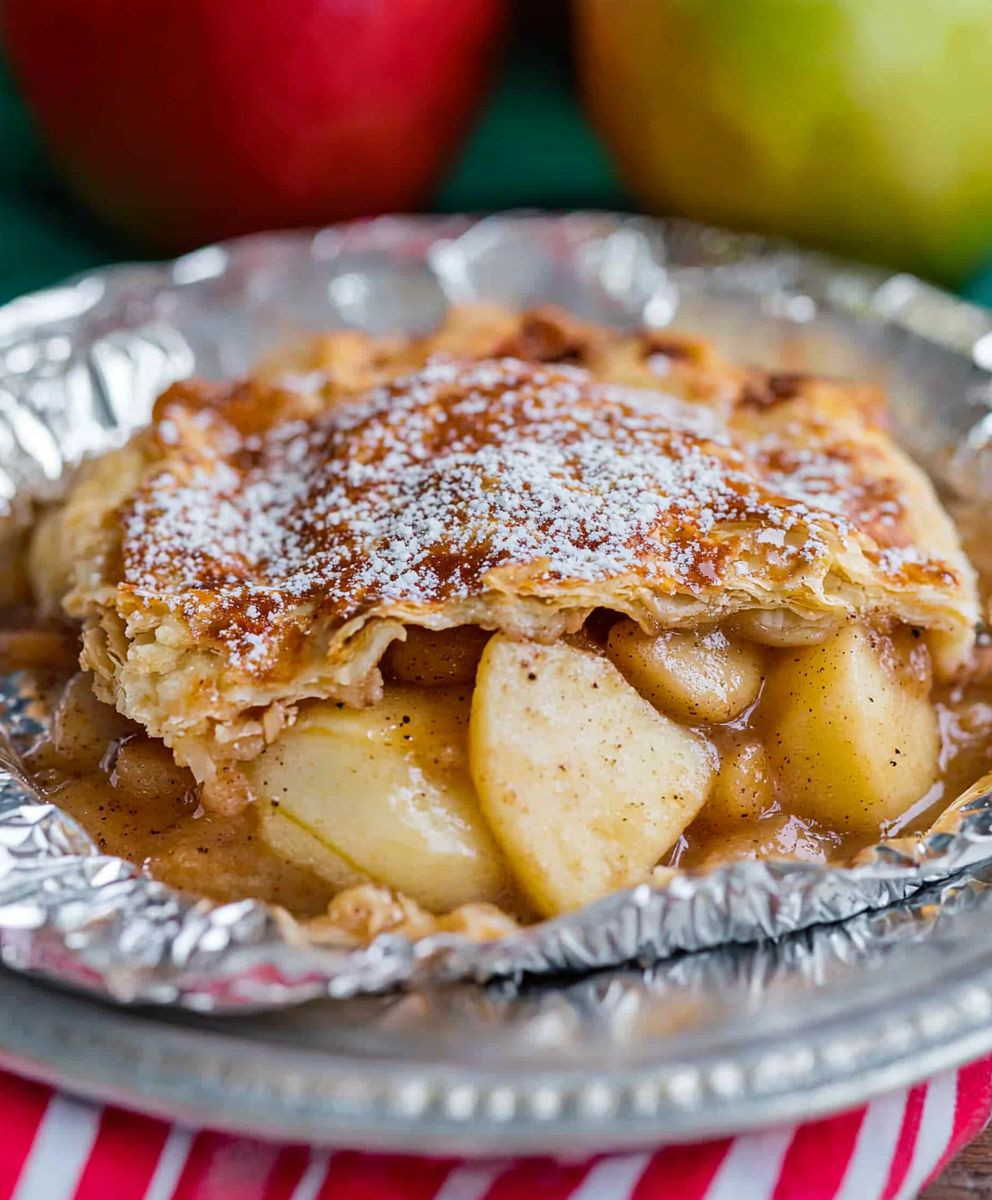
Campfire apple pie: just the name conjures up images of crackling fires, starry nights, and the sweet, comforting aroma of cinnamon and baked apples. But what if I told you that you could enjoy this quintessential dessert, not just in your kitchen, but right there in the heart of the great outdoors? Forget complicated baking equipment and precise oven temperatures; this recipe brings the warmth and deliciousness of apple pie to your next camping adventure.
Apple pie, in its various forms, has been a beloved dessert for centuries, with roots tracing back to Europe. While the modern American version is often associated with home and hearth, its adaptability makes it a perfect candidate for campfire cooking. The beauty of campfire apple pie lies in its simplicity and the unique smoky flavor imparted by the open flame. It’s a dessert that connects us to simpler times, when food was cooked over an open fire and shared amongst friends and family.
People adore apple pie for its comforting blend of sweet and tart flavors, the tender texture of the apples, and the satisfying crunch of the crust. This campfire version retains all those beloved qualities, while adding a touch of rustic charm. It’s incredibly easy to prepare, requiring minimal ingredients and equipment, making it the perfect treat to share after a long day of hiking or exploring. So, gather around the campfire, and let’s bake up some unforgettable memories with this delightful dessert!

Ingredients:
- For the Crust:
- 2 1/2 cups all-purpose flour, plus more for dusting
- 1 teaspoon salt
- 1 cup (2 sticks) cold unsalted butter, cut into cubes
- 1/2 cup ice water, plus more if needed
- For the Apple Filling:
- 6 medium apples (such as Granny Smith, Honeycrisp, or a mix), peeled, cored, and sliced
- 1/2 cup granulated sugar
- 1/4 cup packed light brown sugar
- 2 tablespoons all-purpose flour
- 1 teaspoon ground cinnamon
- 1/2 teaspoon ground nutmeg
- 1/4 teaspoon ground allspice
- 2 tablespoons lemon juice
- 2 tablespoons unsalted butter, cut into small pieces
- For the Egg Wash (Optional):
- 1 large egg
- 1 tablespoon milk or water
- Equipment:
- Large mixing bowl
- Pastry blender or food processor
- Plastic wrap
- Rolling pin
- 9-inch pie plate
- Sharp knife or pizza cutter
- Baking sheet (optional, for catching drips)
Preparing the Crust:
Okay, let’s get started with the crust. This is the foundation of our delicious campfire apple pie, so we want to make sure we get it right. Don’t be intimidated; it’s easier than you think!
- Combine Dry Ingredients: In a large mixing bowl, whisk together the flour and salt. This ensures the salt is evenly distributed throughout the dough.
- Cut in the Butter: Add the cold, cubed butter to the flour mixture. Using a pastry blender (or your fingertips if you’re feeling adventurous), cut the butter into the flour until the mixture resembles coarse crumbs. You should still see small pieces of butter – these are what create those flaky layers we all love. If you’re using a food processor, pulse the butter and flour together until you reach the same coarse crumb consistency. Be careful not to over-process!
- Add Ice Water: Gradually add the ice water, one tablespoon at a time, mixing gently after each addition. The amount of water you need will vary depending on the humidity and the flour you’re using. Stop adding water when the dough just comes together and is no longer dry. It should be slightly shaggy but not sticky.
- Form the Dough: Divide the dough in half. Gently flatten each half into a disc about 1 inch thick. Wrap each disc tightly in plastic wrap and refrigerate for at least 30 minutes, or up to 2 days. This chilling time is crucial for relaxing the gluten in the flour, which will make the crust more tender and easier to roll out.
Preparing the Apple Filling:
While the crust is chilling, let’s get that apple filling ready. The aroma alone will make you crave a slice!
- Prepare the Apples: Peel, core, and slice the apples into about 1/4-inch thick slices. I like to use a mix of apple varieties for a more complex flavor, but you can use whatever you have on hand.
- Combine Filling Ingredients: In a large bowl, combine the sliced apples, granulated sugar, brown sugar, flour, cinnamon, nutmeg, and allspice. Toss everything together gently but thoroughly to ensure the apples are evenly coated with the spices and sugar.
- Add Lemon Juice and Butter: Stir in the lemon juice. This will help prevent the apples from browning and add a touch of brightness to the filling. Dot the apple mixture with the small pieces of butter. The butter will melt during baking and add richness to the filling.
Assembling the Pie:
Now for the fun part – putting it all together!
- Roll Out the Bottom Crust: On a lightly floured surface, roll out one of the dough discs into a 12-inch circle. Gently transfer the dough to a 9-inch pie plate. Trim any excess dough that hangs over the edge of the pie plate, leaving about a 1-inch overhang. Fold the overhang under and crimp the edges to create a decorative border. You can use a fork to press the edges, or get fancy with a fluted edge.
- Add the Filling: Pour the apple filling into the prepared pie crust, mounding it slightly in the center.
- Roll Out the Top Crust: On a lightly floured surface, roll out the second dough disc into a 12-inch circle.
- Place the Top Crust: Carefully place the top crust over the apple filling. Trim any excess dough, leaving about a 1-inch overhang. Fold the overhang under and crimp the edges to seal the top and bottom crusts together.
- Cut Vents: Use a sharp knife or pizza cutter to cut several vents in the top crust. This will allow steam to escape during baking and prevent the crust from puffing up too much. You can create simple slits or get creative with decorative patterns.
- Egg Wash (Optional): In a small bowl, whisk together the egg and milk (or water). Brush the top crust with the egg wash. This will give the crust a beautiful golden-brown color and a slight sheen.
- Chill (Optional): For the best results, chill the assembled pie in the refrigerator for at least 30 minutes before baking. This will help prevent the crust from shrinking during baking.
Cooking Process:
Time to bake this beauty! The aroma that fills your kitchen (or campsite) will be heavenly.
- Preheat and Prepare: Preheat your oven to 400°F (200°C). If you’re baking the pie on a baking sheet, line it with parchment paper to catch any drips.
- Bake: Bake the pie for 45-55 minutes, or until the crust is golden brown and the filling is bubbling. If the crust starts to brown too quickly, you can tent it with aluminum foil.
- Cool: Let the pie cool completely on a wire rack before slicing and serving. This will allow the filling to set and prevent it from being too runny.
Campfire Cooking Adaptation:
Want to make this over a campfire? Here’s how to adapt the recipe:
- Prepare Ahead: Make the crust and filling at home before your camping trip. Store the crust discs wrapped in plastic wrap in a cooler. Store the filling in a separate container.
- Dutch Oven: You’ll need a Dutch oven with a lid.
- Prepare the Coals: Build a campfire and let it burn down to hot coals. You want a consistent heat source.
- Assemble the Pie: Assemble the pie in the Dutch oven as described above. You can line the Dutch oven with parchment paper for easier cleanup.
- Bake Over Coals: Place the Dutch oven over a bed of hot coals. Place more hot coals on top of the lid. The number of coals you need will depend on the size of your Dutch oven and the heat of your coals. A good starting point is about twice as many coals on top as underneath.
- Rotate and Check: Rotate the Dutch oven and the lid every 15-20 minutes to ensure even baking. Check the pie after about 45 minutes. It’s done when the crust is golden brown and the filling is bubbling.
- Cool and Serve: Let the pie cool slightly before slicing and serving. Be careful when handling the hot Dutch oven and coals!
Tips for Success:
- Keep Ingredients Cold: Cold butter and ice water are essential for a flaky crust.
- Don’t Overwork the Dough: Overworking the dough will develop the gluten and result in a tough crust.
- Chill the Dough: Chilling the dough allows the gluten to relax and makes the crust easier to roll out.
- Use a Variety of Apples: A mix of apple varieties will add complexity to the filling.
- Don’t Skip the Lemon Juice: Lemon juice prevents the apples from browning and adds a touch of brightness.
- Cool Completely: Let the pie cool completely before slicing to allow the filling to set.
Variations:
- Add Nuts: Add chopped walnuts or pecans to the filling for extra flavor and texture.
-
Conclusion:
So, there you have it! This Campfire Apple Pie recipe isn’t just another dessert; it’s an experience. It’s the crackling fire, the crisp night air, and the sweet, comforting aroma of apples and cinnamon all rolled into one unforgettable treat. I truly believe this is a must-try recipe for anyone who loves the outdoors, enjoys a good challenge, or simply craves a slice of homemade goodness with a rustic twist.
Why is it a must-try? Because it’s more than just baking; it’s about creating memories. It’s about slowing down, connecting with nature, and sharing something special with the people you care about. The slightly smoky flavor imparted by the campfire adds a depth you just can’t achieve in a conventional oven. Plus, let’s be honest, who can resist a warm, gooey apple pie fresh from the flames?
Now, let’s talk serving suggestions and variations! While this Campfire Apple Pie is absolutely divine on its own, a scoop of vanilla ice cream or a dollop of freshly whipped cream takes it to the next level. Imagine the contrast of the warm pie with the cool, creamy ice cream – pure bliss! For a little extra indulgence, drizzle some caramel sauce over the top. You could also sprinkle on some chopped pecans or walnuts for added texture and nutty flavor.
Feeling adventurous? Try these variations:
- Berry Blast: Add a handful of fresh or frozen berries (blueberries, raspberries, or blackberries) to the apple filling for a burst of fruity goodness.
- Spiced Up: Experiment with different spices! A pinch of nutmeg, allspice, or even a little cardamom can add a unique and warming flavor.
- Boozy Apple Pie: A splash of bourbon or apple brandy to the apple mixture will add a sophisticated kick.
- Dutch Apple Pie: Instead of a top crust, create a crumb topping with flour, butter, and sugar for a delightful textural contrast.
The possibilities are endless! Don’t be afraid to get creative and adapt the recipe to your own taste preferences. That’s the beauty of campfire cooking – it’s all about improvisation and making it your own.
I’m so excited for you to try this recipe and experience the magic of campfire baking for yourself. I poured my heart into perfecting this Campfire Apple Pie, and I truly believe you’ll love it as much as I do. It’s the perfect dessert for camping trips, backyard bonfires, or any occasion where you want to add a touch of rustic charm.
So, gather your ingredients, build your fire, and get ready to create something truly special. And please, don’t forget to share your experience with me! I’d love to hear how your Campfire Apple Pie turned out, what variations you tried, and what memories you made along the way. You can leave a comment below, tag me on social media, or send me an email. I can’t wait to see your creations!
Happy baking (or should I say, happy campfire cooking!), and may your Campfire Apple Pie be filled with warmth, sweetness, and unforgettable moments.
Print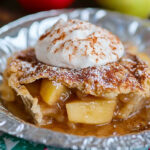
Campfire Apple Pie: The Ultimate Guide to Delicious Outdoor Baking
- Total Time: 100 minutes
- Yield: 8 servings 1x
Description
A classic homemade apple pie with a flaky crust and a delicious blend of apples, spices, and a hint of lemon. Perfect for baking at home or adapting for campfire cooking in a Dutch oven.
Ingredients
Scale- 2 1/2 cups all-purpose flour, plus more for dusting
- 1 teaspoon salt
- 1 cup (2 sticks) cold unsalted butter, cut into cubes
- 1/2 cup ice water, plus more if needed
- 6 medium apples (such as Granny Smith, Honeycrisp, or a mix), peeled, cored, and sliced
- 1/2 cup granulated sugar
- 1/4 cup packed light brown sugar
- 2 tablespoons all-purpose flour
- 1 teaspoon ground cinnamon
- 1/2 teaspoon ground nutmeg
- 1/4 teaspoon ground allspice
- 2 tablespoons lemon juice
- 2 tablespoons unsalted butter, cut into small pieces
- 1 large egg
- 1 tablespoon milk or water
Instructions
- In a large mixing bowl, whisk together the flour and salt.
- Add the cold, cubed butter to the flour mixture. Using a pastry blender (or your fingertips), cut the butter into the flour until the mixture resembles coarse crumbs. If using a food processor, pulse until the same consistency.
- Gradually add the ice water, one tablespoon at a time, mixing gently after each addition. Stop when the dough just comes together and is no longer dry.
- Divide the dough in half. Gently flatten each half into a disc about 1 inch thick. Wrap each disc tightly in plastic wrap and refrigerate for at least 30 minutes, or up to 2 days.
- Peel, core, and slice the apples into about 1/4-inch thick slices.
- In a large bowl, combine the sliced apples, granulated sugar, brown sugar, flour, cinnamon, nutmeg, and allspice. Toss gently but thoroughly.
- Stir in the lemon juice. Dot the apple mixture with the small pieces of butter.
- On a lightly floured surface, roll out one of the dough discs into a 12-inch circle. Gently transfer the dough to a 9-inch pie plate. Trim any excess dough, leaving about a 1-inch overhang. Fold the overhang under and crimp the edges to create a decorative border.
- Pour the apple filling into the prepared pie crust, mounding it slightly in the center.
- On a lightly floured surface, roll out the second dough disc into a 12-inch circle.
- Carefully place the top crust over the apple filling. Trim any excess dough, leaving about a 1-inch overhang. Fold the overhang under and crimp the edges to seal the top and bottom crusts together.
- Use a sharp knife or pizza cutter to cut several vents in the top crust.
- In a small bowl, whisk together the egg and milk (or water). Brush the top crust with the egg wash.
- For the best results, chill the assembled pie in the refrigerator for at least 30 minutes before baking.
- Preheat your oven to 400°F (200°C). If you’re baking the pie on a baking sheet, line it with parchment paper to catch any drips.
- Bake the pie for 45-55 minutes, or until the crust is golden brown and the filling is bubbling. If the crust starts to brown too quickly, you can tent it with aluminum foil.
- Let the pie cool completely on a wire rack before slicing and serving.
- Make the crust and filling at home before your camping trip. Store the crust discs wrapped in plastic wrap in a cooler. Store the filling in a separate container.
- You’ll need a Dutch oven with a lid.
- Build a campfire and let it burn down to hot coals. You want a consistent heat source.
- Assemble the pie in the Dutch oven as described above. You can line the Dutch oven with parchment paper for easier cleanup.
- Place the Dutch oven over a bed of hot coals. Place more hot coals on top of the lid. The number of coals you need will depend on the size of your Dutch oven and the heat of your coals. A good starting point is about twice as many coals on top as underneath.
- Rotate the Dutch oven and the lid every 15-20 minutes to ensure even baking. Check the pie after about 45 minutes. It’s done when the crust is golden brown and the filling is bubbling.
- Let the pie cool slightly before slicing and serving. Be careful when handling the hot Dutch oven and coals!
Notes
- Keep ingredients cold for a flaky crust.
- Don’t overwork the dough.
- Chill the dough before rolling.
- Use a variety of apples for a more complex flavor.
- Lemon juice prevents browning and adds brightness.
- Cool completely before slicing.
- Prep Time: 45 minutes
- Cook Time: 45-55 minutes
Leave a Comment