

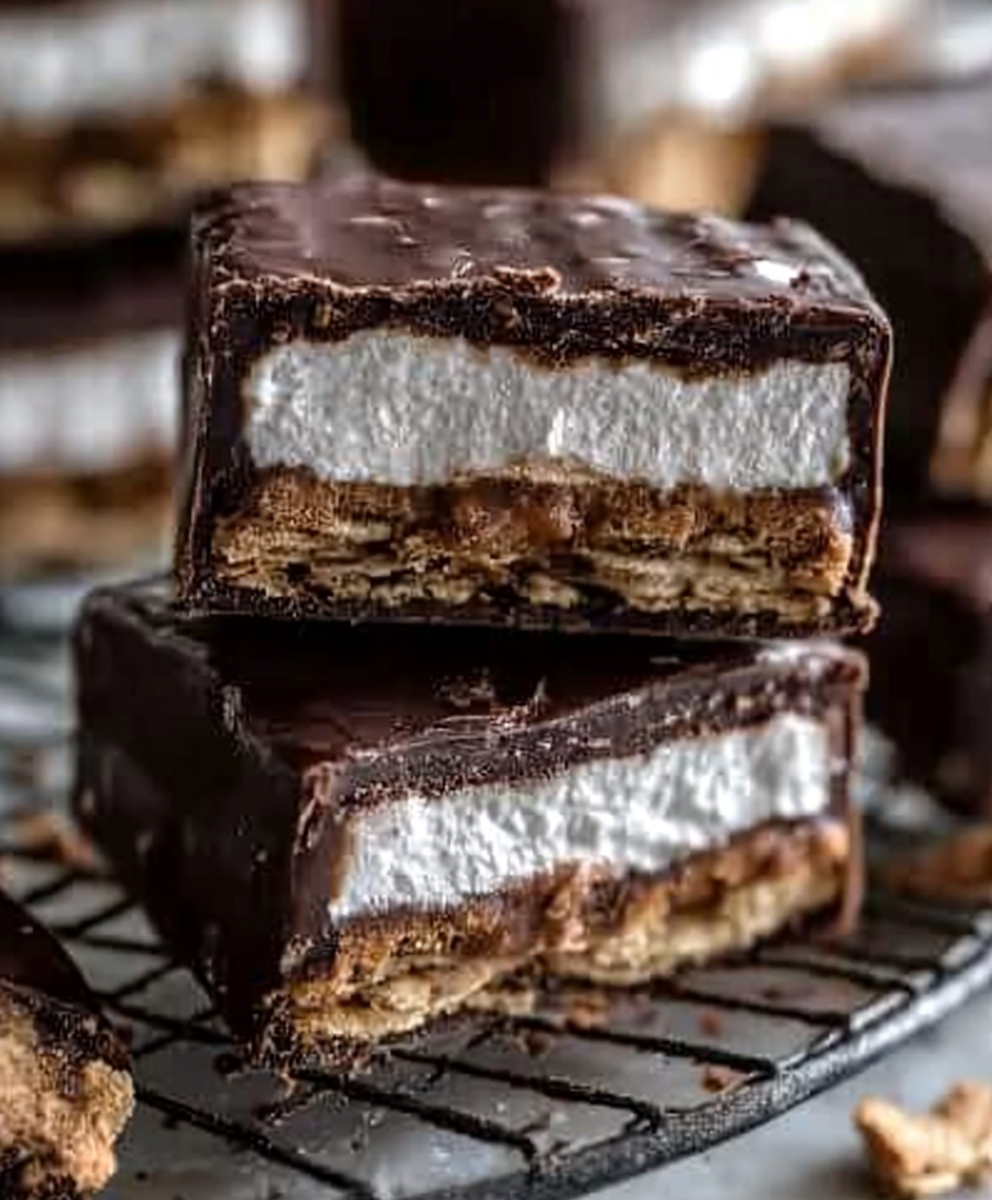
S’more candy bars are a delightful twist on the classic campfire treat that many of us cherish from childhood. Imagine the rich, gooey combination of chocolate, marshmallow, and graham crackers, all wrapped up in a convenient bar form! This recipe not only brings back nostalgic memories of summer nights spent roasting marshmallows but also offers a modern, easy-to-make version that can be enjoyed year-round. People love s’more candy bars for their perfect balance of sweetness and crunch, making them an irresistible snack for both kids and adults alike. Whether you’re hosting a gathering or simply indulging in a sweet craving, these bars are sure to impress with their delightful taste and texture. So, let’s dive into this scrumptious recipe and bring a little bit of that campfire magic into our kitchens!

Ingredients:
- 1 cup graham cracker crumbs
- 1/2 cup unsweetened cocoa powder
- 1/2 cup powdered sugar
- 1/2 cup unsalted butter, melted
- 1 cup mini marshmallows
- 1 cup milk chocolate chips
- 1/2 cup semi-sweet chocolate chips
- 1 teaspoon vanilla extract
- 1/4 teaspoon salt
Preparing the Base
To start off, I like to prepare the base for my S’more candy bars. This is where the graham cracker flavor really shines through.
- In a large mixing bowl, combine the graham cracker crumbs, cocoa powder, powdered sugar, and salt. Stir them together until they are well mixed.
- Next, pour in the melted butter and vanilla extract. Mix everything together until the dry ingredients are fully incorporated and the mixture resembles wet sand.
- Line an 8×8 inch baking dish with parchment paper, leaving some overhang on the sides for easy removal later. Press the graham cracker mixture firmly into the bottom of the dish, creating an even layer. I like to use the back of a measuring cup to really pack it down.
Adding the Chocolate Layer
Now that the base is ready, it’s time to add that delicious chocolate layer that makes these bars so irresistible.
- In a microwave-safe bowl, combine the milk chocolate chips and semi-sweet chocolate chips. Microwave in 30-second intervals, stirring in between, until the chocolate is completely melted and smooth. This usually takes about 1-2 minutes total.
- Once the chocolate is melted, pour it over the graham cracker base, spreading it evenly with a spatula. Make sure to cover the entire surface for that perfect chocolatey goodness.
- Now, sprinkle the mini marshmallows evenly over the melted chocolate layer. I like to use a generous amount because who doesn’t love marshmallows?
Melting the Marshmallows
To achieve that gooey, toasted marshmallow effect, we need to melt them just a bit.
- Preheat your oven to 350°F (175°C). Once it’s heated, place the baking dish in the oven for about 5-7 minutes. Keep an eye on them; you want the marshmallows to puff up and turn golden brown, but not burn.
- After removing the dish from the oven, let it cool for about 10 minutes. This will help the chocolate set slightly before we add the final layer.
Final Touches
Now it’s time to finish off our S’more candy bars with a little extra chocolate drizzle.
- In a small microwave-safe bowl, melt an additional 1/2 cup of chocolate chips (you can use either milk or semi-sweet). Again, microwave in 30-second intervals, stirring until smooth.
- Using a spoon or a piping bag, drizzle the melted chocolate over the marshmallow layer. This adds a beautiful finish and extra chocolate flavor.
- Let the bars cool completely at room temperature, or you can speed up the process by placing them in the refrigerator for about 30 minutes.
Cutting and Serving
Once the bars are set, it’s time to cut them into squares and serve!
- Using the parchment paper overhang, lift the entire block of candy out of the baking dish. Place it on a cutting board.
- With a sharp knife, cut the candy into squares. I usually aim for about 16 squares, but you can make them larger or smaller depending on your preference.
- Serve immediately or store them in an airtight container at room temperature for up to a week. If you want to keep them longer, you can refrigerate them, but I recommend letting them come to room temperature before serving for the best texture.
Tips and Variations
Here are some of my favorite tips and variations to make these S’more candy bars even more exciting:
- Total Time: 15 minutes
- Yield: 16 squares 1x
- 1 cup graham cracker crumbs
- 1/2 cup unsweetened cocoa powder
- 1/2 cup powdered sugar
- 1/2 cup unsalted butter, melted
- 1 cup mini marshmallows
- 1 cup milk chocolate chips
- 1/2 cup semi-sweet chocolate chips
- 1 teaspoon vanilla extract
- 1/4 teaspoon salt
- In a large mixing bowl, combine the graham cracker crumbs, cocoa powder, powdered sugar, and salt. Stir until well mixed.
- Pour in the melted butter and vanilla extract. Mix until the dry ingredients are fully incorporated and the mixture resembles wet sand.
- Line an 8×8 inch baking dish with parchment paper, leaving overhang for easy removal. Press the graham cracker mixture firmly into the bottom of the dish, creating an even layer.
- In a microwave-safe bowl, combine the milk chocolate chips and semi-sweet chocolate chips. Microwave in 30-second intervals, stirring in between, until melted and smooth (about 1-2 minutes).
- Pour the melted chocolate over the graham cracker base, spreading it evenly with a spatula.
- Sprinkle mini marshmallows evenly over the melted chocolate layer.
- Preheat your oven to 350°F (175°C). Place the baking dish in the oven for about 5-7 minutes, watching for the marshmallows to puff up and turn golden brown.
- Remove from the oven and let cool for about 10 minutes to allow the chocolate to set slightly.
- In a small microwave-safe bowl, melt an additional 1/2 cup of chocolate chips in 30-second intervals until smooth.
- Drizzle the melted chocolate over the marshmallow layer using a spoon or piping bag.
- Let the bars cool completely at room temperature or refrigerate for about 30 minutes to speed up the process.
- Lift the entire block of candy out of the baking dish using the parchment paper overhang and place it on a cutting board.
- Cut into squares (aim for about 16 squares, but adjust to your preference).
- Serve immediately or store in an airtight container at room temperature for up to a week. Refrigerate for longer storage, but allow to come to room temperature before serving for the best texture.
- For a fun twist, consider adding crushed nuts or different types of chocolate chips.
- These bars can be stored in an airtight container for up to a week at room temperature.
- Prep Time: 15 minutes
- Cook Time: 15 minutes
Conclusion:
In summary, these S’more candy bars are an absolute must-try for anyone who loves the classic campfire treat but wants to enjoy it in a convenient, delicious bar form. The combination of rich chocolate, gooey marshmallows, and crunchy graham crackers creates a delightful texture and flavor that is sure to satisfy your sweet tooth. Plus, they are incredibly easy to make, making them perfect for both novice bakers and seasoned pros alike. For serving suggestions, consider pairing these S’more candy bars with a scoop of vanilla ice cream for an indulgent dessert experience. You can also experiment with variations by adding in your favorite nuts, drizzling caramel on top, or even incorporating peanut butter for a unique twist. The possibilities are endless, and I encourage you to get creative! I genuinely hope you give this S’more candy bar recipe a try. Once you do, I would love to hear about your experience! Share your thoughts, any variations you tried, or even a photo of your delicious creation. Let’s spread the joy of these S’more candy bars together! Happy baking! Print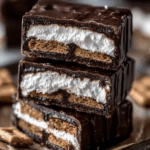
Smore Candy Bars: The Ultimate Guide to Making Delicious Treats at Home
Description
Enjoy these S’more Candy Bars with a delightful combination of chocolate, marshmallows, and a graham cracker crust. They’re a quick and easy treat that brings the nostalgic flavors of campfire s’mores right to your kitchen!


Leave a Comment