

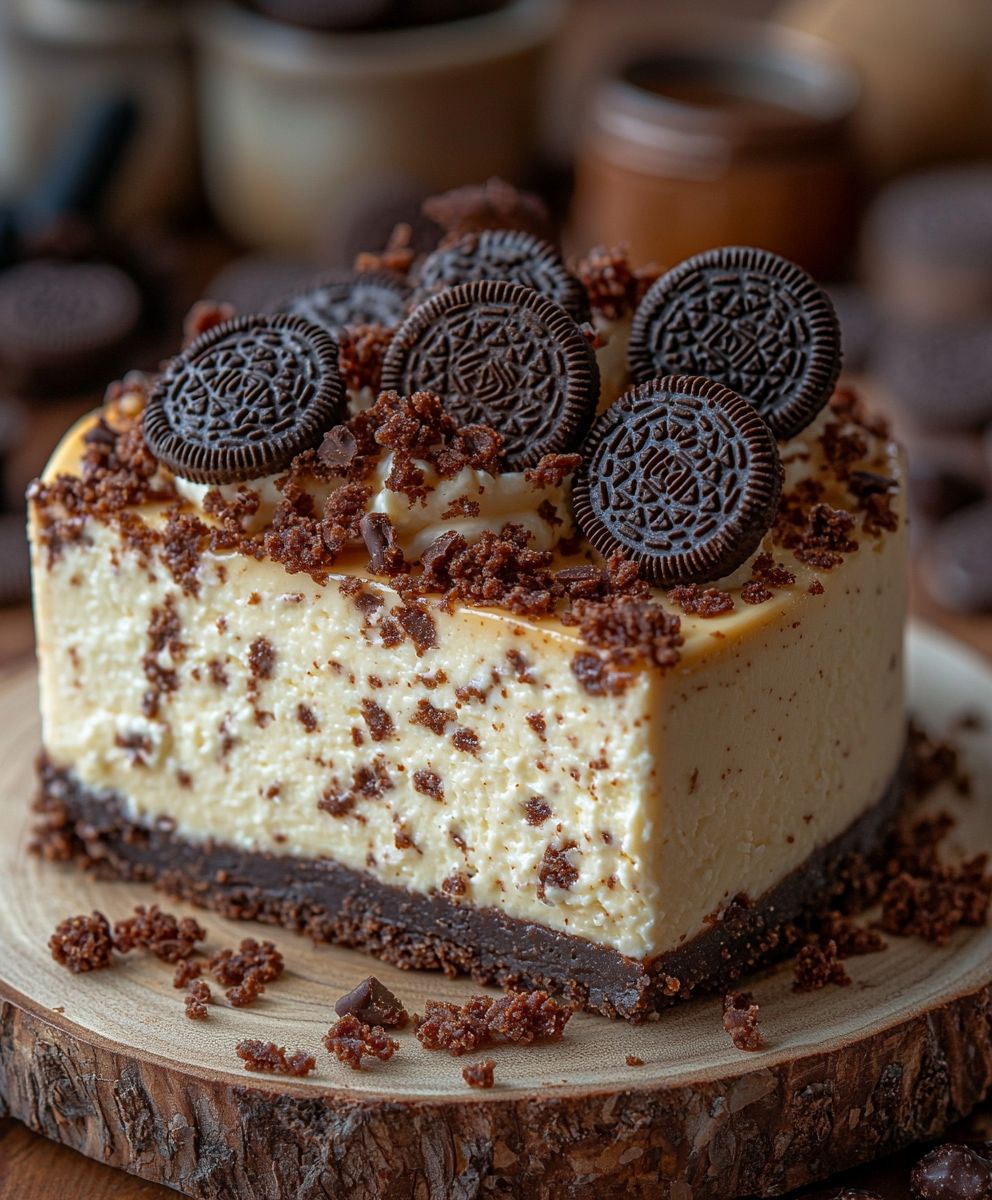
Oreo Peanut Butter Cheesecake is a delightful dessert that combines the rich flavors of creamy cheesecake with the irresistible crunch of Oreo cookies and the nutty goodness of peanut butter. As a dessert lover, I can confidently say that this cheesecake is a crowd-pleaser, perfect for any occasion. The history of cheesecake dates back to ancient Greece, but the modern twist of incorporating Oreos and peanut butter has made it a favorite in many households today.
People adore this Oreo Peanut Butter Cheesecake not only for its decadent taste but also for its creamy texture that melts in your mouth. The combination of the sweet, velvety cheesecake filling with the crunchy Oreo crust creates a delightful contrast that keeps you coming back for more. Plus, it’s surprisingly easy to make, making it a convenient choice for both novice and experienced bakers alike. Join me as we dive into this delicious recipe that is sure to impress your family and friends!

Ingredients:
- For the crust:
- 24 Oreo cookies, crushed into fine crumbs
- 1/2 cup unsalted butter, melted
- For the cheesecake filling:
- 16 oz cream cheese, softened
- 1 cup creamy peanut butter
- 1 cup powdered sugar
- 1 teaspoon vanilla extract
- 1 cup heavy whipping cream
- For the topping:
- 1/2 cup heavy whipping cream
- 2 tablespoons powdered sugar
- 4-6 Oreo cookies, crushed for garnish
- Chocolate sauce (optional, for drizzling)
Preparing the Crust
- Start by preheating your oven to 350°F (175°C). This will ensure that your crust bakes evenly and becomes nice and crispy.
- In a medium mixing bowl, combine the crushed Oreo cookies with the melted butter. Mix until all the crumbs are well coated with butter. The mixture should resemble wet sand.
- Press the Oreo mixture firmly into the bottom of a 9-inch springform pan. Make sure to pack it tightly to create a solid base for your cheesecake. You can use the bottom of a measuring cup to help with this.
- Bake the crust in the preheated oven for about 10 minutes. This step helps to set the crust and enhances the flavor. Once done, remove it from the oven and let it cool while you prepare the filling.
Preparing the Cheesecake Filling
- In a large mixing bowl, beat the softened cream cheese with an electric mixer on medium speed until it’s smooth and creamy. This usually takes about 2-3 minutes. Make sure there are no lumps for a silky texture.
- Add the creamy peanut butter to the cream cheese and continue to mix until well combined. The mixture should be smooth and free of lumps.
- Gradually add the powdered sugar and vanilla extract to the mixture. Beat on low speed until the sugar is incorporated, then increase to medium speed and mix until everything is well blended.
- In a separate bowl, whip the heavy cream until stiff peaks form. This will give your cheesecake a light and airy texture. Be careful not to over-whip, as it can turn grainy.
- Gently fold the whipped cream into the peanut butter and cream cheese mixture. Use a spatula and fold carefully to maintain the airiness of the whipped cream. This step is crucial for achieving a light cheesecake.
Assembling the Cheesecake
- Once the filling is ready, pour it over the cooled Oreo crust in the springform pan. Use a spatula to spread it evenly across the top.
- Tap the pan gently on the counter to remove any air bubbles that may have formed in the filling. This will help ensure a smooth surface.
- Cover the cheesecake with plastic wrap and refrigerate for at least 4 hours, or preferably overnight. This allows the cheesecake to set properly and develop its flavors.
Preparing the Topping
- When you’re ready to serve the cheesecake, start by making the whipped topping. In a mixing bowl, combine 1/2 cup of heavy whipping cream with 2 tablespoons of powdered sugar.
- Using an electric mixer, whip the cream until stiff peaks form. This will create a light and fluffy topping for your cheesecake.
- Once the cheesecake has set, carefully remove it from the springform pan. You can run a knife around the edge to help release it if needed.
- Spread the whipped cream topping evenly over the cheesecake. You can use a spatula or the back of a spoon to create swirls for a decorative effect.
- Sprinkle the crushed Oreo cookies on top of the whipped cream for added texture and flavor. If you like, drizzle some chocolate sauce over the top for an extra indulgent touch.
Serving the Cheesecake
-
Conclusion:
In summary, this Oreo Peanut Butter Cheesecake is an absolute must-try for anyone who loves a rich, creamy dessert that combines the irresistible flavors of chocolate and peanut butter. The crunchy Oreo crust perfectly complements the smooth cheesecake filling, creating a delightful contrast that will have your taste buds dancing with joy. Whether you’re serving it at a special occasion or simply indulging yourself on a cozy night in, this cheesecake is sure to impress. For serving suggestions, consider topping your cheesecake with a drizzle of chocolate ganache or a sprinkle of crushed Oreos for an extra touch of decadence. You can also experiment with variations by adding a layer of caramel sauce or incorporating chopped peanuts for added texture. The possibilities are endless, and I encourage you to get creative! I can’t wait for you to try this Oreo Peanut Butter Cheesecake! Once you do, please share your experience and any personal twists you added to the recipe. Your feedback not only inspires me but also helps fellow dessert lovers discover new ways to enjoy this delightful treat. So grab your ingredients, roll up your sleeves, and let’s make some cheesecake magic happen! Print
Oreo Peanut Butter Cheesecake: A Decadent Dessert Recipe You Must Try
- Total Time: 270 minutes
- Yield: 12 servings 1x
Description
Enjoy a rich and creamy No-Bake Peanut Butter Oreo Cheesecake with a delicious Oreo crust and a smooth peanut butter filling, topped with whipped cream and crushed Oreos. This indulgent dessert is perfect for any occasion and is sure to impress your guests!
Ingredients
Scale- 24 Oreo cookies, crushed into fine crumbs
- 1/2 cup unsalted butter, melted
- 16 oz cream cheese, softened
- 1 cup creamy peanut butter
- 1 cup powdered sugar
- 1 teaspoon vanilla extract
- 1 cup heavy whipping cream
- 1/2 cup heavy whipping cream
- 2 tablespoons powdered sugar
- 4–6 Oreo cookies, crushed for garnish
- Chocolate sauce (optional, for drizzling)
Instructions
- Preheat your oven to 350°F (175°C).
- In a medium mixing bowl, combine the crushed Oreo cookies with the melted butter. Mix until all the crumbs are well coated with butter.
- Press the Oreo mixture firmly into the bottom of a 9-inch springform pan.
- Bake the crust in the preheated oven for about 10 minutes. Once done, remove it from the oven and let it cool.
- In a large mixing bowl, beat the softened cream cheese with an electric mixer on medium speed until smooth and creamy (about 2-3 minutes).
- Add the creamy peanut butter and mix until well combined.
- Gradually add the powdered sugar and vanilla extract, mixing until everything is well blended.
- In a separate bowl, whip the heavy cream until stiff peaks form.
- Gently fold the whipped cream into the peanut butter and cream cheese mixture.
- Pour the filling over the cooled Oreo crust in the springform pan.
- Tap the pan gently on the counter to remove any air bubbles.
- Cover the cheesecake with plastic wrap and refrigerate for at least 4 hours, or preferably overnight.
- In a mixing bowl, combine 1/2 cup of heavy whipping cream with 2 tablespoons of powdered sugar.
- Whip the cream until stiff peaks form.
- Carefully remove the cheesecake from the springform pan.
- Spread the whipped cream topping evenly over the cheesecake.
- Sprinkle the crushed Oreo cookies on top and drizzle with chocolate sauce if desired.
- Slice the cheesecake and serve chilled. Enjoy your delicious creation!
Notes
- For best results, allow the cheesecake to set overnight for optimal flavor and texture.
- You can customize the topping with additional ingredients like chopped peanuts or chocolate shavings for extra flair.
- Prep Time: 20 minutes
- Cook Time: 10 minutes
Leave a Comment