

Grandma’s Chocolate Pie is more than just a dessert; it’s a cherished family tradition that has been passed down through generations. The moment you take a bite of this rich, velvety pie, you are transported back to warm, cozy kitchens filled with laughter and the sweet aroma of chocolate wafting through the air. This delightful recipe has its roots in classic American cuisine, where chocolate desserts have long been a favorite for celebrations and everyday indulgences alike.
People love Grandma’s Chocolate Pie not only for its decadent taste and creamy texture but also for the memories it evokes. Each slice is a reminder of family gatherings, holiday feasts, and the simple joy of sharing a homemade treat. The convenience of this recipe makes it a go-to for both novice and experienced bakers, allowing anyone to create a slice of nostalgia in their own kitchen. Join me as we dive into the delightful world of Grandma’s Chocolate Pie, where every bite tells a story and every recipe is a labor of love.

Ingredients:
- 1 pre-made pie crust (store-bought or homemade)
- 1 cup granulated sugar
- 1/3 cup unsweetened cocoa powder
- 1/4 cup cornstarch
- 1/4 teaspoon salt
- 2 3/4 cups whole milk
- 3 large egg yolks, lightly beaten
- 2 tablespoons unsalted butter
- 1 teaspoon vanilla extract
- Whipped cream, for topping (optional)
- Chocolate shavings or cocoa powder, for garnish (optional)
Preparing the Filling
Now, let’s dive into making the rich and creamy chocolate filling that makes this pie so special. Follow these steps carefully, and you’ll have a delicious filling in no time!
- In a medium saucepan, combine the granulated sugar, cocoa powder, cornstarch, and salt. Whisk these dry ingredients together until they are well blended. This step is crucial as it ensures that there are no lumps in your filling.
- Gradually add the whole milk to the dry mixture, whisking continuously. This will help to dissolve the dry ingredients and create a smooth mixture. Make sure to scrape the bottom of the pan to incorporate all the dry ingredients.
- Place the saucepan over medium heat. Continue to whisk the mixture constantly as it heats up. This is important to prevent the mixture from sticking to the bottom of the pan and burning.
- Once the mixture starts to bubble and thicken (this usually takes about 5-7 minutes), reduce the heat to low. At this point, you can add the beaten egg yolks. Make sure to temper the yolks by adding a small amount of the hot mixture to them first, whisking quickly to avoid scrambling the eggs.
- After tempering, pour the egg yolk mixture back into the saucepan. Continue to cook on low heat for another 2-3 minutes, stirring constantly until the filling is thick and creamy. You’ll know it’s ready when it coats the back of a spoon.
- Remove the saucepan from the heat and stir in the unsalted butter and vanilla extract. Mix until the butter is completely melted and incorporated into the filling. This will add a lovely richness to your chocolate pie.
Preparing the Pie Crust
While the filling is cooling slightly, let’s prepare the pie crust. If you’re using a store-bought crust, you can skip to the next section. If you’re making your own, here’s how to do it:
- If you’re making a homemade pie crust, start by preheating your oven to 375°F (190°C).
- In a large mixing bowl, combine 1 1/4 cups all-purpose flour, 1/2 teaspoon salt, and 1/2 cup unsalted butter (cold and cut into small cubes). Use a pastry cutter or your fingers to mix until the mixture resembles coarse crumbs.
- Add 3-4 tablespoons of ice water, one tablespoon at a time, mixing until the dough comes together. Be careful not to overwork the dough.
- Shape the dough into a disk, wrap it in plastic wrap, and refrigerate for at least 30 minutes.
- Once chilled, roll out the dough on a floured surface to fit your pie dish. Transfer the rolled-out dough to the pie dish, pressing it gently into the bottom and sides. Trim any excess dough hanging over the edges.
- To prevent the crust from puffing up while baking, prick the bottom with a fork. You can also use pie weights or dried beans to keep the crust flat.
- Bake the crust in the preheated oven for about 15-20 minutes or until it’s lightly golden. Remove from the oven and let it cool completely.
Assembling the Pie
Now that we have our delicious chocolate filling and a perfectly baked pie crust, it’s time to assemble the pie!
- Once the chocolate filling has cooled slightly (it should still be pourable but not hot), pour it into the cooled pie crust. Use a spatula to spread

Conclusion:
In summary, Grandma’s Chocolate Pie is not just a dessert; it’s a heartfelt experience that brings warmth and nostalgia to any gathering. The rich, velvety chocolate filling paired with a flaky crust creates a perfect harmony of flavors that will leave your taste buds dancing with joy. This recipe is a must-try for anyone who appreciates the simple pleasures of homemade treats, and it’s sure to become a cherished favorite in your household. For serving suggestions, I love to top my pie with a generous dollop of freshly whipped cream or a scoop of vanilla ice cream for that extra indulgence. You can also sprinkle some chocolate shavings or crushed nuts on top for added texture and flavor. If you’re feeling adventurous, try adding a hint of espresso or a splash of peppermint extract to the filling for a delightful twist that will surprise your guests. I encourage you to give this recipe a try and make it your own! Whether you’re baking for a special occasion or just because, I promise that Grandma’s Chocolate Pie will bring smiles and satisfaction to everyone who gets a slice. Don’t forget to share your experience with me—I’d love to hear how your pie turned out and any variations you tried. Happy baking! Print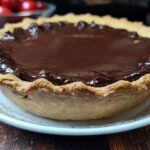
Grandma’s Chocolate Pie: A Delicious Recipe to Satisfy Your Sweet Tooth
- Total Time: 290 minutes
- Yield: 8 servings
Description
This rich and creamy chocolate pie features a luscious chocolate filling nestled in a flaky pie crust. Perfect for chocolate lovers, this dessert is easy to make and sure to impress at any gathering!
Ingredients
- whipped cream
- chocolate shavings
- cocoa powder
- dark chocolate cocoa powder (optional)
- fresh berries (optional)
- nuts (optional)
Instructions
- Cover the pie with plastic wrap or aluminum foil and refrigerate for at least 4 hours, or until set. This will help the filling firm up and develop its rich flavor.
- Before serving, top the pie with whipped cream, if desired, and garnish with chocolate shavings or a dusting of cocoa powder for an elegant touch.
- Slice and serve chilled. Enjoy your delicious homemade chocolate pie!
Notes
- For a richer flavor, consider using dark chocolate cocoa powder.
- This pie can be made a day in advance, making it a great dessert for gatherings.
- Feel free to experiment with different toppings, such as fresh berries or nuts.
- Prep Time: 30 minutes
- Cook Time: 20 minutes


Leave a Comment