

Chocolate Cream Pie is a delightful dessert that has captured the hearts of many dessert lovers around the world. This luscious pie, with its velvety chocolate filling and creamy topping, is not just a treat for the taste buds but also a feast for the eyes. Originating in the United States, Chocolate Cream Pie has a rich history that dates back to the early 19th century, evolving from simple custard pies to the decadent version we enjoy today.
What I love most about Chocolate Cream Pie is its perfect balance of flavors and textures. The smooth, rich chocolate filling contrasts beautifully with the light, airy whipped cream on top, creating a dessert that is both indulgent and satisfying. Whether served at a family gathering, a holiday celebration, or simply as a sweet end to a weeknight dinner, this pie is always a crowd-pleaser. It’s easy to make, and the convenience of preparing it ahead of time makes it a favorite in my kitchen. Join me as we dive into the delightful world of Chocolate Cream Pie and discover how to create this classic dessert that everyone will adore!

Ingredients:
- 1 pre-made 9-inch pie crust (store-bought or homemade)
- 1 cup granulated sugar
- 1/3 cup unsweetened cocoa powder
- 1/4 cup cornstarch
- 1/4 teaspoon salt
- 2 3/4 cups whole milk
- 4 large egg yolks, lightly beaten
- 2 tablespoons unsalted butter
- 1 teaspoon pure vanilla extract
- 1 cup heavy whipping cream
- 2 tablespoons powdered sugar
- Chocolate shavings or cocoa powder for garnish (optional)
Preparing the Chocolate Filling
- In a medium saucepan, combine the granulated sugar, cocoa powder, cornstarch, and salt. Whisk these dry ingredients together until they are well blended. This step is crucial as it ensures that there are no lumps in your filling.
- Gradually whisk in the whole milk, making sure to incorporate it smoothly into the dry mixture. It’s important to do this slowly to avoid clumping.
- Place the saucepan over medium heat and continue to whisk the mixture constantly. This will help prevent it from sticking to the bottom of the pan and burning. You’ll want to keep an eye on it as it heats up.
- Once the mixture starts to thicken and bubble, reduce the heat to low. At this point, you can add the beaten egg yolks. It’s best to temper the yolks first by adding a small amount of the hot mixture to them, whisking quickly, and then adding the yolk mixture back into the saucepan. This prevents the yolks from scrambling.
- Continue to cook the mixture on low heat for about 2-3 minutes, whisking constantly until it thickens to a pudding-like consistency. You’ll know it’s ready when it coats the back of a spoon.
- Remove the saucepan from the heat and stir in the unsalted butter and vanilla extract. Mix until the butter is fully melted and incorporated. This adds a rich flavor to your chocolate filling.
- Pour the chocolate filling into the pre-made pie crust, smoothing the top with a spatula. Make sure to spread it evenly to avoid any uneven layers.
- Cover the pie with plastic wrap, pressing it directly onto the surface of the filling to prevent a skin from forming. Refrigerate the pie for at least 4 hours, or overnight if you have the time. This allows the filling to set properly.
Preparing the Whipped Cream Topping
- Once your pie has set, it’s time to prepare the whipped cream. In a large mixing bowl, pour in the heavy whipping cream. Make sure your bowl is cold; this helps the cream whip up better.
- Add the powdered sugar to the cream. This will sweeten the whipped cream and help stabilize it.
- Using an electric mixer, beat the cream on medium-high speed until soft peaks form. This usually takes about 3-5 minutes. Be careful not to overbeat, as you don’t want to turn it into butter!
- Once you have soft peaks, you can stop mixing. The whipped cream should be fluffy and hold its shape well.
Assembling the Pie
- After the chocolate filling has set and your whipped cream is ready, it’s time to assemble the pie. Remove the plastic wrap from the pie.
- Using a spatula, gently spread the whipped cream over the top of the chocolate filling. You can create swirls or peaks for a decorative touch, or simply smooth it out for a clean finish.
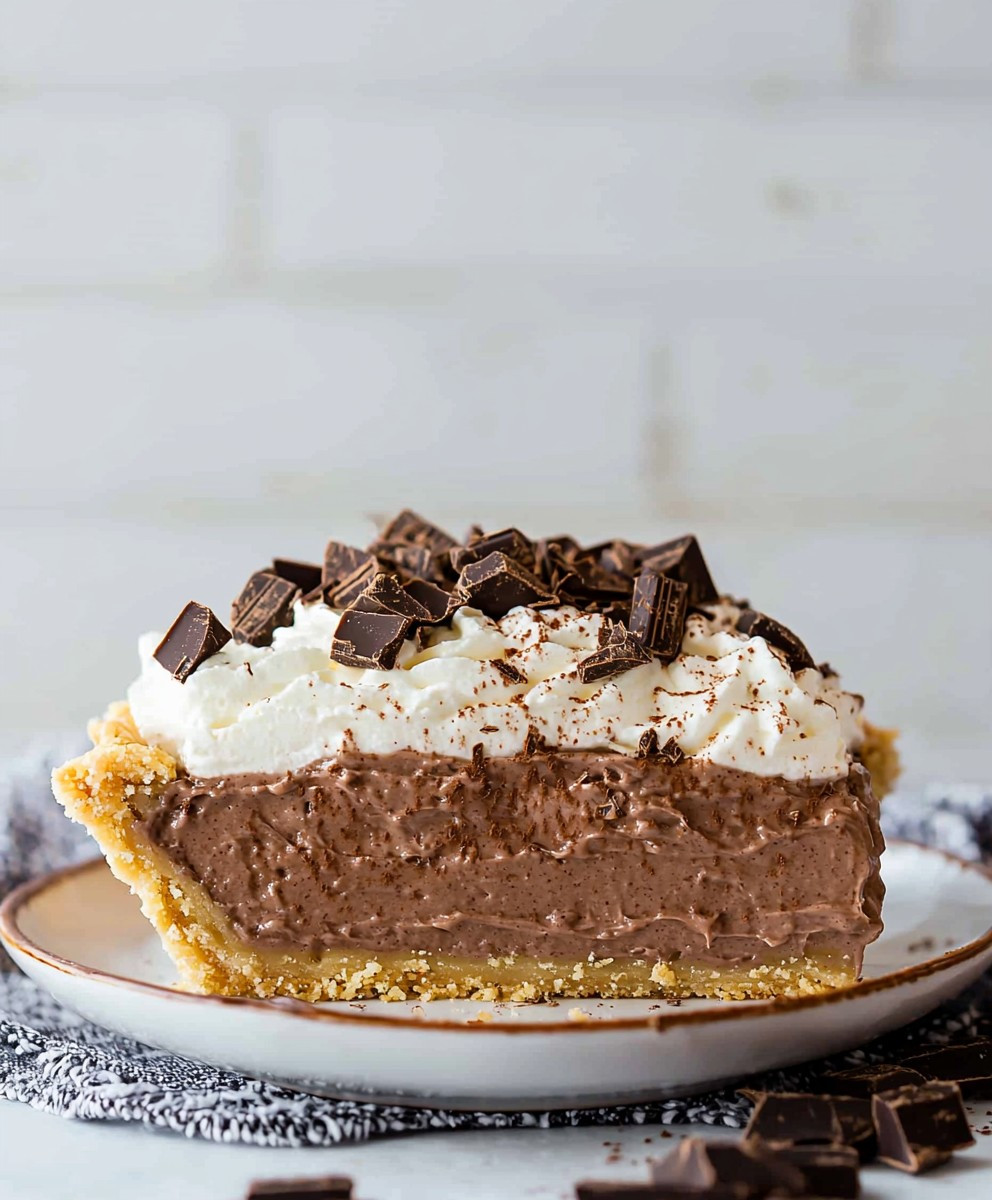
- If you’d like, you can garnish the pie with chocolate shavings or a dusting of cocoa powder. This adds a nice visual appeal and enhances the chocolate flavor.
- Once garnished, return the pie to the refrigerator for about 30 minutes to allow the whipped cream to set slightly before serving. This step is optional but recommended for a neater slice.
Serving the Pie
- When you’re ready to serve, take
Conclusion:
In summary, this Chocolate Cream Pie is an absolute must-try for anyone who loves a rich, decadent dessert that’s surprisingly easy to make. The combination of a buttery, flaky crust, velvety chocolate filling, and a cloud of whipped cream on top creates a symphony of flavors and textures that will leave your taste buds dancing with joy. Whether you’re celebrating a special occasion or simply indulging in a sweet treat after dinner, this pie is sure to impress your family and friends. For serving suggestions, consider garnishing your Chocolate Cream Pie with chocolate shavings, fresh berries, or a sprinkle of sea salt to elevate the flavor even further. If you’re feeling adventurous, you can also experiment with variations by adding a hint of espresso to the chocolate filling for a mocha twist or incorporating a layer of peanut butter for a delightful chocolate-peanut butter combination. I wholeheartedly encourage you to try this recipe and make it your own! Once you’ve whipped up your own Chocolate Cream Pie, I’d love to hear about your experience. Share your thoughts, any variations you tried, or even a photo of your creation. Let’s spread the joy of this delicious dessert together! Happy baking! Print
Chocolate Cream Pie: The Ultimate Recipe for a Decadent Dessert
- Total Time: 25 minutes
- Yield: 8 servings 1x
Description
Indulge in a rich Chocolate Cream Pie with a velvety chocolate filling in a flaky crust, topped with fluffy whipped cream. This delightful dessert is perfect for chocolate lovers and is sure to impress at any gathering!
Ingredients
Scale- 1 pre-made 9-inch pie crust (store-bought or homemade)
- 1 cup granulated sugar
- 1/3 cup unsweetened cocoa powder
- 1/4 cup cornstarch
- 1/4 teaspoon salt
- 2 3/4 cups whole milk
- 4 large egg yolks, lightly beaten
- 2 tablespoons unsalted butter
- 1 teaspoon pure vanilla extract
- 1 cup heavy whipping cream
- 2 tablespoons powdered sugar
- Chocolate shavings or cocoa powder for garnish (optional)
Instructions
- In a medium saucepan, combine the granulated sugar, cocoa powder, cornstarch, and salt. Whisk until well blended.
- Gradually whisk in the whole milk, ensuring a smooth mixture.
- Place the saucepan over medium heat, whisking constantly to prevent sticking.
- Once thickened and bubbling, reduce heat to low and temper the egg yolks by adding a small amount of the hot mixture to them, then return to the saucepan.
- Cook on low for 2-3 minutes until thickened to a pudding-like consistency.
- Remove from heat and stir in the unsalted butter and vanilla extract until fully melted.
- Pour the chocolate filling into the pre-made pie crust and smooth the top. Cover with plastic wrap and refrigerate for at least 4 hours or overnight.
- In a large mixing bowl, pour in the heavy whipping cream.
- Add the powdered sugar and beat on medium-high speed until soft peaks form (about 3-5 minutes).
- Remove the plastic wrap from the pie and spread the whipped cream over the chocolate filling.
- Garnish with chocolate shavings or cocoa powder if desired.
- Return to the refrigerator for about 30 minutes before serving.
- Slice the pie with a sharp knife and serve chilled.
Notes
- For best results, ensure all ingredients are at room temperature before starting.
- The pie can be made a day in advance, making it a great option for gatherings.
- Feel free to customize the topping with additional garnishes like fresh berries or nuts.
- Prep Time: 20 minutes
- Cook Time: 15 minutes


Leave a Comment