

Cherry Pie Bites are a delightful twist on the classic dessert that many of us know and love. These bite-sized treats encapsulate the sweet and tart essence of cherries, all wrapped in a flaky, buttery crust. Growing up, I remember my grandmother making cherry pie from scratch, filling our home with the warm, inviting aroma of baked cherries and spices. This recipe pays homage to that cherished tradition while offering a convenient, portable version that’s perfect for sharing at gatherings or enjoying as a quick snack.
People adore Cherry Pie Bites not just for their irresistible taste, but also for their delightful texture. The combination of the crisp crust and the gooey cherry filling creates a symphony of flavors that dance on your palate. Plus, they are incredibly easy to make, allowing you to whip up a batch in no time. Whether you’re a seasoned baker or a novice in the kitchen, these Cherry Pie Bites are sure to impress and satisfy your sweet tooth!

Ingredients:
- 1 package (14 oz) refrigerated pie crusts (2 crusts)
- 1 can (21 oz) cherry pie filling
- 1 tablespoon cornstarch
- 1 tablespoon lemon juice
- 1 teaspoon vanilla extract
- 1 egg (for egg wash)
- 1 tablespoon milk (for egg wash)
- Granulated sugar (for sprinkling)
- Flour (for dusting)
Preparing the Filling
1. Start by preheating your oven to 425°F (220°C). This will ensure that your pie bites bake evenly and get that lovely golden color. 2. In a medium mixing bowl, combine the cherry pie filling, cornstarch, lemon juice, and vanilla extract. The cornstarch will help thicken the filling, while the lemon juice adds a nice brightness to the cherries. Stir gently until everything is well mixed. Set this aside to let the flavors meld together.Preparing the Dough
3. On a clean, floured surface, unroll one of the pie crusts. Using a rolling pin, gently roll it out to smooth out any creases. You want it to be about 1/8 inch thick. 4. Using a round cookie cutter or a glass (about 3 inches in diameter), cut out circles from the dough. You should be able to get about 12 circles from one crust. Repeat this process with the second crust. 5. Once you have your circles, gather the scraps and re-roll them to cut out additional circles if needed. It’s okay if they aren’t perfect; a little rustic charm adds to the appeal!Assembling the Cherry Pie Bites
6. Take one of the dough circles and place about 1 tablespoon of the cherry filling in the center. Be careful not to overfill, as this can cause the bites to burst open while baking. 7. Fold the dough over the filling to create a half-moon shape. Press the edges together firmly to seal. You can use a fork to crimp the edges for a decorative touch and to ensure they are well sealed. 8. Repeat this process with the remaining dough circles and filling until you’ve used up all the ingredients.Preparing for Baking
9. In a small bowl, whisk together the egg and milk to create an egg wash. This will give your pie bites a beautiful golden color when baked. 10. Place the assembled cherry pie bites on a baking sheet lined with parchment paper. Brush the tops of each bite with the egg wash, making sure to cover them evenly. 11. Sprinkle a little granulated sugar on top of each pie bite for added sweetness and a nice crunch.Baking the Cherry Pie Bites
12. Place the baking sheet in the preheated oven and bake for 15-20 minutes, or until the bites are golden brown and the filling is bubbling slightly. Keep an eye on them to prevent over-browning. 13. Once they are done, remove the baking sheet from the oven and let the cherry pie bites cool on the sheet for about 5 minutes. This will help them set a bit before transferring them to a wire rack.Serving Suggestions
14. After cooling, transfer the cherry pie bites to a wire rack to cool completely. They can be served warm or at room temperature. 15. For an extra special touch, consider serving them with a scoop of vanilla ice cream or a dollop of whipped cream. The creamy texture pairs beautifully with the tart cherry filling. 16. If you have any leftovers (which is rare, but it happens!), store them in an airtight container at room temperature for up to 2 days. You can also freeze them for longer storage; just make sure to thaw them before reheating.Tips and Variations
17. If you want to switch things up, feel free to use other fruit fillings like blueberry, apple, or even a mix of berries. Just adjust the sugar and cornstarch according to the sweetness and juiciness of the fruit. 18. For a fun twist, you can add a sprinkle of cinnamon or nutmeg to the cherry filling for a warm, spiced flavor. 19. If you’re feeling adventurous, try adding a bit of almond extract to the filling for a unique flavor profile that complements the cherries beautifully. 20. These cherry pie bites are perfect for parties, picnics, or just a cozy night in. They’re easy to make and always a hit with family and friends. Enjoy making these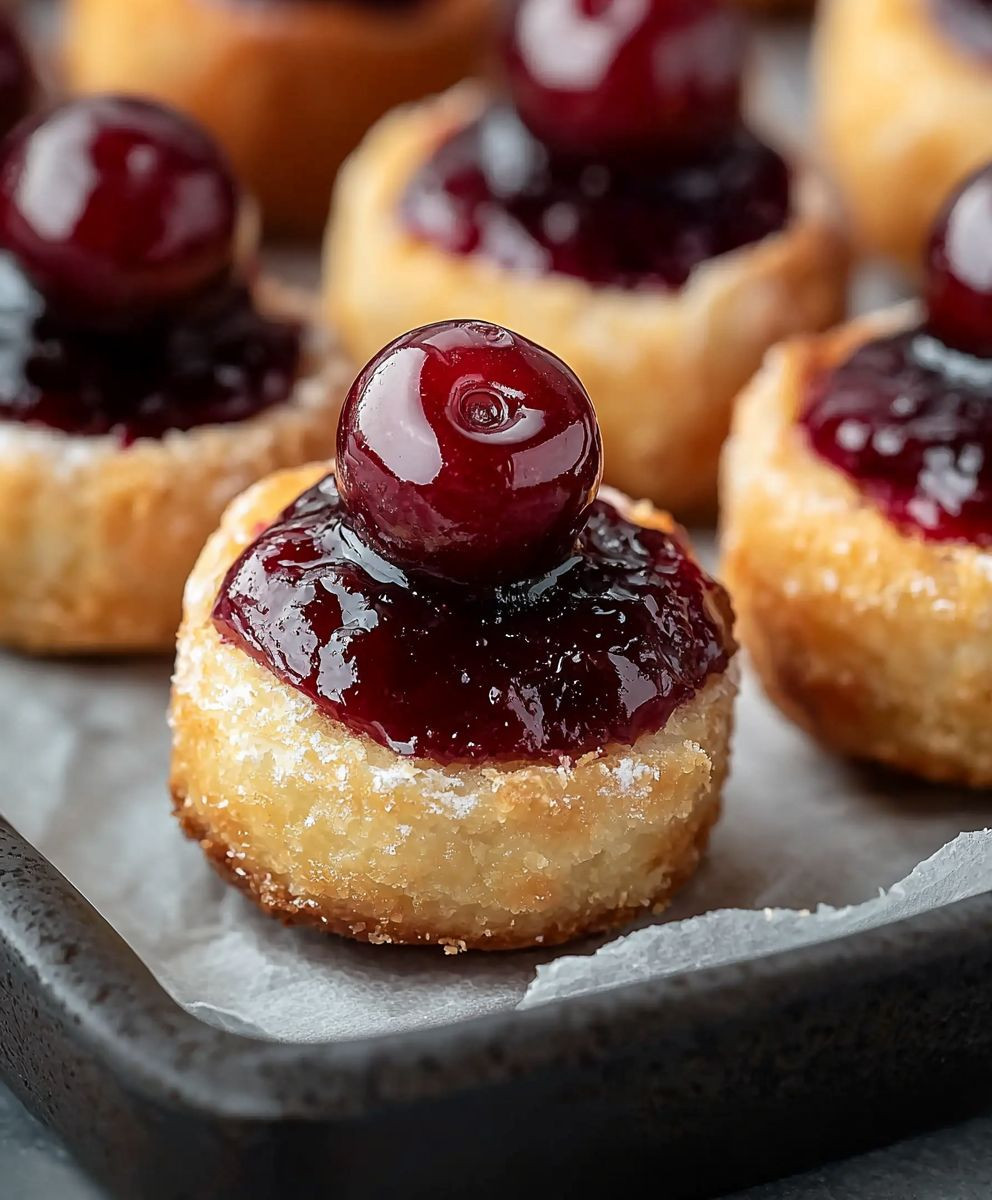
Conclusion:
In summary, these Cherry Pie Bites are an absolute must-try for anyone looking to indulge in a delightful dessert that’s both easy to make and incredibly satisfying. The combination of flaky pastry and sweet, tangy cherry filling creates a burst of flavor that will have your taste buds dancing with joy. Plus, they’re the perfect size for sharing—or keeping all to yourself! For serving suggestions, I recommend pairing these bites with a scoop of vanilla ice cream or a dollop of whipped cream for an extra touch of decadence. You can also experiment with variations by using different fruits like blueberries or peaches, or even adding a sprinkle of cinnamon for a warm, cozy twist. I truly encourage you to give this recipe a try. I promise you won’t be disappointed! Once you’ve made your own Cherry Pie Bites, I’d love to hear about your experience. Share your thoughts, any variations you tried, or even a photo of your delicious creations. Let’s spread the joy of baking together! Print
Cherry Pie Bites: Delicious Mini Desserts for Every Occasion
- Total Time: 25 minutes
- Yield: 24 pieces 1x
Description
Enjoy these delightful Cherry Pie Bites with a flaky crust and sweet cherry filling, perfect for any occasion. Easy to make and sure to impress, they are a delicious treat that can be served warm or at room temperature.
Ingredients
- 1 package (14 oz) refrigerated pie crusts (2 crusts)
- 1 can (21 oz) cherry pie filling
- 1 tablespoon cornstarch
- 1 tablespoon lemon juice
- 1 teaspoon vanilla extract
- 1 egg (for egg wash)
- 1 tablespoon milk (for egg wash)
- Granulated sugar (for sprinkling)
- Flour (for dusting)
Instructions
- Preheat your oven to 425°F (220°C).
- In a medium mixing bowl, combine cherry pie filling, cornstarch, lemon juice, and vanilla extract. Stir gently until well mixed and set aside.
- On a floured surface, unroll one pie crust and roll it out to about 1/8 inch thick.
- Cut out circles using a round cookie cutter or glass (about 3 inches in diameter). Repeat with the second crust.
- Gather scraps, re-roll, and cut out additional circles if needed.
- Place about 1 tablespoon of cherry filling in the center of each dough circle.
- Fold the dough over the filling to create a half-moon shape and press edges to seal. Use a fork to crimp edges if desired.
- Repeat with remaining dough circles and filling.
- In a small bowl, whisk together egg and milk for the egg wash.
- Place assembled pie bites on a parchment-lined baking sheet. Brush tops with egg wash and sprinkle with granulated sugar.
- Bake in the preheated oven for 15-20 minutes, or until golden brown and filling is bubbling.
- Remove from oven and let cool on the baking sheet for 5 minutes before transferring to a wire rack.
- Serve warm or at room temperature. For an extra treat, pair with vanilla ice cream or whipped cream.
- Store leftovers in an airtight container at room temperature for up to 2 days or freeze for longer storage.
Notes
- Feel free to experiment with different fruit fillings like blueberry or apple.
- Add spices like cinnamon or nutmeg for a warm flavor.
- A splash of almond extract can enhance the cherry flavor.
- Prep Time: 15 minutes
- Cook Time: 15-20 minutes
Leave a Comment